This May I finally had an opportunity to travel to the U.S. for a short trip, and I took it. I went there to pay a visit to one of my best friends, who has been living in Boston for the last few years, but I especially wanted to see New York once again, since my last visit in 1994. The “Big Apple” is still considered by most photographers and photo-amateurs as a “Mecca” because of its vitality, recognisable landmarks, and unique citizens. Also, New York is still one of the few good places on Earth for the Art Gallery business, and I was really interested in seeing what gets exhibited there, and how much photography can be found in these galleries.
So, how did I find New York after all these years? Well, those of you who have been there recently know what it is like, for the others I want to start saying that it’s a hell of a metropolis. Literally. Hell and Metropolis…
That said, I had my X100T with me. I actually had brought only the X100T out of all my equipment. That’s how much I already trust this camera. When it comes to photographing New York, two approaches come immediately in mind: street photography, and skyline landscaping. There’s no other place on Earth which had been so intensively photographed with these two approaches. And there couldn’t be, since New York seems to have been built for a sole reason: to be photographed.
The streets are constantly overwhelmed by a unique ordered-caos. People of all kind (but especially the weird ones) walk in all directions, never paying attention to what happens around, while cars of all kind (but especially the weird ones) jam all the major roads and most of the minors too. In the background the harsh geometries of the city, dressed with an infinite multitude of signs constantly informing about all the infinite rules and bans that makes it possible to have millions of people walking and driving on a small island like Manhattan. I did a quick search for this post, and apparently in 2012 it was calculated that 4 million people would daily occupy Manhattan during daytime, with a population density of around 68.000 people per square Km, that is 124.000 people for square mile. Yes, Manhattan is just a colossal crowd, a Hell of a Metropolis…
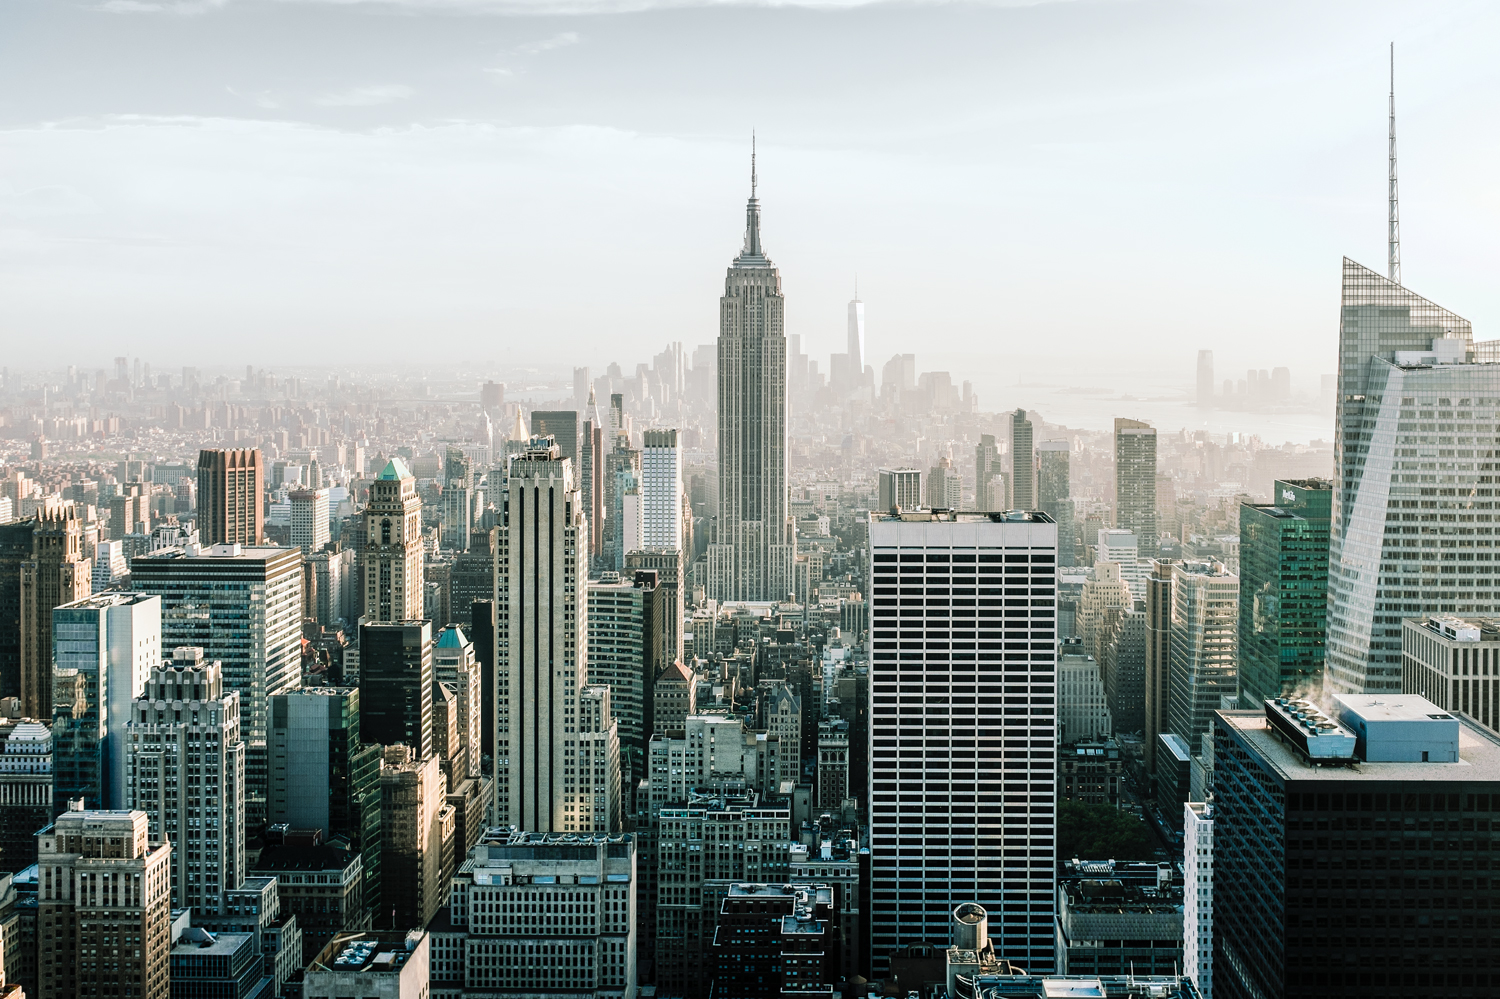
New York’s skyline, on the other hand, is just as scenic as it gets. It’s the most famous skyline, immediately recognisable by almost any human being older than 10, and very easy to capture thanks to the multitude of accessible viewpoints.
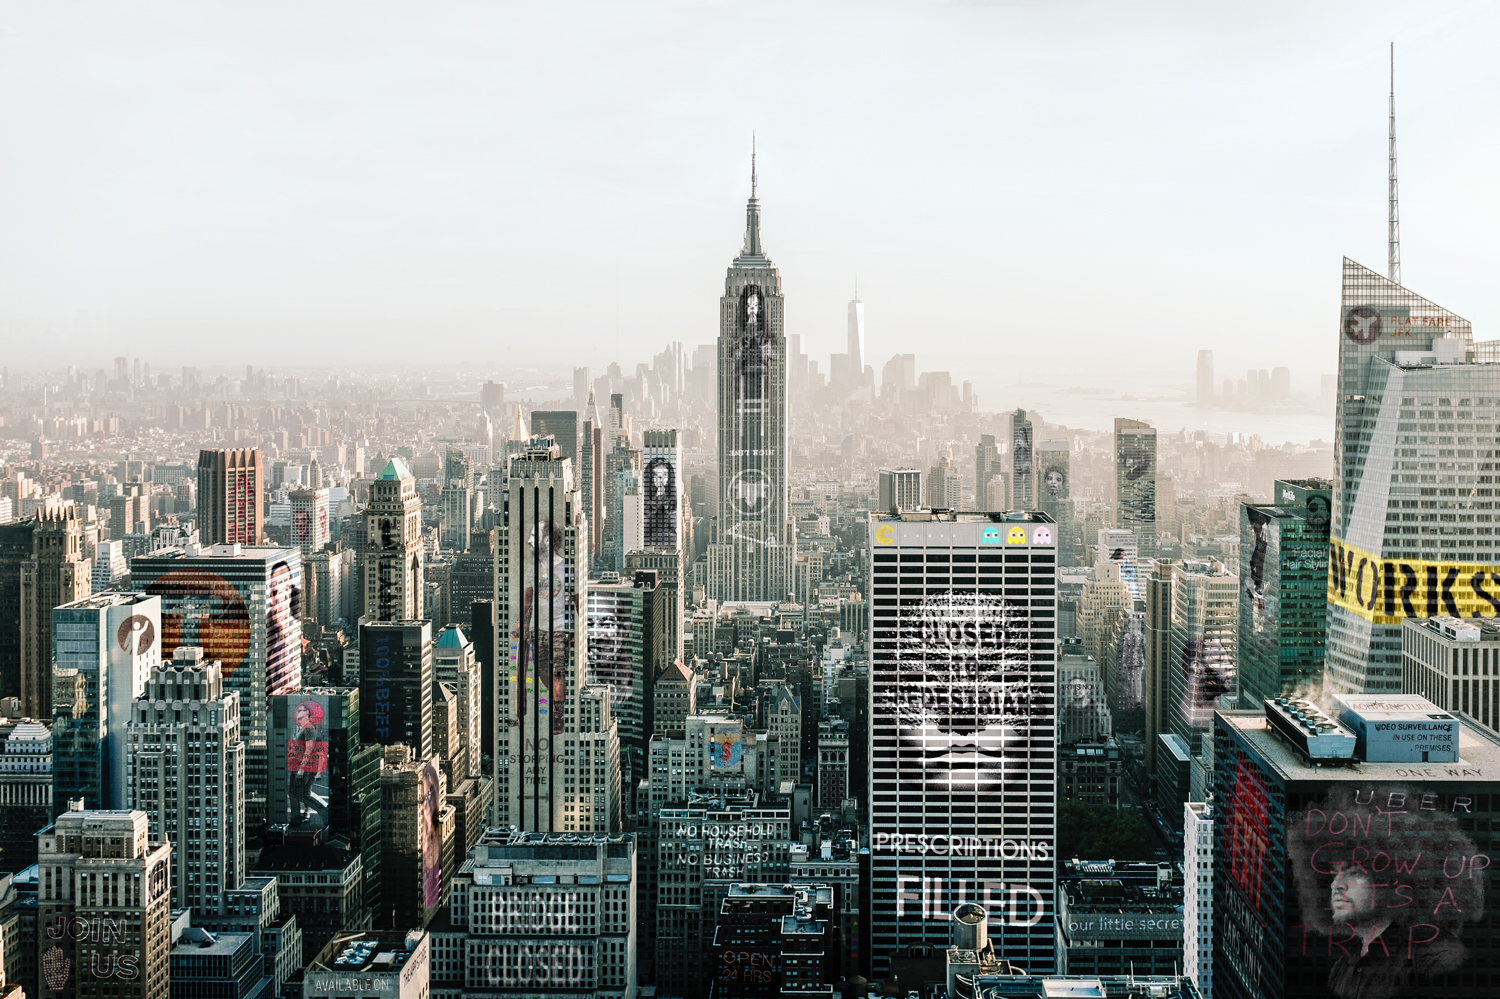
So, any tourist visiting New York even for just a day has been able/forced to play with these two approaches, the street and the skyline/landscape photography. And no, I didn’t make any exception. What I tried to do, though, was to collapse, by using different compositing techniques, these two approaches into a single piece of work: a skyline view in which the major skyscrapers and palaces would get covered with murals representing what can bee seen down in the streets. A skyline reflecting its underlying streets. Here you can see the result, and I’ll now try to explain the tools and techniques I adopted to get to it.
THE LANDSCAPE
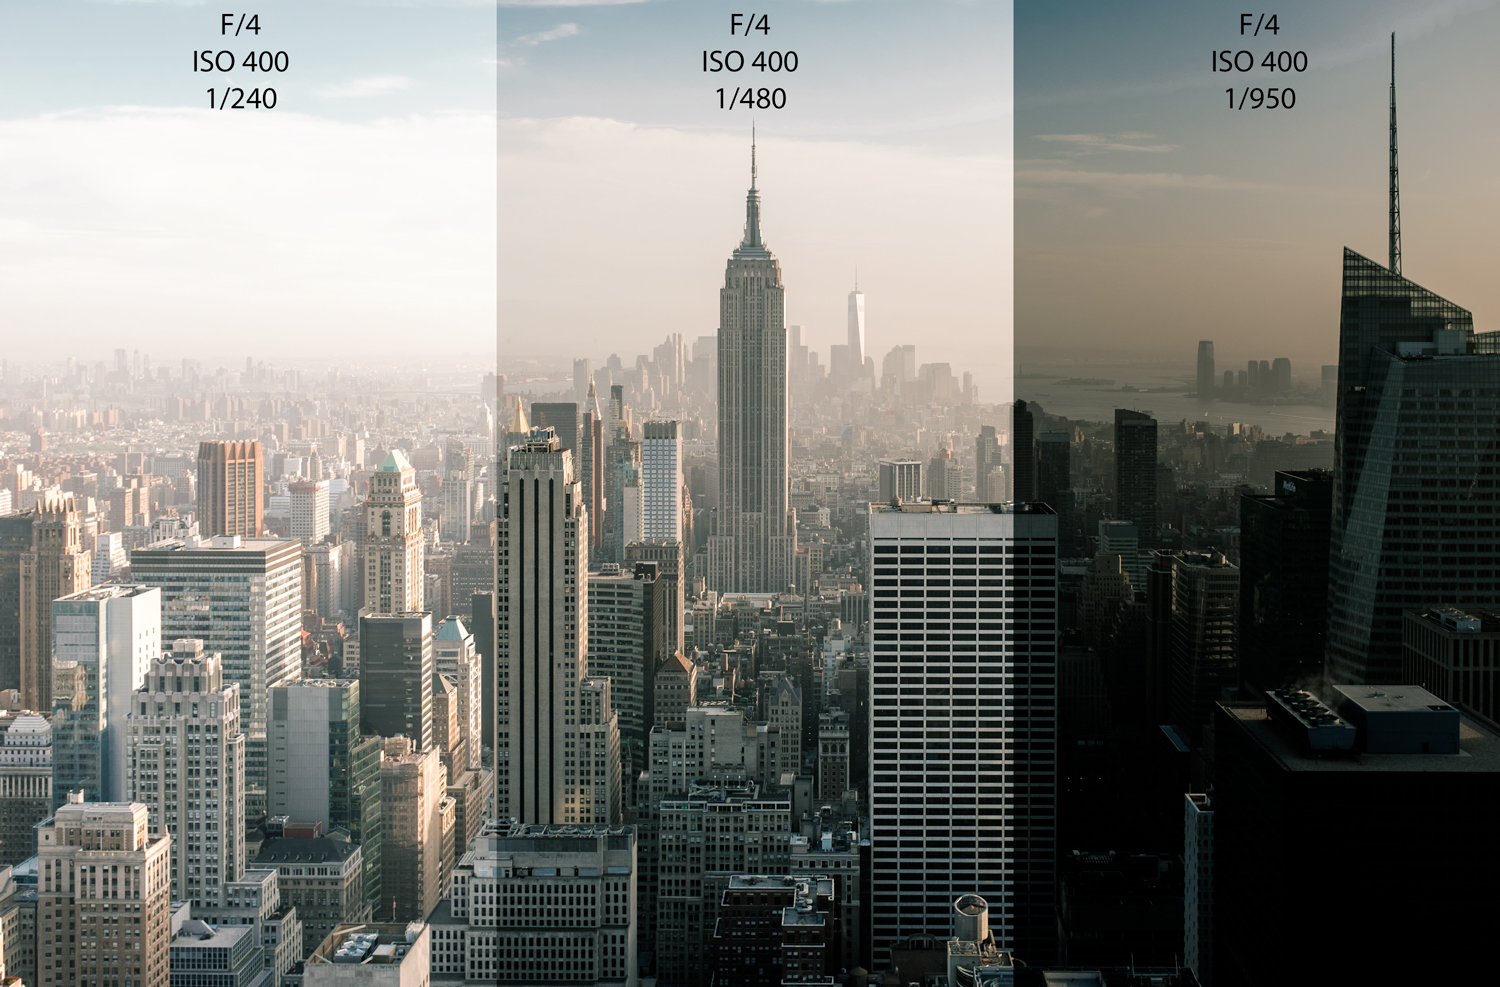
The landscape was taken from the top of the Rockefeller center at a time close to sunset, using the bracketing function of the X100T. I’m not a fan of the HDR techniques, and this is probably the second HDR I’ve ever done, the first one using Photoshop. The reason why I went for it is that I couldn’t be at the top of the Rockefeller at dusk, when I would have had the “perfect light”, so I wanted to capture a wider dynamic range than what was possible with a single exposure. I went for a full stop between each shot, so a bracketing of 3 stops in the overall image. I set the aperture (f/4), and the camera changed solely the shutter speed (1/950, 1/480/, 1/240), keeping the ISO fixed at 400. The three shots went under the very same post-production in Lightroom (Camera Classic profile, lens corrections, sharpening, split toning, white balance, contrast, highlights, shadows, whites, blacks, vibrance, and clarity). Only the exposure has been differently set on each shot, to get precisely to the three exposures I wanted to merge. In Photoshop I used the command File/Automate/Merge to HDR Pro untill I got quite precisely to the kind of global illumination, contrast, and tones I was looking for.
THE STREET PHOTOGRAPHY
I wanted the “murals” to represent what I experienced in the streets. So I decided to go for “un-composed street photography”, which meant having the camera hanging around my neck and pressing the shutter every time I spotted something interesting in my field of view. I never, ever, looked through the viewfinder. I took shots while walking, crossing streets, riding on a cab. To do that, I set the X100T so it could take everything close by in focus, while freezing the moment regardless if me and/or the subjects where moving. I opted for an f11 aperture, manual focus set to get what was between 3 to 10 meters in focus, and a shutter speed of 1/2000 of a second, while ISO was left on auto so to give the camera a parameter to control the overall exposure.
With such a set-up I went around the streets for two days, “fishing” for people, signs, and scenes. Luckily the X100T proved to be just the perfect tool for this work. It’s small, unobtrusive, and silent, and it hangs straight and ready to shoot around my neck. A whole day of shooting in the streets with no “camera-related pain” is more than something! The camera that’s always with me is the only camera I really need.


THE MURALS
In order to take bits of the street-photos and apply them to the buildings’ facades in the landscape as murals, I used Photoshop CC. The very first thing I did was to apply the “Frequency Separation” technique to get the image split into two separate layers, one with the textures and details (High Frequency layer), and one with the tones, lights and shadows (Low Frequency layer). This technique is most commonly used for skin retouching in fashion and beauty photographs, and I first saw it explained by the Ukrainian photographer Ilya Rattman during the Creative Pro Show here in Rome, during the last November. When applied in skin retouching, this technique allows to retouch the details without affecting the tones and the shadows, hence keeping the skin extremely natural even after heavy post production.

However, if you add any element, in form of a layer, between the High and the Low frequency layers, then this element gets “integrated” between the details and the tones, hence looking like “stenciled” on the surface of the objects. From there it is a matter of “masking” to get the proper look, for example by cutting the image along the borders of the buildings, removing it in correspondence with windows, making it “whiter” for a far building, adding a gradient darkening to follow the natural light falling over facades, or converting the element in black and white. It is a procedure that takes its time, yet as always with compositing the longer you’ll stay on each layer, the better integrated and the more “real” it will look.
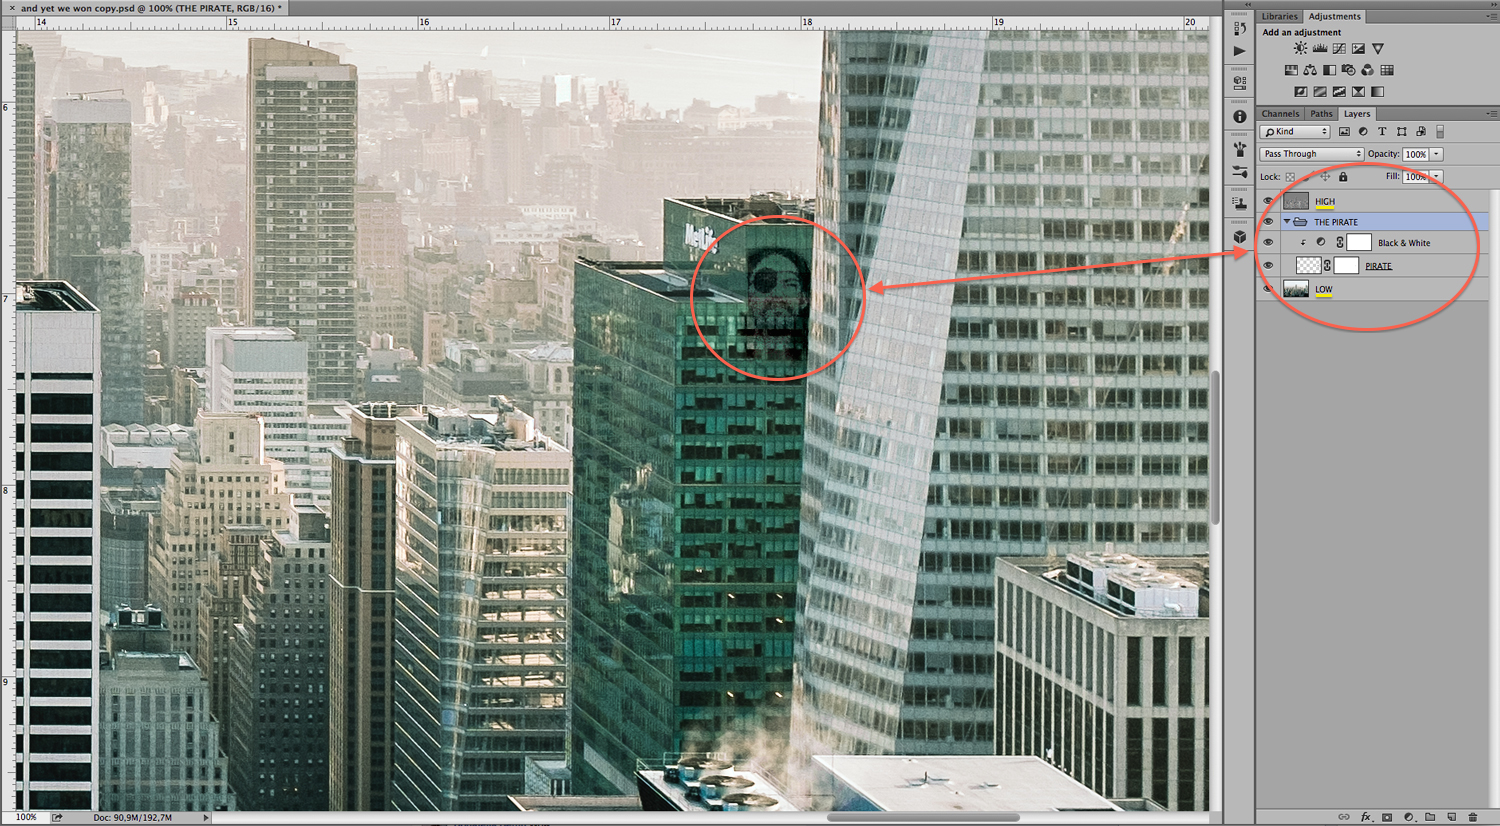
The other tool from Photoshop CC I used a lot in this work was the “3d Postcard”. I saw this tool for the first time during Fabio Timpanaro’s lecture at the last Creative Pro Show, where he showed how easy it was to take any 2D image and modify its perspective in a 3D environment. As a 3D Postcard, the image can be rotated and moved as a 3D panel, while Photoshop takes care of transforming the image accordingly. It’s really easy to do, and in this work it made it possible to adapt the murals to the shapes of the buildings. To follow complex shapes it may be necessary to cut the murals in as many elements as the shapes it has to follow and to treat each element as a separate 3D Postcard, as I did here with the big yellow stripe “WORK”.

So, this piece is the result of two days spent around the streets of New York, a quick visit to the top of the Rockefeller Center for the skyline bracketed shot, and quite a few more days of post production to merge, integrate, and finally realise the compositing. The X100T proved itself once more as my most favorite camera to bring along, for its exquisite mix of small size and weight, high image-quality, and immediacy of use. When I arrived in New York I wasn’t planning this compositing, I actually visualised it while on the top of the Rockefeller Center. I’m just glad I had brought the X100T along, since it proved to be up to the job once I set my mind on it.