We as Fujifilm users have a bit of a love hate relationship with Adobe and Lightroom. The combined asset management and image development makes for a great workflow environment, but the way Fujifilm X files are handled can be a little tear inducing at times. Previews especially take much longer to generate and read than normal Bayer Array based sensors. Even at Import, you have to wait while the tiny thumbnails load one at a time into the image preview area. If you’re Importing from a card where images have already been imported, it also takes ages for Lightroom to find the ‘Suspected Duplicates’ and show them as already imported. Other camera systems seem to zip along in comparison. Once the previews have been created on Import, everything runs the same as any other camera system.
People rave about how Capture One renders Fuji files, but then you have to deal with the learning curve of a new system if you want something other than the base rendering. Incidentally, you can say that of most Raw files – C1 does have a good rendition across the board with any camera system. This render is designed to make file look great as soon as they open. Lightroom, on the other hand, tends to have a very muted look to images from any camera system. Fujifilm X files still seem even flatter than others when imported. Despite this default look, you still have a great range of tools to get the best from the RAF, and those settings can be saved as the default rendering for your imports.
Fuji knows colour, and as someone that still has Fujifilm film in the fridge, I know that from years of experience. I know I’m preaching to the converted when I say that the film emulation modes in camera are one of the things that makes Fujifilm X a great choice for fabulous colour. These emulation modes make it possible to shoot only in JPEG and still have great images; Even more than with other camera system’s Picture Styles or Modes. So how does Lightroom deal with Fuji’s film emulations for those that want to shoot with raw files?
Previews and Profiles
After Import, Lightroom generates Previews, and you get to see the photo change from the camera generated Jpeg to Lightroom’s default preview. It’s a little disappointing watching the image lose contrast and saturation as this preview emerges. This preview is based on a Profile called ‘Adobe Standard’ and is a base look for how all raw files appear in Lightroom. It’s not all bad though! Adobe Standard is not the only render option.
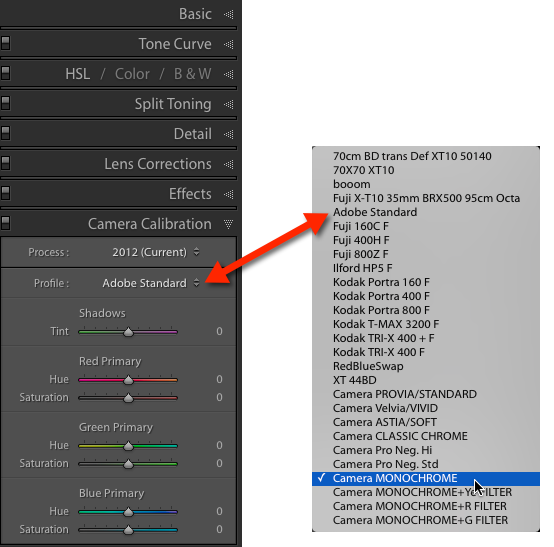
Lightroom does its own version of the film emulations in the Camera Calibration panel in Develop. In the Profile section you can choose between all these looks. There is one slight caveat. With these Profiles, the darker parts of the images block up a lot. I tend to move the Blacks and Shadows sliders (in the Basic panel) to the right to compensate. The additional profiles you see in my list are ones I’ve either created myself, purchased or downloaded.
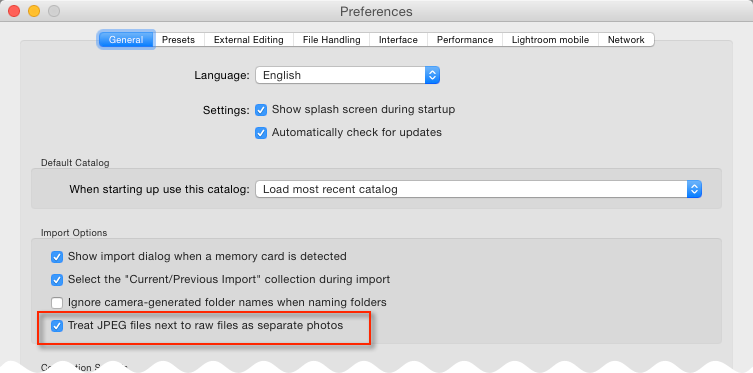
You can make a comparison between Fuji’s rendering and Adobe’s by shooting a series of images with the camera set to Raw and Large Fine, and switching between the different emulations. Shoot a series of images, changing the film for each shot. It’s best to do them in list order to make it easier when you get back to the computer. Before you start importing, go to the Preferences dialog (choose from the Edit menu on PC, or the Lightroom menu on Mac). In the General section, tick the ’Treat JPEG files next to raw files as separate photos’ box. This option lets the JPEG sit beside the RAF in the Library.
For this article, I took a series of evening shots of Long Walk in Galway. I set up my shot, then ran through all the emulations. I started to pack up, but then I realised in my haste that I’d changed from Raw to Large Fine, and not Raw and Large Fine. So I had to take another set as the light really started to drop. For absolute accuracy in comparison these images are completely unprocessed bar matching the Camera Profile with the corresponding JPEG. We’ll take a look at the differences between the process raw and the Jpeg and discuss these differences after. In the gallery, the raw file is first, then the JPEG, running through the first 7 emulations: Provia, Velvia, Astia, Classic Chrome, Pro Neg Hi, Pro Neg Std and Monochrome.
The gallery was not found!
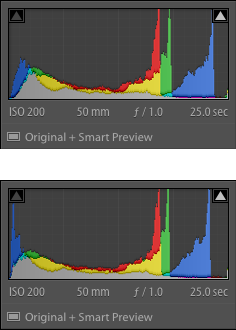
By and large the Profile is reasonably close to the Fuji JPEG-with one very noticeable issue in each set. The blacks in the converted RAF files are all bunched up. There’s far more contrast in the shadows than with the JPEG. Taking a look at the histograms for each images confirms this. It’s true of each emulation. It’s not terrible, but it’s definitely noticeable.
Is there a solution? Of course there is. Two of them in fact, each one depending on how you like to work. Both depend on getting the look you want first, then creating a way for the settings to be applied automatically. To fix the issue with the shadows, first select the Profile you want to change in Camera Calibration. Next, open up the Shadows slider in the Basic panel, and then the Blacks. This is really a matter of personal taste. Make sure you’ve changed nothing else (or only change things you really want to have set for your photos).
Option one from here is based on whether or not you want to use this look for every image you import into Lightroom for this camera. To do this, hold down the Alt or Option key. The ‘Reset’ button on the bottom right panel will change to ‘Set Default’.
![]()
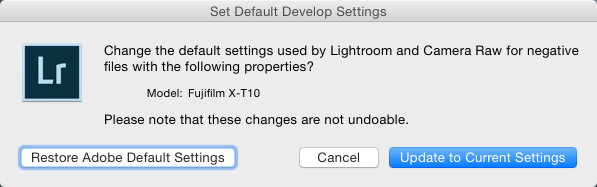
Clicking this button will bring up a dialog warning you that you can’t undo this, and explaining that it will apply to all files from that camera. While you can’t undo this action, you can always run it again and choose ‘Restore Adobe Defaults’ to reset it. Press ‘Update to Current Settings’ to make your settings the new default. This stores every single setting as your default, so be sure it’s exactly what you want before invoking it.
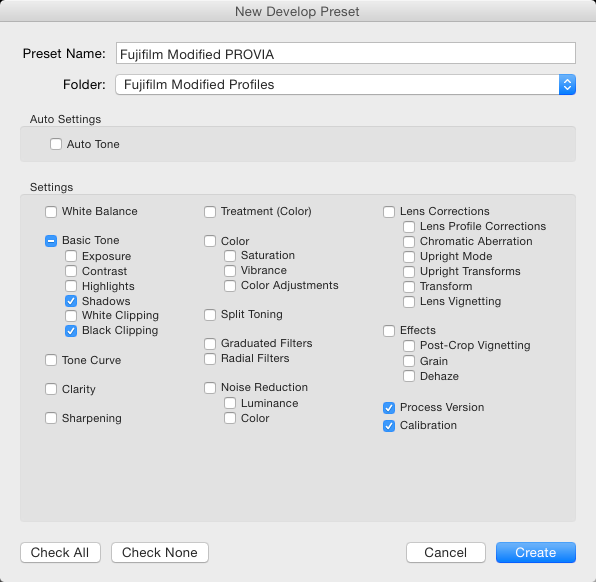
The second option is to create a Preset. You can create a preset for each film emulation Profile, including the new Blacks and Shadows settings. To create a Preset, click the + in the Presets panel (located in the Left Panel of Develop). When the dialog box appears, choose ‘Check None’, then click the Black Clipping, Shadows, Calibration and Process Version boxes. It’s good practice to only include settings that absolutely need to be included to make a preset work. If you plan on making a set of profile presets, use the Folder dropdown menu in the New Preset dialog and use the ‘New Folder’ option to create a dedicated folder for these presets.
To have any of the these presets change your photo automatically on Import, go to the Develop Settings option in the ‘Apply During Import’ panel of the Import Dialog. From the dropdown menu, choose your preferred preset.

Sharpening
Another area where there’s a lot of debate is on how Lightroom sharpens Fuji files, especially in the area of fine detail. From a technical viewpoint, the lack of an anti aliasing filter on the Fujifilm X-Series of cameras should make the images remarkably sharp, with great fine detail. Usually this is at the expense of Moiré in the image, but the random nature of the X-trans array mitigates this pattern distortion. But for a lot of people the fine detail is just a little bit mushy.
Without turning this into a primer on Lightroom sharpening, let’s take a quick look at what the sliders for sharpening do in the Detail panel.
– Amount: This controls the strength of the sharpening. It’s 25 for Raw files by default, and 0 for rendered files like JPEG. It goes to 150, but beyond 100 it tends to break up the image a lot.
– Radius: Sharpening works by creating contrast at edges in the photo. Radius controls how far from the edge the sharpening occurs.
– Detail: This has two purposes, to the left it reduces halos along highlight edges, to the right it increases high frequency detail (e.g. Foliage).
– Masking: Best seen by holding the Alt/Option key in use, this slider reduces the areas in the images that can be sharpened. As you go more to the right, less prominent edges are preserved from being sharpened.
Some photographers have suggested pushing the Detail slider in the Detail panel to 100 for all images, but that’s a heavy handed approach, probably best suited to the large prints made by those photographers. Do try it though, because it’s worth seeing the effects on your photos. Fujifilm files do take more of the Detail slider than other Raw files, so the default of 25 may be a little conservative. Make sure you’re at 100% when you make changes as any other view will not give a correct rendering of sharpening.
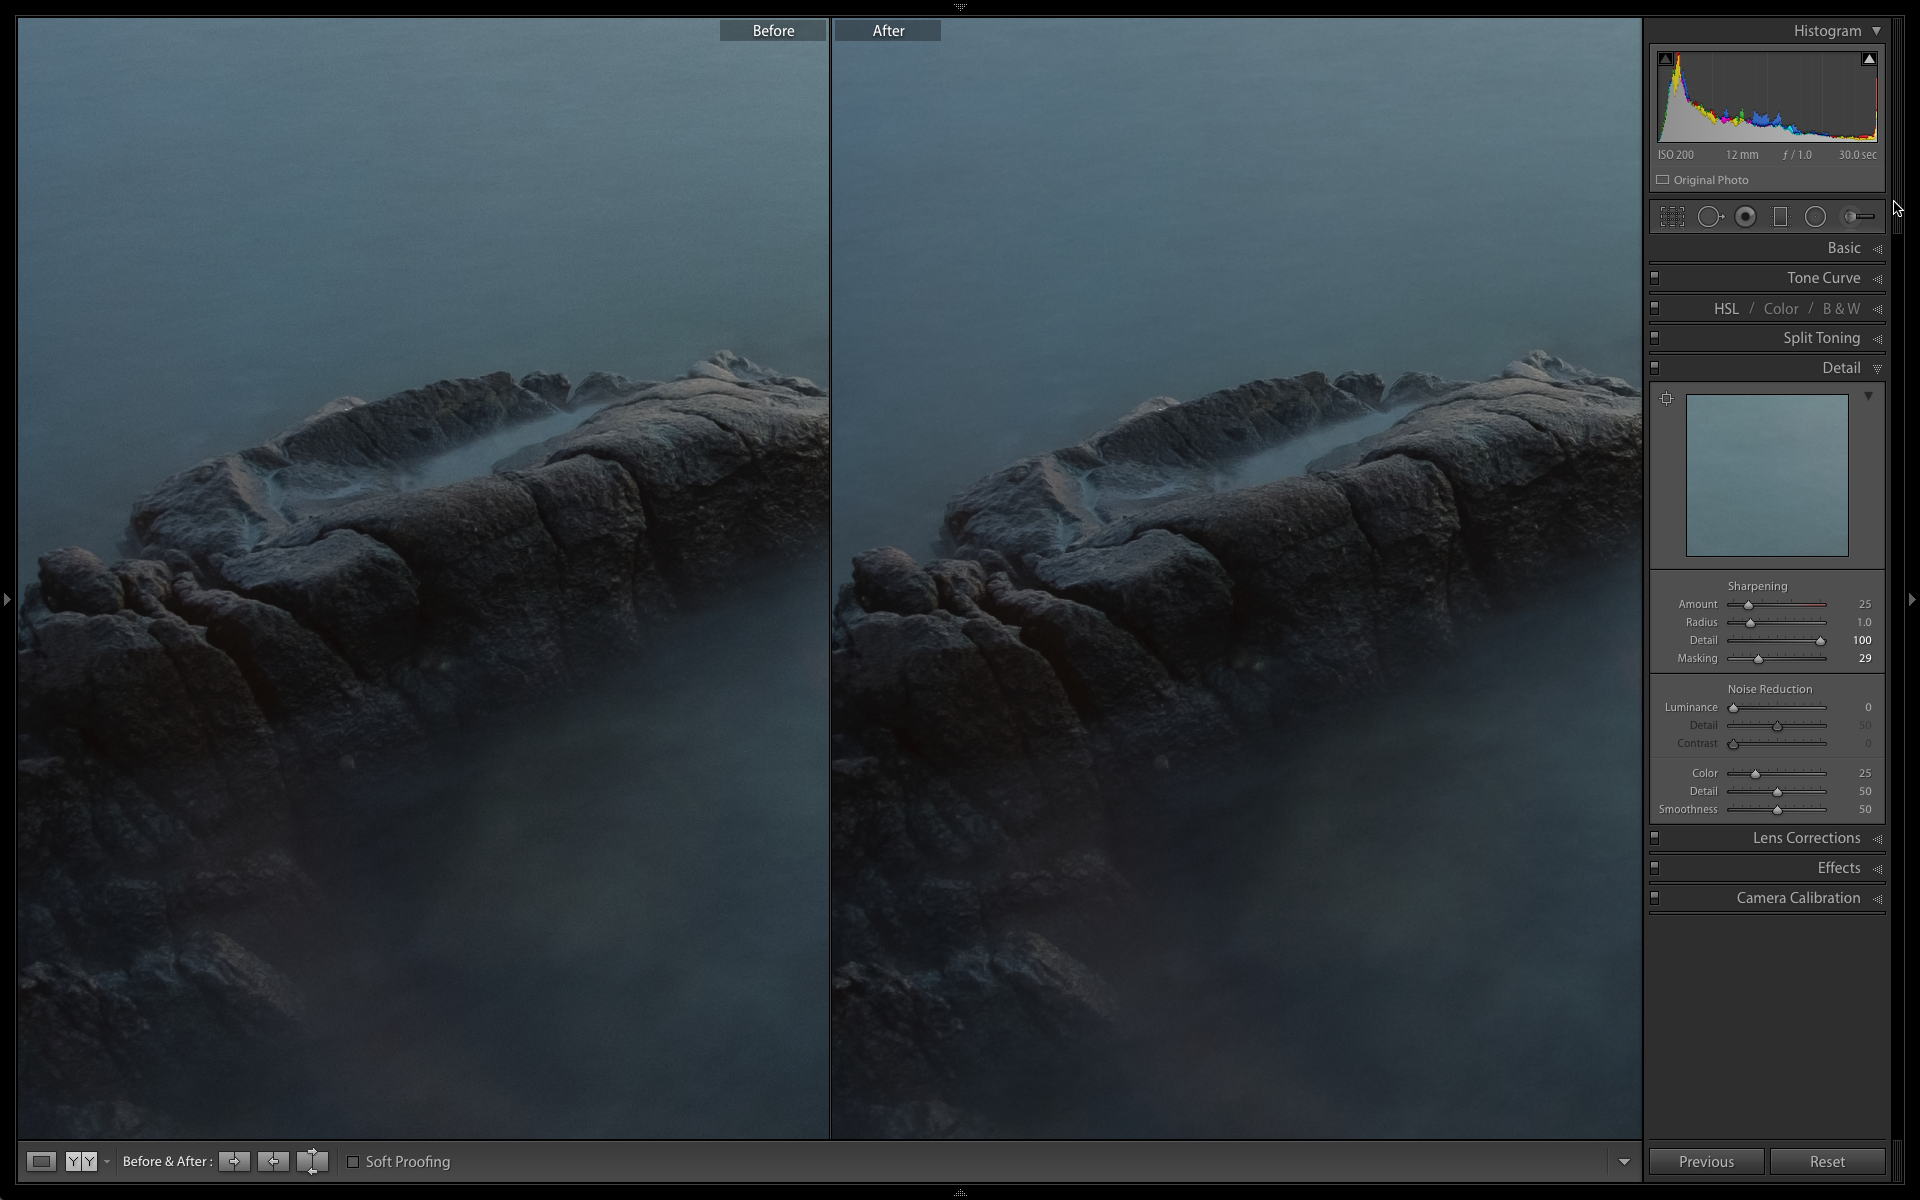
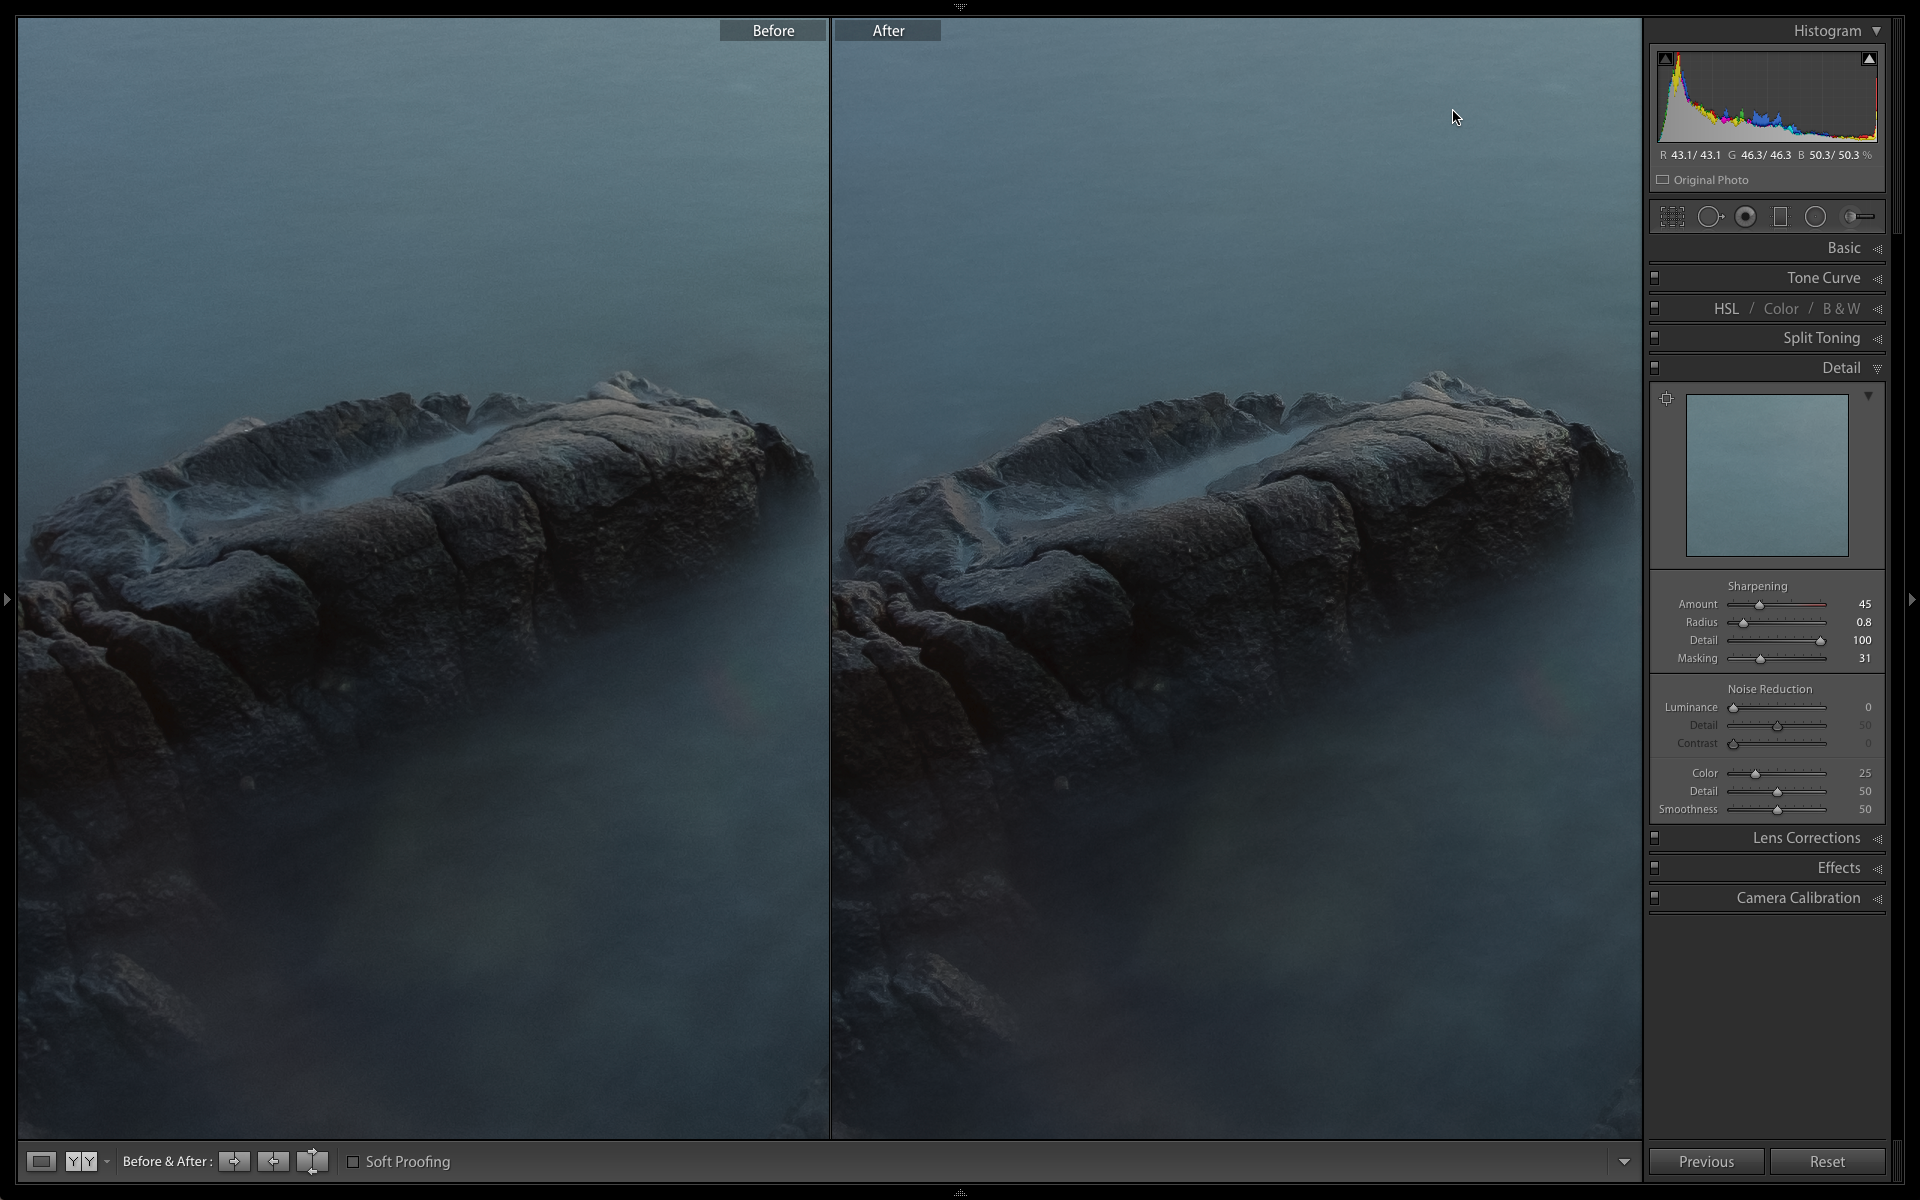
Here’s a series of images of a landscape foreground at 100% taking with the default view on the left in each case. With Detail set to 100, we do get increased detail in the image-but the water pattern is a bit crunchy.

Using the Masking slider, a setting of around 30 (29 in this image) reduces the effect on the water, without reducing the detail on the rocks.
Lightroom has two Presets for sharpening built in. One for Scenics and one for Faces. Let’s take a look at the Scenic Preset on this image.
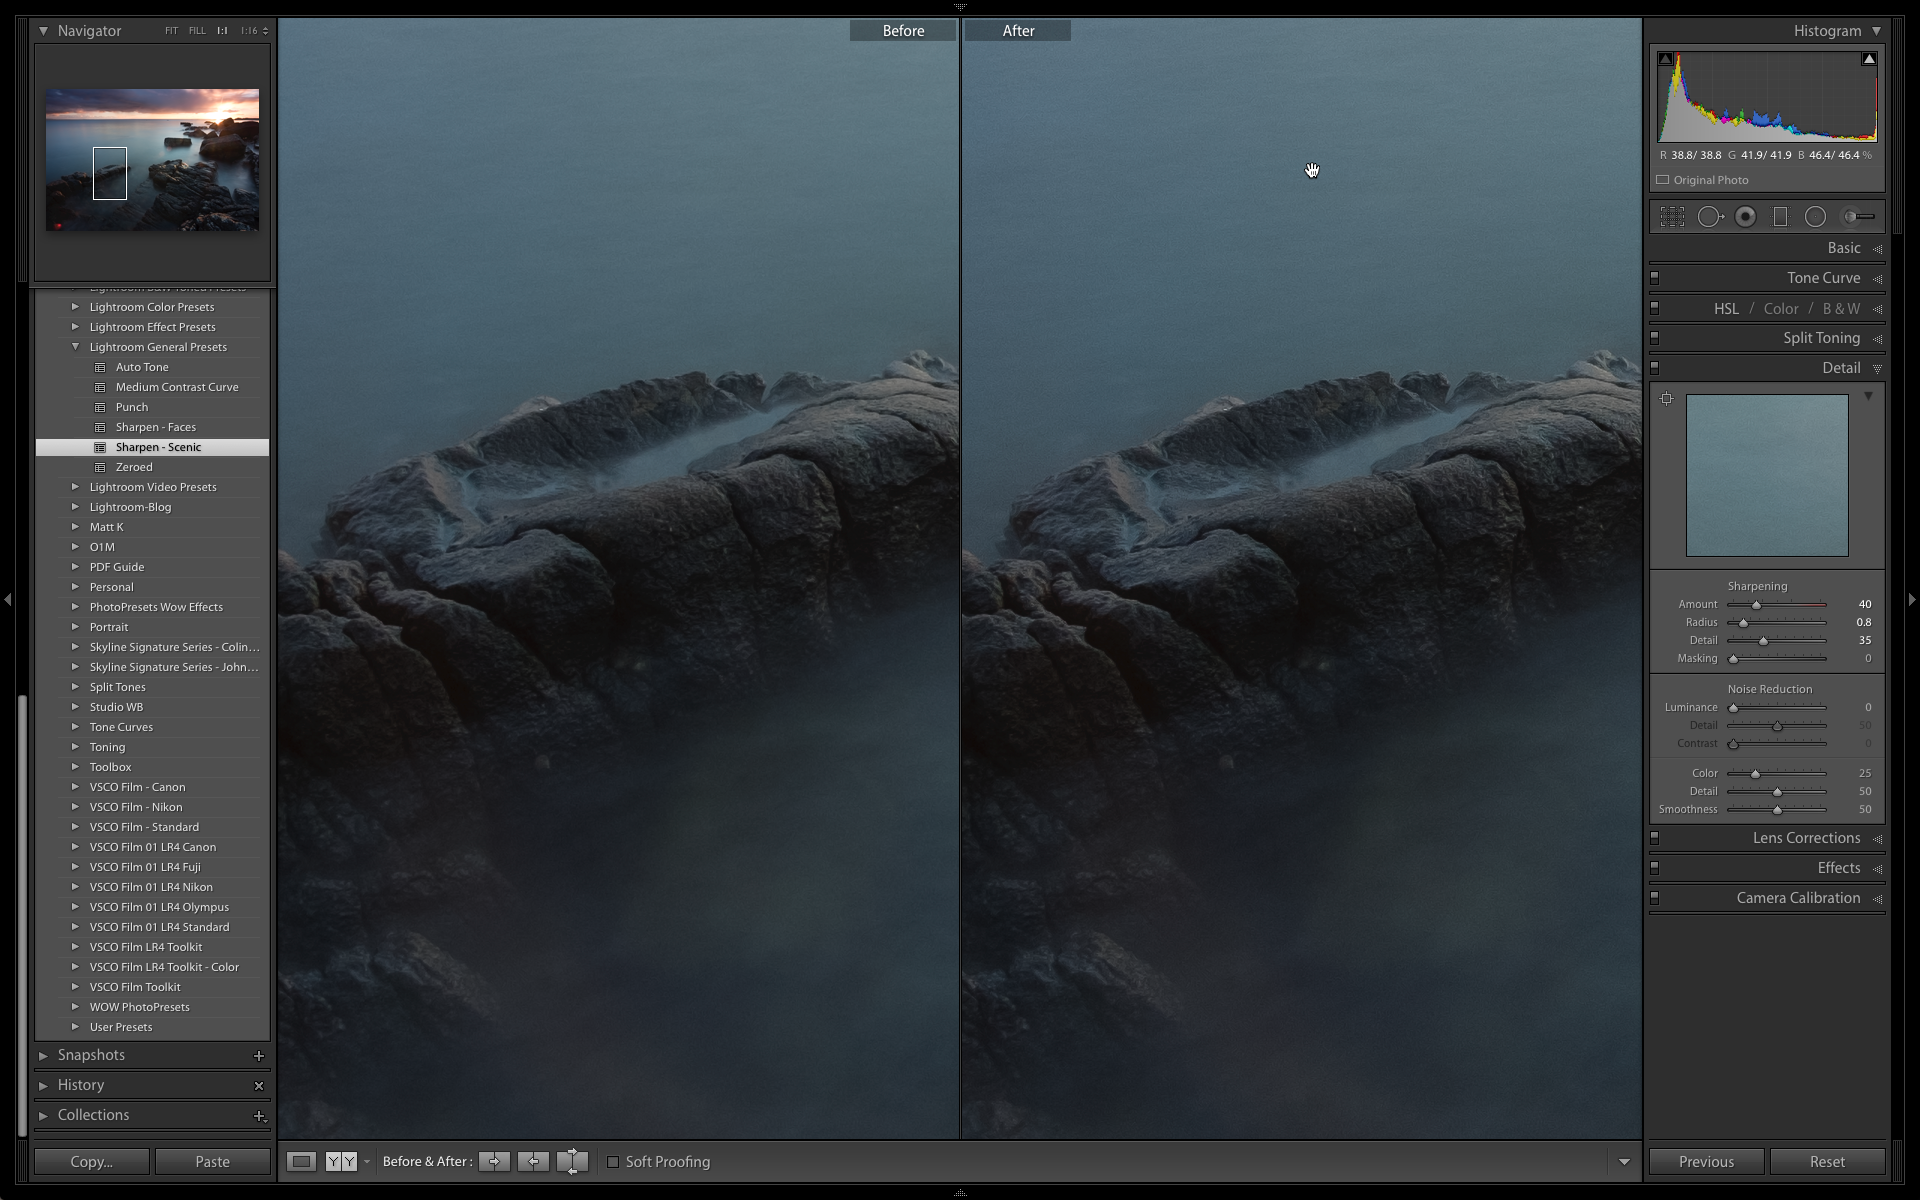
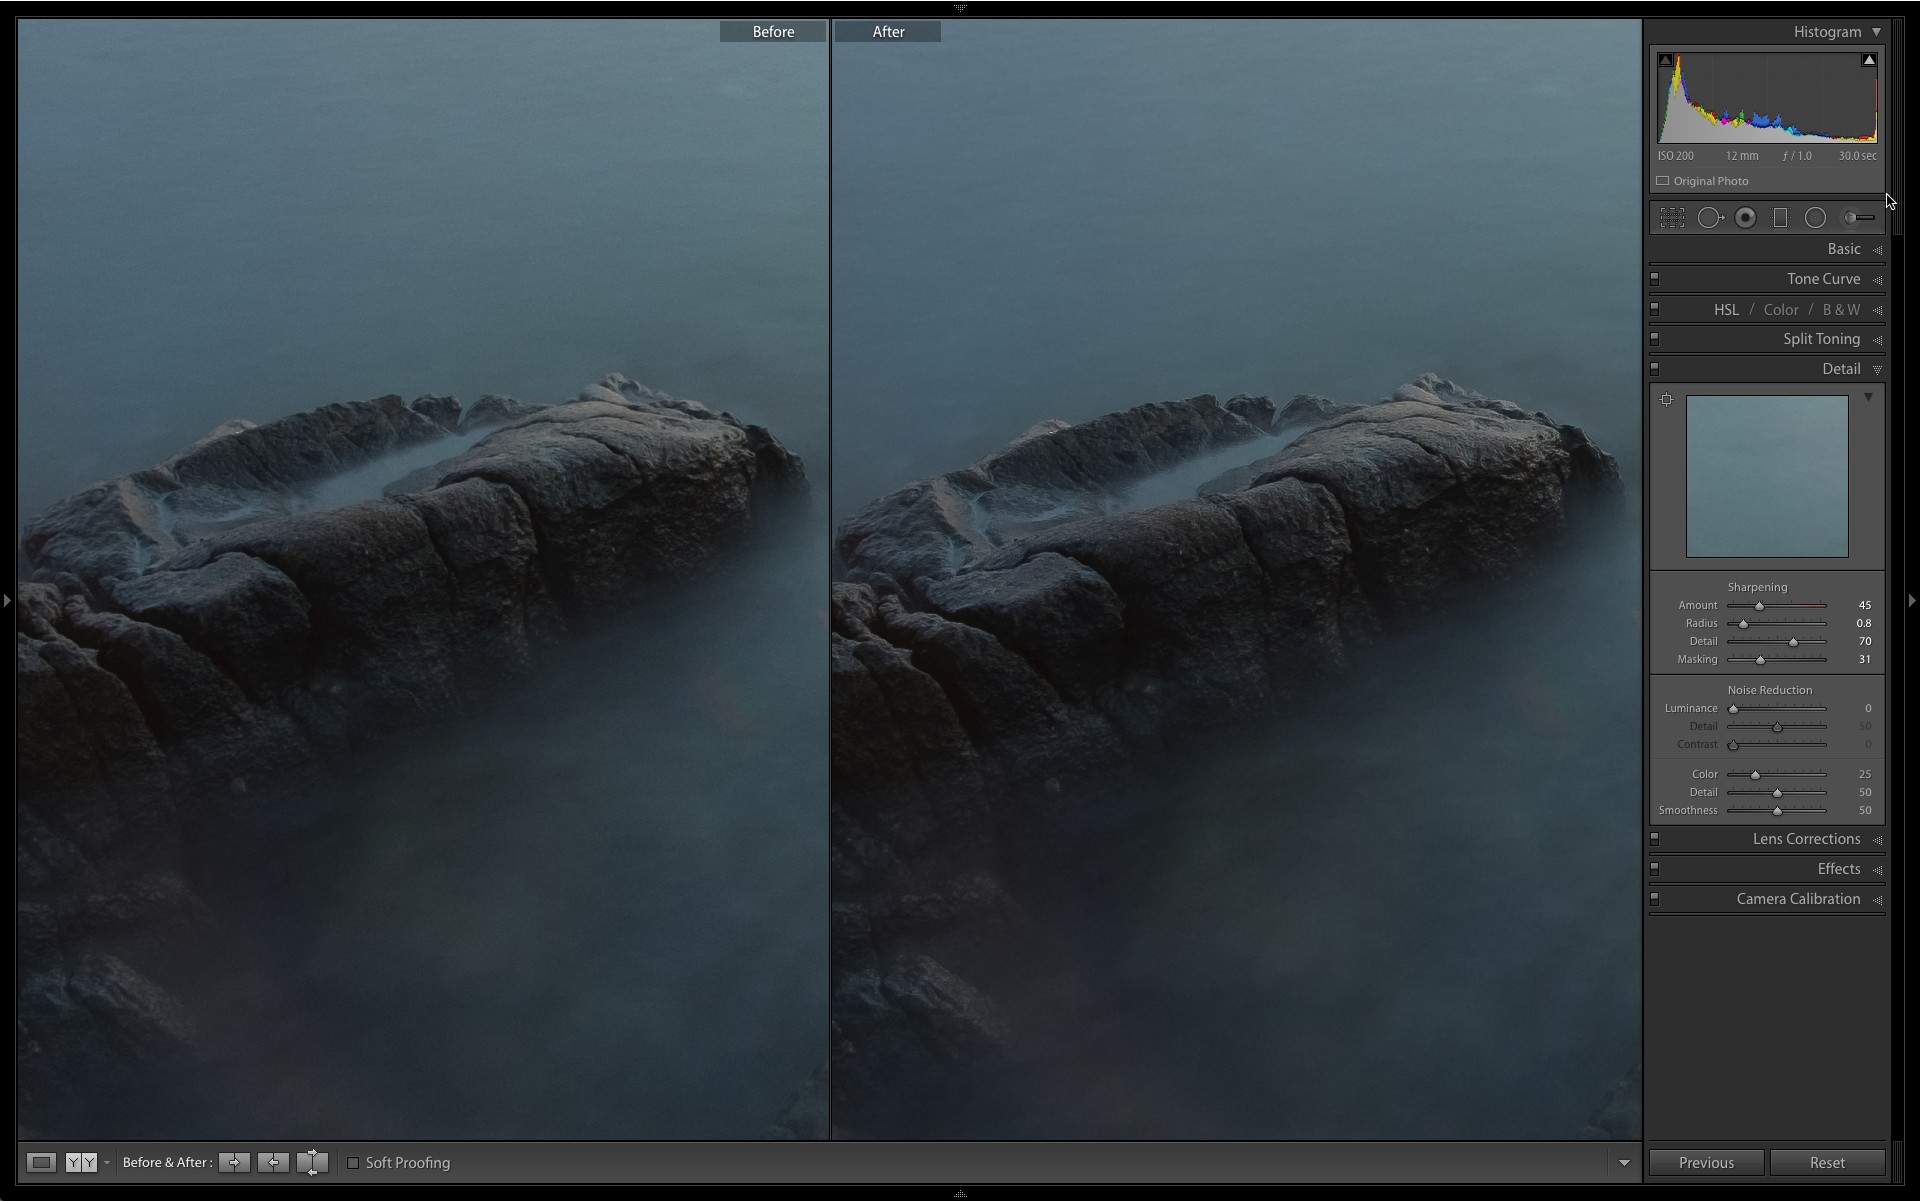
There’s a nice sharpening effect, but compared to our detail 100 image, we do need more detail. Older versions of this preset had an amount of 60, so I bump the amount up to 45. Putting the Detail to 100 and Masking to around 30 as before, we do get a much sharper image, but now the edges are getting crunchy, even with masking.
Pulling Detail back to 70 gives a better looks while removing some of the crunchiness.
So what is the right amount of sharpening? Well, there isn’t one, because each photographer will have a different perception on what’s just right. The information here is to guide you in finding your own preferred amount. And when you find it, save it as a preset to get yourself started. You can also use the Set Default or Modified Profiles Presets we discussed earlier with this Sharpening included for a one stop basic look with sharpening set.
Once you’ve got your new start point set for your photos, it’ll be a much speedier process to finalise your photos in Lightroom.