I have been a Nikon DSRL shooter for more than 20 years. In the last couple of years, I started to look at mirrorless bodies, because I mainly shoot with tilt&shift lenses and the EVF is a major advantage over the DSRL OVF for dealing with manual focusing, so I first purchased my X-E2, then the X-T2 and, as soon as the GFX 50R was launched, I placed the order for the 50R with the 45 mm 2.8 as a combo.
As stated in my article in the February/2019 edition of Fujilove Magazine, there are a lot of advantages using the Fuji ecosystem with tilt&shift lenses, the main of which is a feature that is regularly overlooked by reviewers and it is the “voice memo” function, a feature that was incorporated into the X-T2 via software update and came incorporated into the GFX 50R from factory.
As stated by Darwin Wigget in his ebook “Tilt-Shift Lens Advantage for Outdoor & Nature Photography”, “we are firm believers in the idea that it’s not gear that makes you a better photographer but your creative vision. That said, we also acknowledge that, sometimes, special tools offer the visionary photographer more creative possibilities. For us, the tilt-shift lens is one of these special tools. No other lens offers as much creative control over the look of an image as the tilt-shift lens! “.
These are special lenses that are used in photography for specific reasons. There are good reasons why photographers give up using zoom lenses and autofocus for these primes, manual focus pieces of glass. Be advised, however, that they are quite expensive, they are bulkier and heavier than their counterparts in the same focal lengths and there is a long learning curve until one can grasp the way it works, especially regarding how to get the appropriate “Scheimpflug effect.
Despite these disadvantages, there are a lot of advantages that one can get out of the use of these precise optics, that outweigh all the problems already mentioned, for example, the possibility to create panoramas by shifting the lens up, down, left and right and the fact that we can control the placement of the plane of focus, both to align the plane of focus with the subject plane so that the subject is rendered entirely sharp and/or to misalign the plane of focus with the subject plane to render a more blurry and soft effect.
One of the main characteristics of medium format compared to full frame is that in the former it is required to close the aperture of at least one stop, which means that a shot at f8 in full frame would require to be at f11 in medium format to get the same depth of field. So, given that implication, to have a lens that can be used to get entire sharpness from background to foreground regardless of the aperture selected, is something that deserves attention.
Where tilt-shift lenses show their real power is in using tilt and shift in combination to control both the perspective and the plane of focus simultaneously. So, with all these ideas in mind, I went out to test my four Nikon tilt & shift lenses with my brand new medium format camera, the GFX 50R. There is one caveat, however, using Nikon tilt-shift lenses with Fuji GFX ecosystem. As of this writing, there are only basic adapters (like Fotodiox) to mount Nikon F lenses onto GFX bodies and, because of that, there is no electronic contact between the two, so, the camera does not control the aperture and they are used at a fixed focal lenght (in my case, at f8 selected previously at a Nikon body), because they have electronic aperture, controlled by a Nikon body. There is a company called Steelsring that it is on the verge of launching to the market a Nikon to GFX adapter that provides AF from a Nikon F mount lens to a GFX body (check it out here). This company also states: “Electromagnetic diaphragm of type E Lens can be controlled by GFX 50s body, allows AF in full open (decided by camera body) and step down for exposure”, which means that the aperture of the PC-E tilt & shift lenses by Nikon will be able to be controlled by the GFX body.
The exception is the old Nikon PC 85 mm f2.8, that it is manual aperture, has an aperture ring and a dedicated buttom to open-close to the aperture selected, so, it does not need an adapter with neither AF nor aperture communication.
Among the four Nikon tilt&shift lenses, the best one to use with the Fuji GFX system is, in my opinion, the 19mm f4 because it has the widest possible field of view without being a fisheye and it has the ability to control shift and tilt independently one of the other, feature that it is not yet possible with the other Nikon counterparts.
In this regard, I had to sent my other three Nikon lenses back to Nikon USA to ask for rotation so that tilt and shift run in parallel, given that these lenses come from factory with that functions at 90 degree, service for which I had to pay 150 US dollars plus tax per each lens!
In order to understand the odds and ends of these lenses, I recommend the reader to start by reading the accurate article “Focusing the Tilt-Shift lens”, by David Summerhayes, available on the internet, and to get further info, the ebook “Tilt-Shift Lens Advantage for Outdoor & Nature Photography”, by Darwin Wigget.
As David Summerhayes states in his article, “by tilting the lens forward by the right distance, the photographer is able to adjust the plane of focus to run along the ground, giving a vastly apparent depth of field, even with the lens wide open”. So, it is important to know the distance of the camera to the ground as the anchor point to start the calculations. For helping out, he created charts for each of the tilt shift lenses (17 mm, 24 mm, 45 and 90 mm, for Canon lenses), in which he placed the degree of tilt on the left and the focus plane on the right, measured in meters and inches (in separate charts). So, given this starting point, I started to work in three heights with each lens: knee (50-70 cm), waist (90-100 cm) and eye level (160-170 cm). So, for instance, if I have my 24 mm mounted on the tripod at 1 meter, I knew I would need to dial 1,5 degree of tilt. The 45 mm lens at the same distance, requests 2 degree of tilt, and so on. The second procedure is to focus for the foreground (within the first third of the frame) and tilt for the background.
Both the Fuji GFX EVF and voice memo function are the perfect tools to monitor how to get precise focus/tilt and to record what was done for each picture, as if it were a sort of “focus/tilt bracket”. Given David’s starting point chart, it is now easy to get the appropriate tilt or swing (side tilt) to get sharp focus from front to back. The examples below, illustrates what I have learned from these two master photographers and their guidelines stated above.
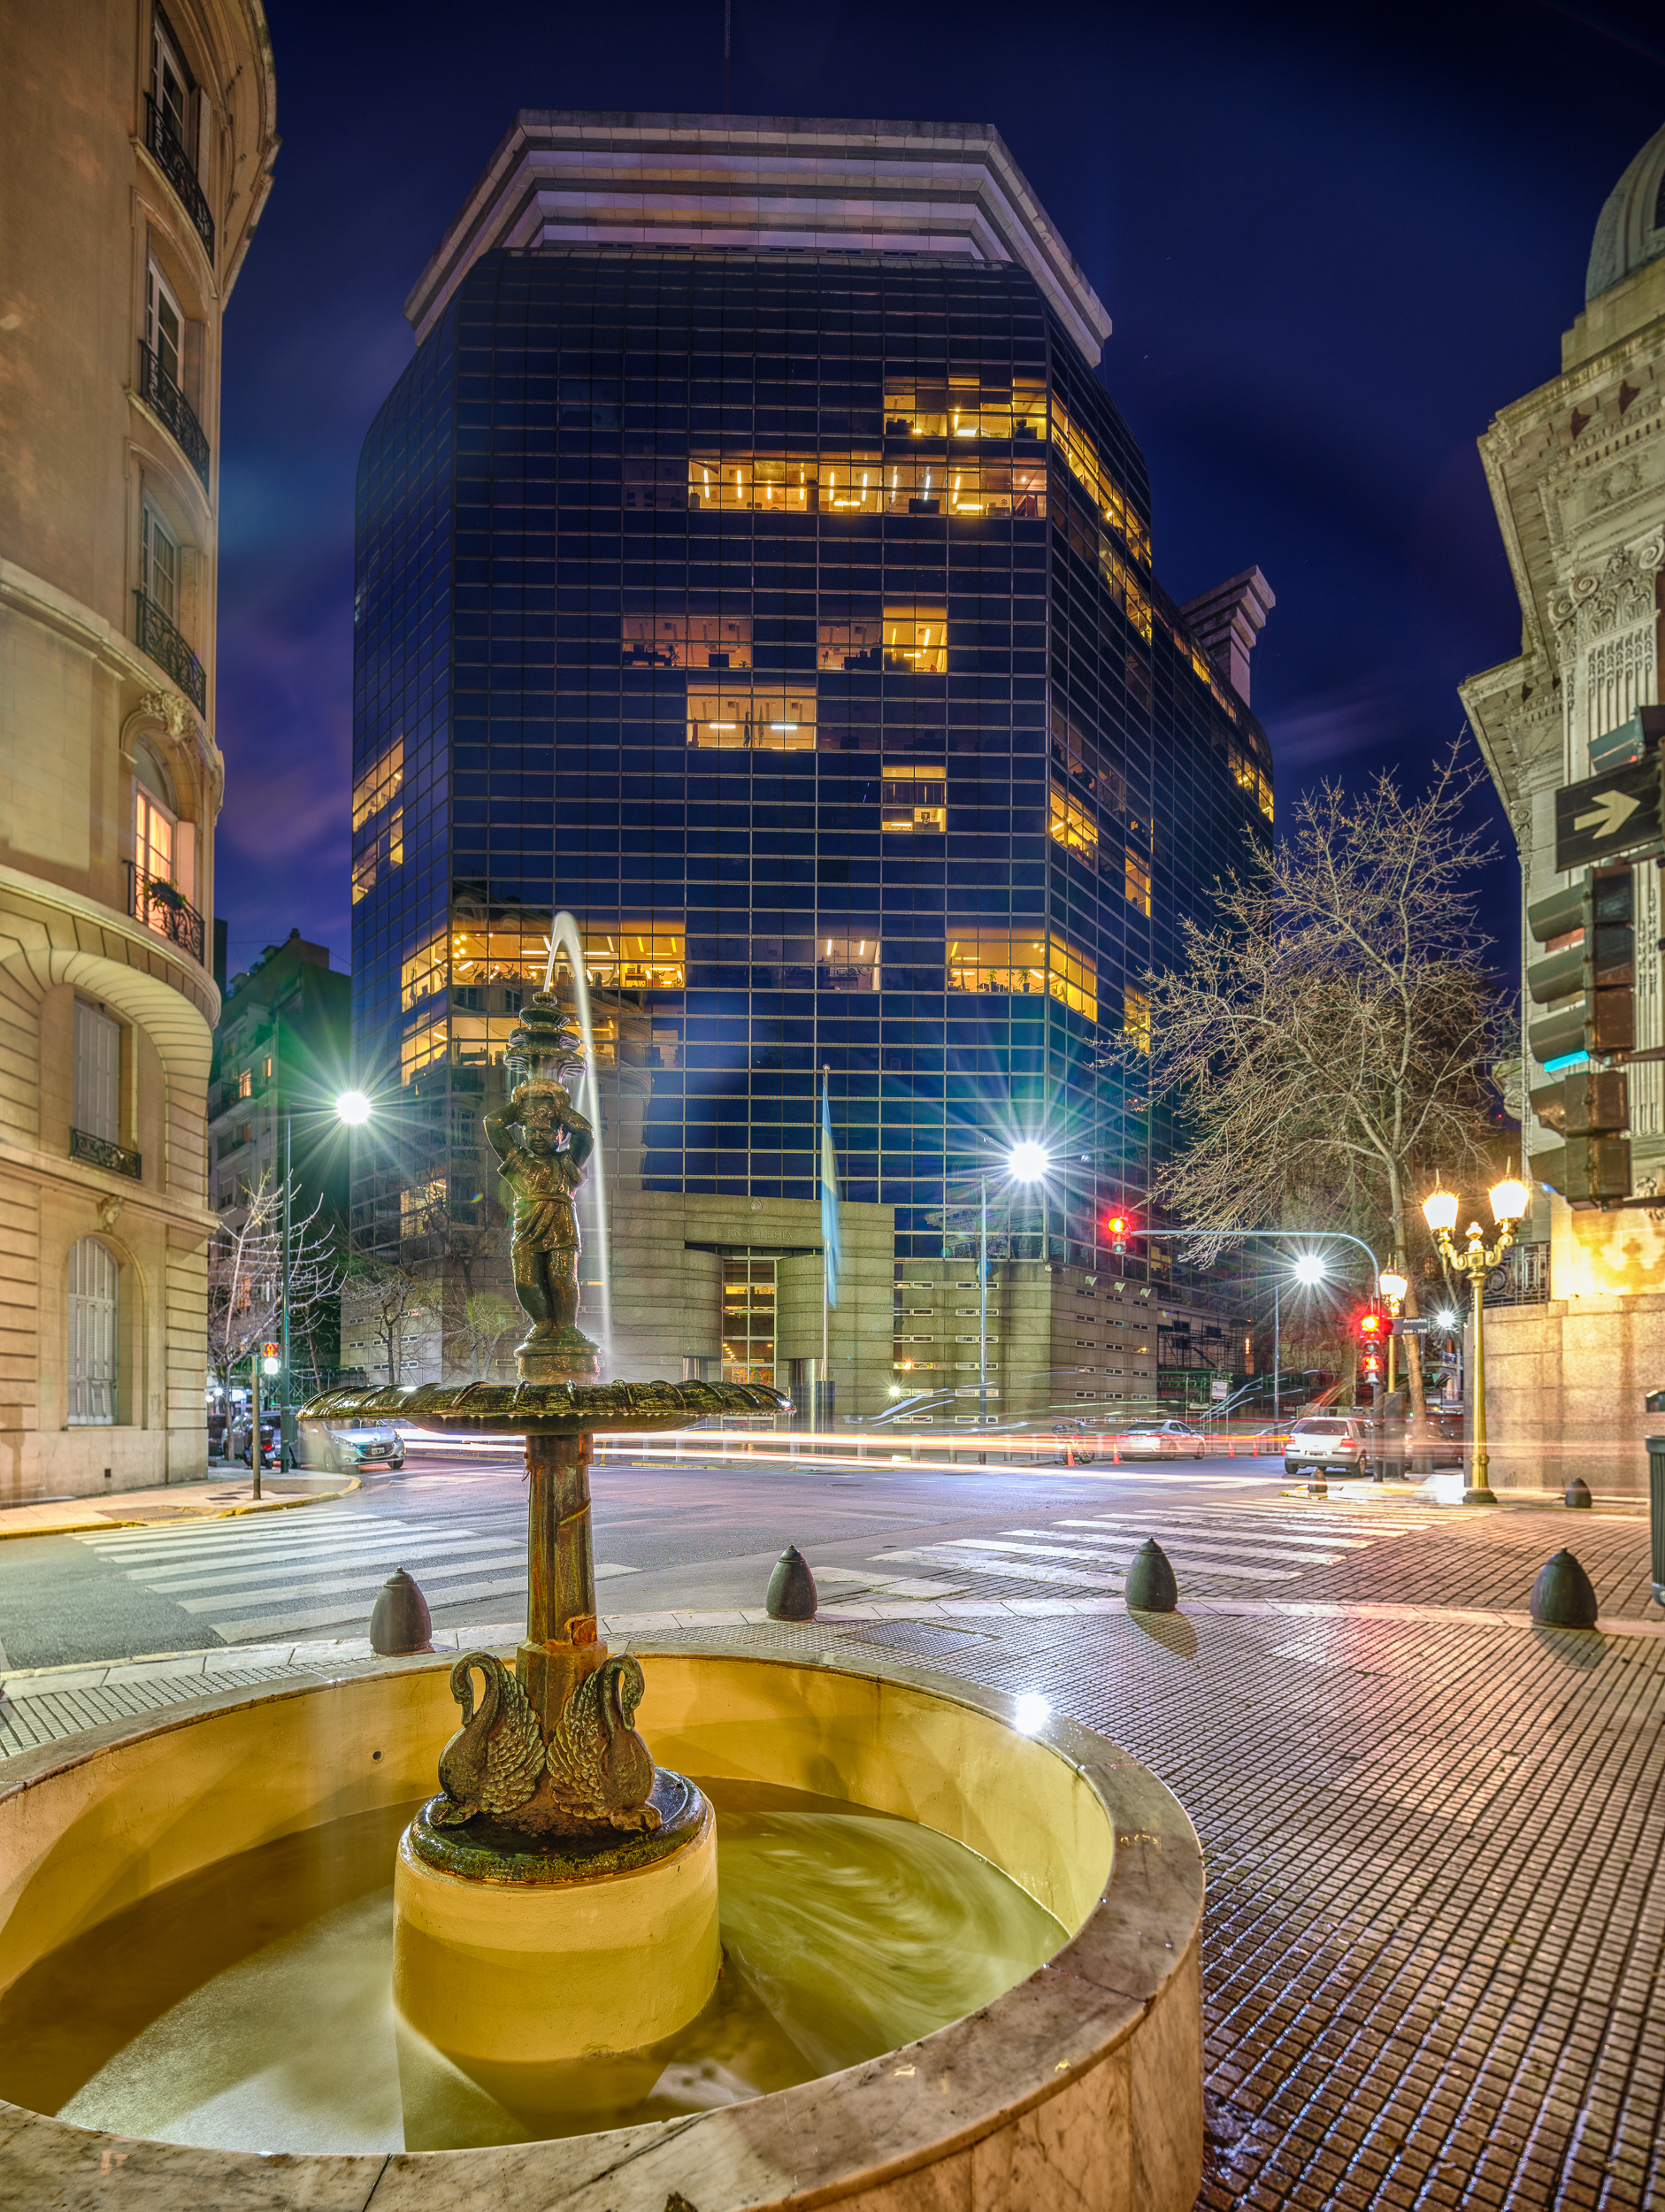
Foreign Affairs Building. I placed the tripod at 1 m, mounted the camera vertically, dialed 6 degree of shift upwards and 1, 1/2 degree of swing from right to left, focusing for the fountain and swinging to the building at the back, to get both in sharp focus. Circular polarizer was added. Fuji GFX 50R, Nikon 19 mm f4. tilt&shift, 30″x f8. iso 200.
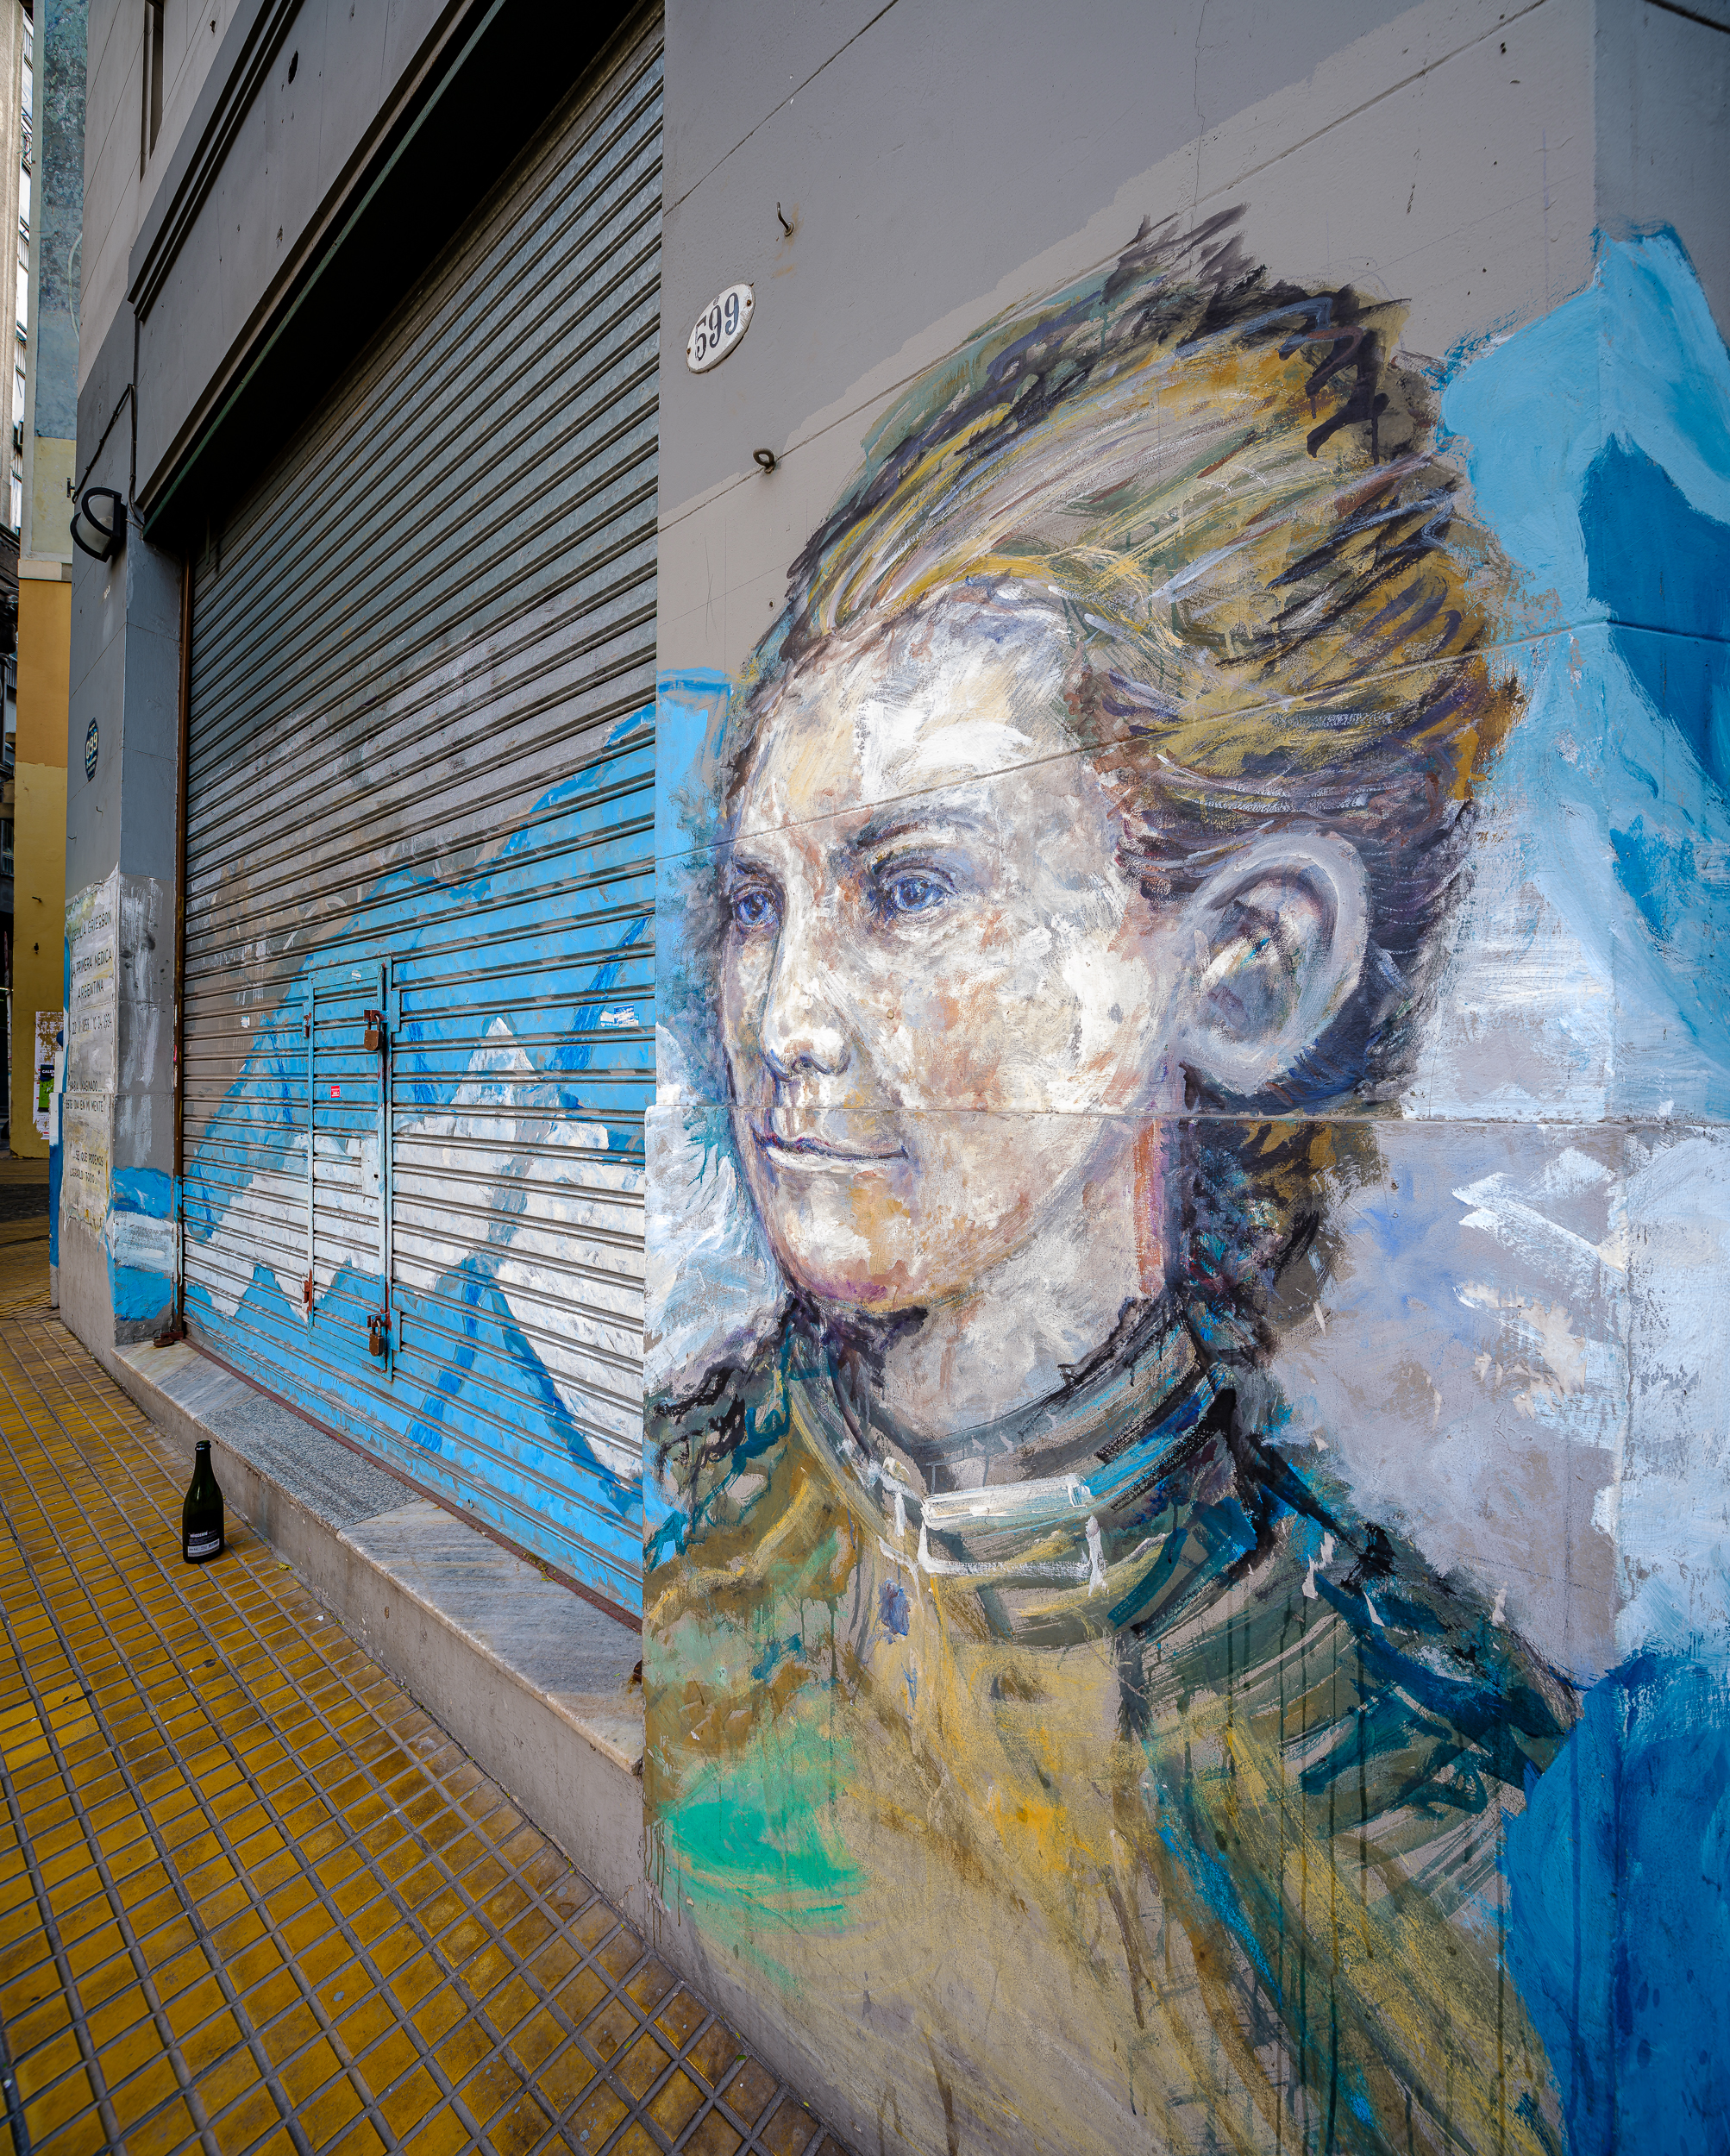
Cecilia Grierson Grafitti. This is a vertical Panorama. Camera mounted horizontally. I focused at the lady’s left eye and applied 1, 1/2 swing from left to right to get the whole scene in sharp focus. It can be read the words carved on the right pillar of the Bar’s facade, something impossible to get in a single shot without Scheimpflug effect. Then, I shifted up and down 11 degrees to get 3 shots to stitch later on post. Fuji GFX 50R, Nikon 19 mm f4. tilt&shift , 1″x f8. iso 100.

Isidoro Canones. I placed the tripod at 1.70 m at 1 meter from the subject. I mounted the camera vertically and focused to Isidoro’s face and dialed 1 degree of tilt downwards, plus 10 degree of shift downwards. I got sharp focus from foreground to background at f8. Fuji GFX 50R, Nikon 19 mm f4. tilt&shift , 25″x f8. iso 200.

Fuente de las Tarascas. I mounted the camera vertically, used my 24 mm lens plus the Nikon 1.7 TCII. Applied 2 degree of shift downwards, plus circular polarizer, a 5 stop ND and a 3 stop graduated ND filter. Since the fountain was far from the reach of the 24 mm lens and because of the fence that prevented to put the camera closer to the fountain, I put my 1.7 teleconverter to get much closer to the subject. Fuji GFX 50R, Nikon 24 mm f3.5 tilt&shift. 120″x f8. iso 200.

Isidorito & Patoruzito Cartoon Characters. The camera was positioned at 70 cm height and it was dialed 3,5 degree of swing (side tilt) to maximize depth of field from the subjects in the foreground to the Statue of Perón in the Background, enhancing sharp focus throughout Perón’s Square. Fuji GFx 50R & Nikon 45 mm f2.8 tilt&shift. 1/10 xf8, iso 100.

In this crop of 2 shots of the same image with and without swing applied, it can be clearly seen the difference between the depth of field available from Isidorito in the front to the Peron’s statue. even at f8.

Matias. I placed the tripod at 1 meter, focused to the wax statue’s eyes and dialed 6 degree of shift and 1, 1/2 tilt downwards, to get sharp focus until the graffitty of that lady at the back. Fuji GFX 50R & Nikon 45 mm f2.8 tilt&shift. 1″ x f8 , ISO 200.

Puerto Madero at dusk. I used my 85mm dialing 2 degree of shift downwards. In scenes like this, there is no need to apply tilt since all the subject is at infinity focus. Shift is useful to place the horizon other than the medium of the frame. Fuji GFX 50R & Nikon 85 mm f2.8 tilt&shift. 60″ x f8 , ISO 100. Circular polarizer used.
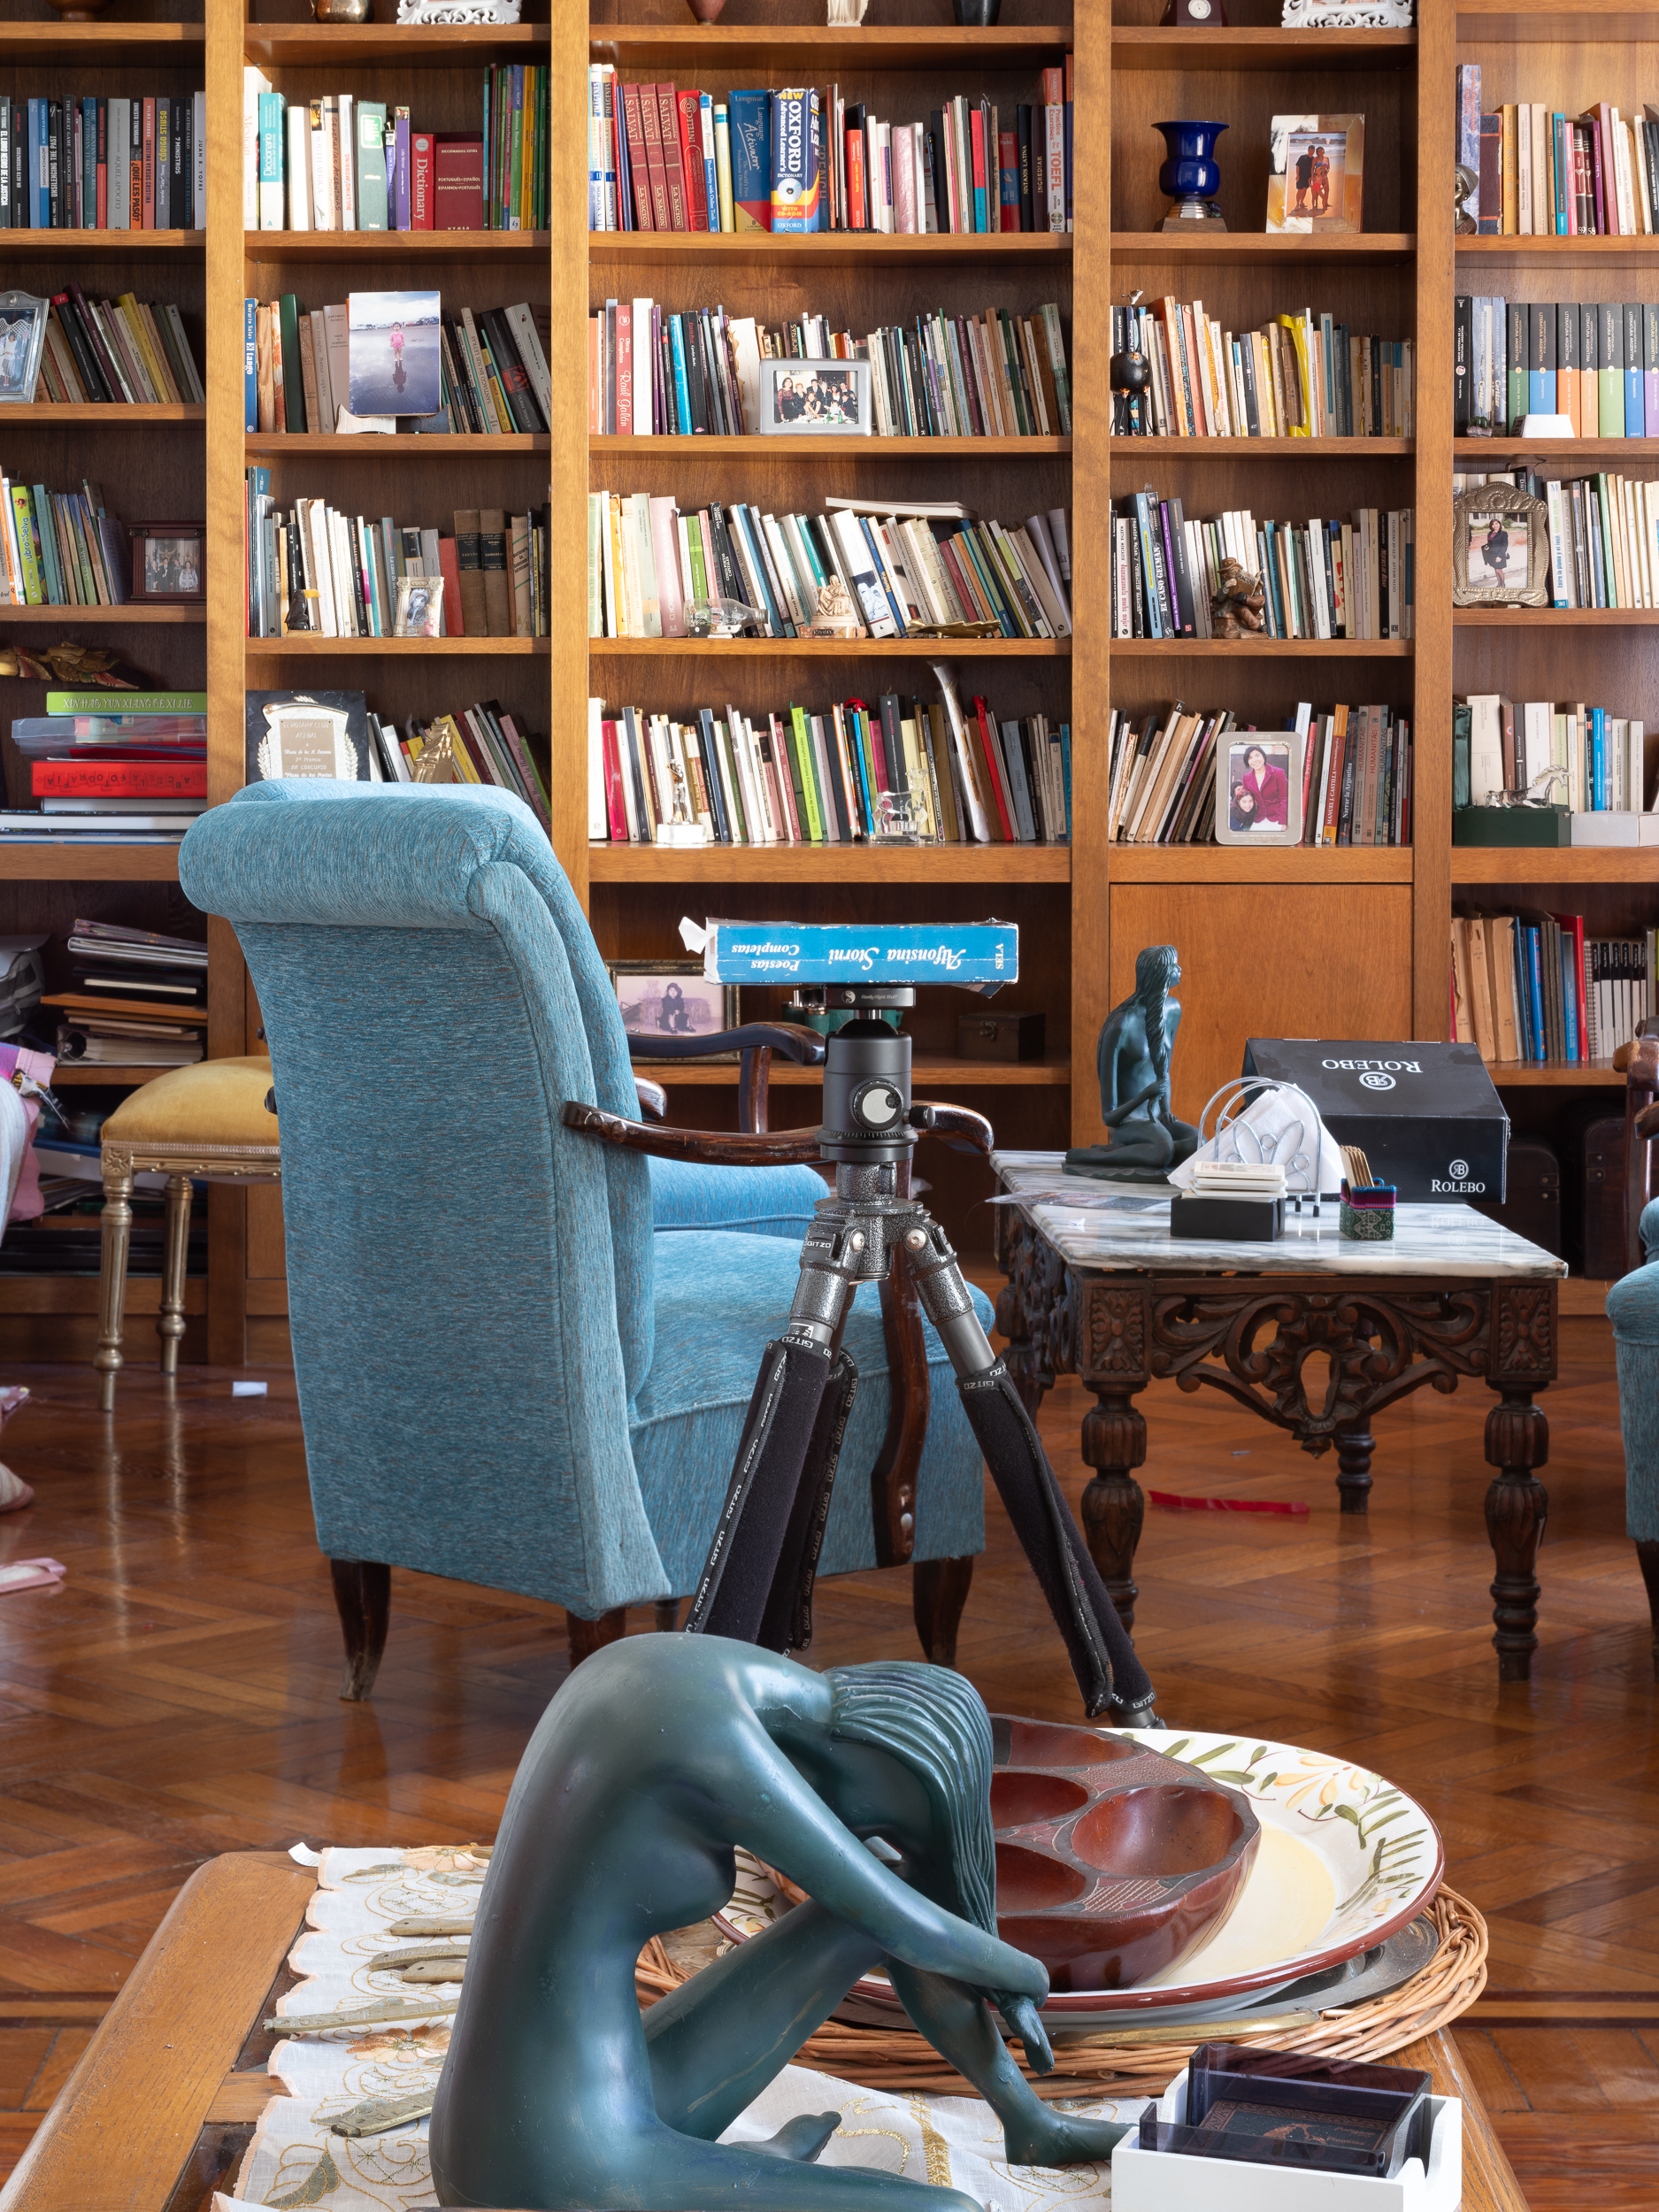
Library. I took this picture in my living room to test tilt with my 85 mm lens. I put the tripod 1,00 m from ground, focus on the lady statue in the foreground (located at 2,00 meters from the camera), applied 5 degree of tilt downwards . I placed a tripod and book at 3,00 meters and I got sharp focus from the little statue, to the tripod in midground and the library at the backgroud. all the scene in sharp focus. Fuji GFx 50R & Nikon 85 mm f2.8 tilt&shift. 15″ x f8 , iso 160.

Larguirucho & Hijitus (1). I placed the tripod at 1,00 meter, camera vertically, dialed 1, 1/2 of tilt and 6 degree of shift downwards, focusing to Larguirucho’s eyes (taller wax statue). I got the entire scene in sharp focus. It can be seen the little distortion of Hijitus blue hat, at the lower right corner. Fuji GFX 50R, Nikon 19 mm f4. tilt&shift, 1/30″ x f8. iso 200. 3 Stop graduated neutral density filter for the sky.

Larguirucho & Hijitus (2). Again, I change the lens for the same scene. I placed the tripod at 1,00 meter, camera vertically, dialed 2 degree of tilt downwards, focusing to Larguirucho’s eyes. I got the entire scene in sharp focus. It can be seen the difference with the former 19 mm lens composition, both in the 2 wax statues, street lamps, cars parked in the street and buildings size to the right of the scene. Fuji GFX 50R, Nikon 45 mm f2.8. tilt&shift , 1/5″ x f8. iso 200. 3 Stop graduated neutral density filter for the sky.

Clemente, one of the cartoon character of the Cartoon walking area, Monserrat, Buenos Aires, Argentina. It was applied 1 and a half swing (side tilt) to get sharp focus from Clemente’s eyes to the upper left tiny sign on wall: “paseo de la historieta”. 2 degree of shift downwards also applied.
Fuji GFX 50R & Nikon 19 mm f4 tilt&shift. 1/13 xf8 iso 100.
For more info, contact me at: jabasbus@gmail.com, or follow me on Instagram or Facebook.