

Hello everyone, my name is Andrea Livieri and I’m a portrait and landscape photographer based in Venice, Italy. I started my journey with Fujifilm cameras in 2013 when I bought my first X100S, an astonishing compact camera with fixed lens that I still use. In 2017, I made the full switch from Canon to the Fujifilm X system, and have no regrets at all. My go-to camera is the X-T2.
An important aspect of my workflow is the RAW conversion of Fujifilm RAF files. One of my secret weapons in the RAW developing stage is the superb non-destructive photo editor and organizer Exposure X3 by Alien Skin Software. I’m totally in love with it since its first release, when it was “simply” a film simulation plugin for Photoshop.
Ever since I began my career in photography, I’ve processed every single portrait (commercial works, corporate portraits, and wedding events) through Exposure. In the last three years, I started to use Exposure in some of my landscape works too.
I’ve watched Exposure grow over the years, and like how it’s now a complete, powerful, and versatile photo editor and organizer, with unique features that you can’t find in any other software on the market. Let’s take a look at what Exposure X3 offers photographers (especially Fujifilm photographers like us), both in terms of overall functionality and new updates.
Fujifilm RAF Conversion Quality
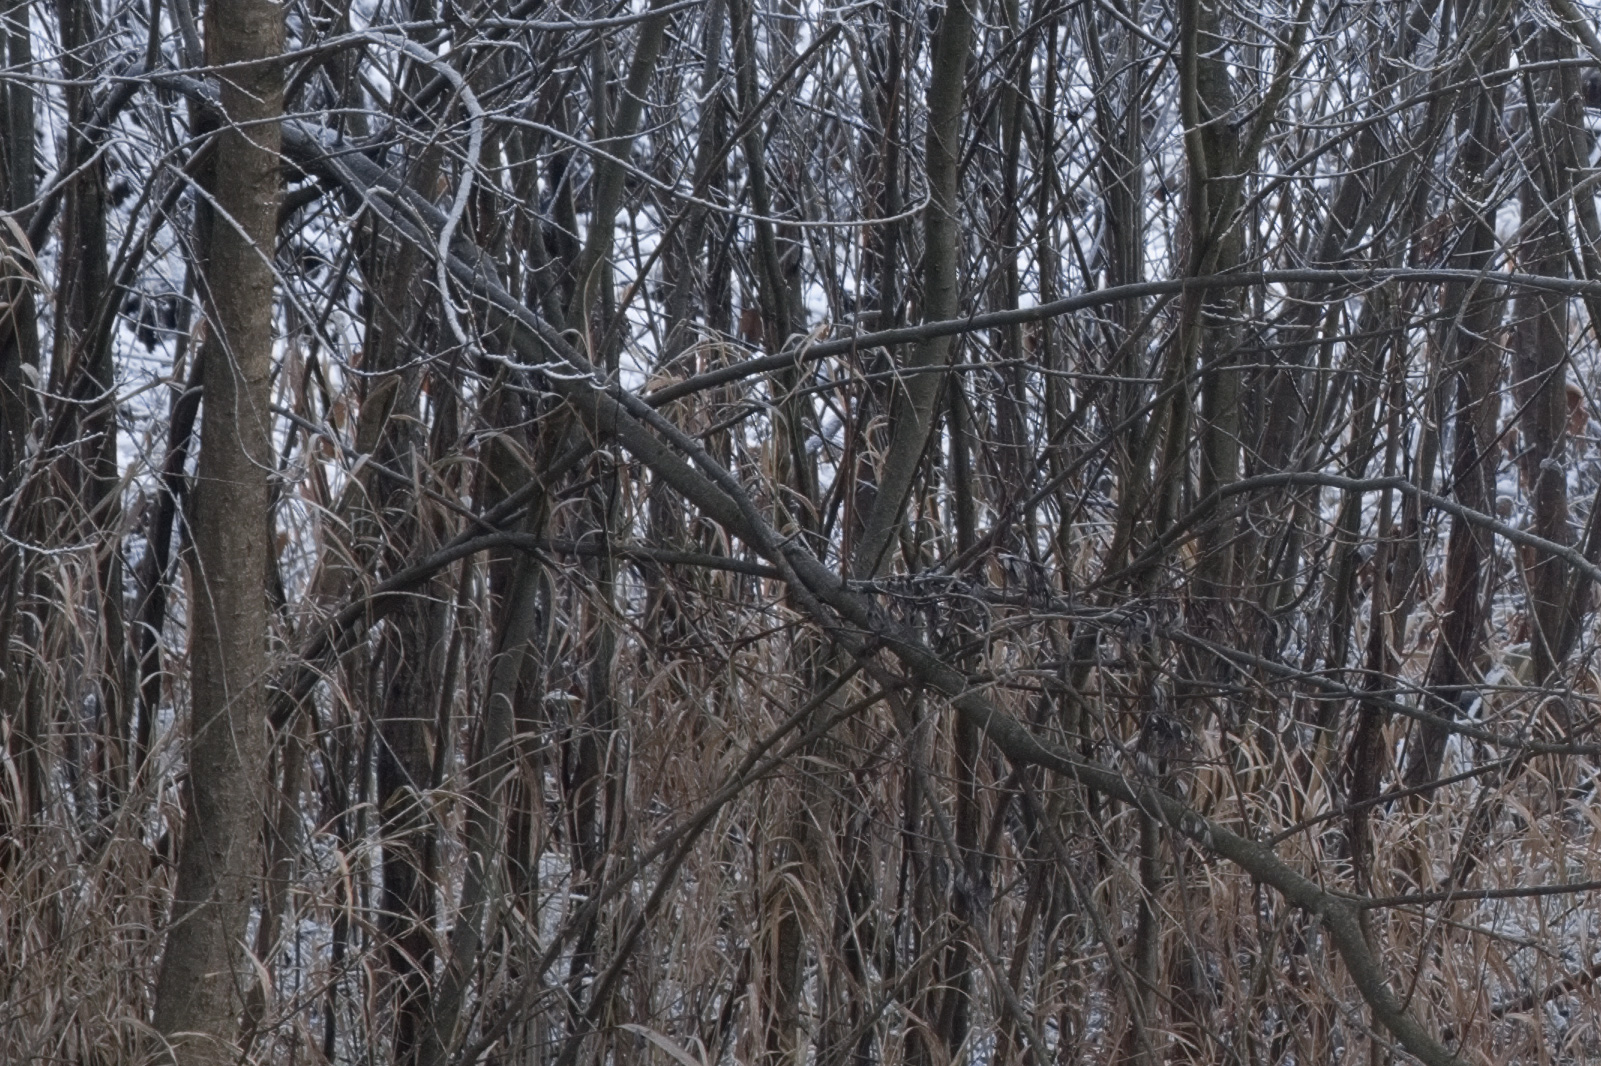
It’s pretty easy to find complaints about a “wormy” look affecting some Fujifilm files in Lightroom, especially in foliage. Fujifilm RAF files in Lightroom have a very “painterly” look to some of the fine details in the trees, obscuring how the leaves actually should appear; particularly in the Amount slider when you start to go over the default setting. I have to admit that it’s dramatically improved but not yet as good as what can be had with Exposure. The difference is nuanced, but it’s there.
The processing of any digital image requires two essential and distinct types of sharpening: capture sharpening and output sharpening. In the capture sharpening, Exposure X3 excels. The fine details rendering is absolutely gorgeous and expresses every small nuance of the image. Here’s a straight out of camera image and then two examples cropped at 100%: one from Exposure and one from Lightroom. In Exposure, the foliage is pre-sharpened very well without any artifacts.

Full view (SOOC) – Exposure X3
Crop 100% – Exposure X3 (roughly the same amount of pre-sharpening used on the next one in Lightroom)

Crop 100% – Lightroom
Exposure’s New HSL Panel and Color Filter
What I love the most in photo editing is playing with colors. The new Complete Workflow Update to Exposure X3 provides new tools to adjust hue, luminance and saturation for specific colors. Further, users can target specific colors in the images they’re processing for additional detailed adjustments. These controls respond very differently from other raw developers, and I like very much how the luminance sliders interact with colors.
Two features that I find especially helpful are the Color Filter and the three sliders in the Saturation section that enable me to adjust the saturation level separately for shadows, midtones and highlights. If you love color grading, you’ll find that these controls open new opportunities for your creative process.


Split Toning Controls in Exposure X3
One of the most useful tools that I use in my post-processing workflow is the Split Toning effect. Exposure X3 has a big advantage over Lightroom because it can filter the extreme blacks and whites. One of the main rules for a good color grading is that your blacks have to be black. The split toning module in Exposure X3 gives you the opportunity to managing the lower threshold to maintain pure blacks. My wish for future updates would be an additional slide to control the gradation of the effect around the selected luminance point.
Exposure’s Presets
Have you ever used Exposure’s presets? You can fall in love with them very easily. Exposure has an excellent list of presets that contains film emulations that span the entire history of film photography, as well as utility presets and modern looks that go beyond film. As Fujifilm users, you have a new folder in Exposure X3 with specific Fujifilm simulation profiles like the Classic Chrome, Astia, Provia and Velvia, as well as other B&W Fujifilm simulations. For portrait photography, I frequently use the Color, Vintage, and Polaroid presets. The B&W selection is beautiful as well, there are a lot of simulations from the classic films, and for creative results the infrared section is crazy good.
-

- (B&W) Daguerreotype – Sepia
-

- Kodak Portra 160NC
Local Adjustments with Layers and Masks
One of the biggest strengths of Exposure that Lightroom does not offer is seamless and very fast layering capabilities.
Exposure provides non-destructive layer-based editing that makes this application especially powerful for me. I can use layers to create a different version of a shot without having create multiple versions of it.
You can make every edit within Exposure to as many layers as you want, and you can mask out the bits you don’t want.
You can modify each mask using any combination of the brush tool, or three different gradient tools (radial, planer, and half planer). The opacity of the active tool on any mask can have its opacity adjusted independently. I think you will find that layers provide you with limitless creative choices.
Here’s a screenshot showing a number of different layers that I’ve applied to my image:

Here’s a before and after comparison of the original image and the edit I did using Exposure’s layers:

Fujifilm X-T2 (custom profile in camera flat)

Edited with Exposure X3 using layers
Image Culling
I regularly capture a lot of similar images, particularly when doing portrait photography or wedding events, so I need to be able to see which image is just a bit sharper or has a slightly better composition. Exposure X3 allows you to compare up to six images side by side, and a great feature is that when you zoom in on one, you zoom in on the other compared images in the same way simultaneously. If I zoom to 100% on an eye, assuming the eye is in a similar spot in all four images, the other three images are also zoomed in to 100% on the eye. It’s awesome and makes culling much easier.

A quick comparison of four similar images to speed up image culling.
Collections
I love to stay organized, and after the image copy stage I usually organize my photos by collections, meaning that I add images to several different groups without actually duplicating them on my hard drive. This step makes my life a lot easier along the developing process and it’s very useful for the final sharing with clients.
The screenshot below shows some of my collections, as well as the sub-collections I have created. Exposure also has a quick collection feature, when you want to add photos with a simple press of a key.

Grain
Vintage-inspired digital presets aren’t difficult to find, but Exposure takes the retro inspiration to a new level. I love the film look so much and I know how important adding grain to digital images is to achieve specific results. Exposure’s grain engine gives me some amazing options to control grain amount, strength, type, size, shadow/midtone/highlight separate amount, push processing (very cool), etc. I’m not trying to replicate the exact grain structure of real analog films, but I like to use grain as a creative add-on in the final stage, mainly in my portrait photography.
Here’s a screenshot of my settings in Exposure’s Grain panel, and an image comparison of my Exposure-edited digital image with an actual analog film image I took:


Crop 100% – Exposure’s Tri-X 400 Preset
I adjusted all the different sliders in Exposure’s Grain panel to simulate the grain of a real Kodak Tri-X 400. Below is an image captured pretty much in the same spot with a Yashica 635 6×6 using Tri-X 400 Kodak film. Both images match very closely in terms of grain.

Crop 100% – Original Kodak Tri-X 400
Lens Correction
This may appear trivial, but it’s not. Small changes can make a big difference. If you’ve never shot with a Fujifilm X series camera, you might not know that if you open a RAF file within Lightroom, Lightroom automatically applies lens correction to certain Fuji lenses, which is impossible to remove. With Exposure you can enable or disable lens correction and adjust the distortion with a dedicated slider. Sometimes in portrait photography I like to maintain the natural vignetting of the lens and customize the lens distortion, leaving the correction switch disabled.
Vignettes
A vignette is usually the final touch that a photographer applies on an image, and for me it’s crucial to be able to customize the area where I want to apply it. Exposure has a powerful Vignette panel where you can customize your vignette in creative and powerful ways. Firstly, there is the ability to move the location of a vignette anywhere within the frame. This is very handy if your subject is off centre. Secondly, besides the typical round and rectangular shaped vignettes, you can create a randomly shaped one using the Lump Size and Distortion sliders. You can alter the shape of the vignette by changing the Random Seed value.

To evaluate the vignette position, I first set the Amount slide to 100 so I can easily see where it appears in my image:

I then adjusted the sliders as shown in the earlier screenshot of the Vignette panel, to achieve this look:

Conclusion
Exposure X3 is growing at the speed of light and in my opinion is the right tool to improve your creative process. It offers tons of features that will help you to stylize your photos in a beautiful way and stay completely organized with your entire workflow. It’s intuitive to use, especially if you currently use Lightroom, and its presets and film simulations are a real bonus. That it does not require a subscription and can perform some pretty powerful edits is a good reason for you give their 30-day free trial a try.
Thanks to the amazing Alien Skin team (not all the aliens live in space!) and to the great community at Fujilove!
In closing, here are a few landscape images that I shot with my Fujifilm camera and edited in Exposure:


Disclaimer: This article has been sponsored by Alien Skin Software, makers of Exposure X3, non-destructive RAW photo editor and organizer. Alien Skin Software is a FujiLove Partner and we would like to thank them very much for their support.


