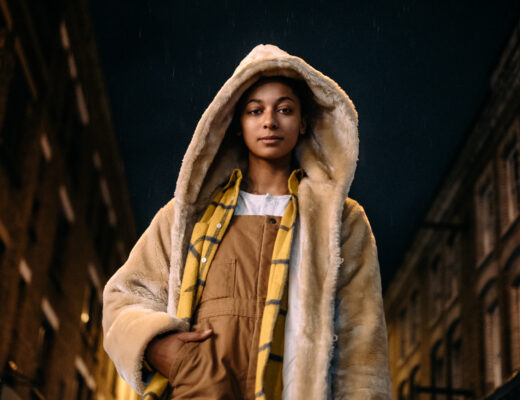
I have said before that I believe the X100 series are the perfect street and travel companions. It’s no secret that they produce some of the best quality images in a compact body from any manufacturer and offer a shooting experience that is unmatched by any camera on the market. With the X100V launching and promising to be compatible with my two favourite accessories (the TCL and WCL conversion lenses), I thought it was high time to revisit my love for this series of cameras and share it with you in the form of a few images from Tokyo.
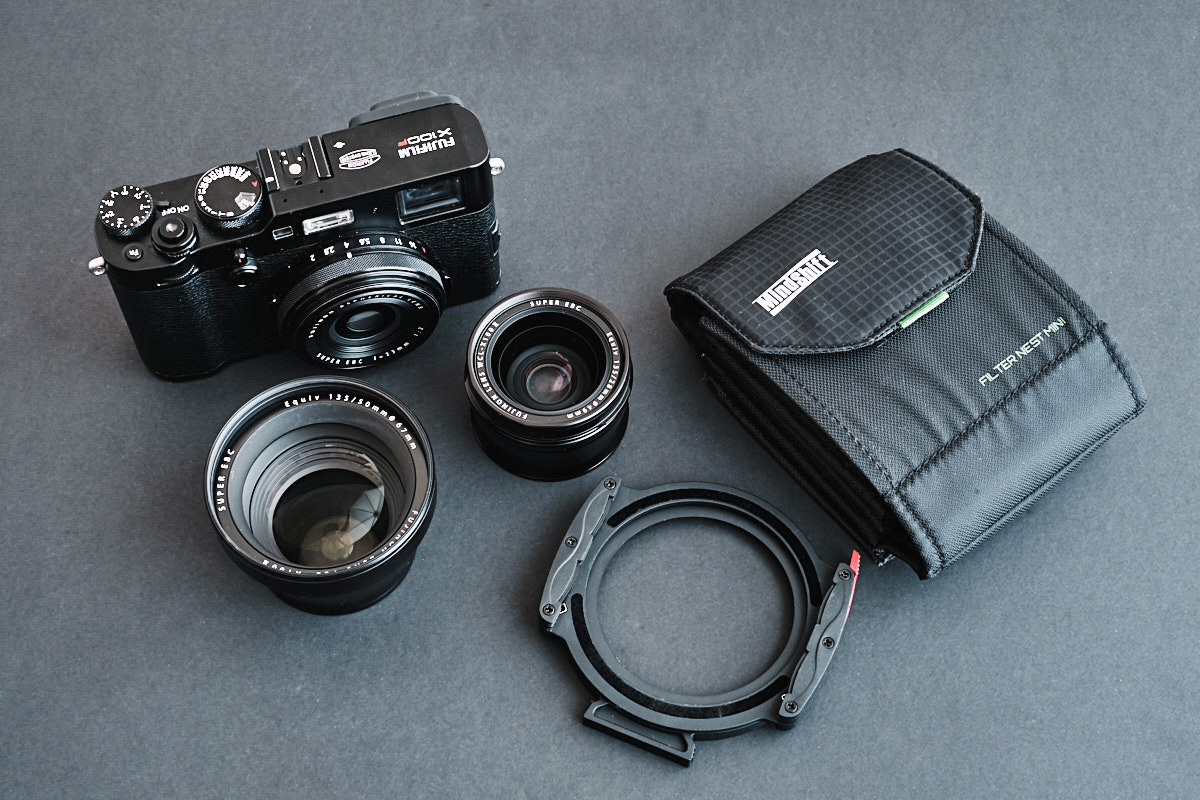
I have owned the original X100, two X100S and two X100Fs at this stage. It’s fair to say, I’m an addict. I’ve tried to get off the drug, but it’s a long road to recovery and I’m not sure I even want to get there. While I love walking around town with my X100F and nothing else, it is actually the conversion lenses that really hold me to this little beast. Even now, I make 90% of my images with the in-built 23mm lens. However, for those few times I want something wider or longer, having the almost weightless conversion lenses at hand really makes the X100 kit for me.
On a recent trip to Japan, I took only this small kit and Haida’s new M7 filter holder with a couple of ND filters just in case I wanted to make some long exposures. This is another reason the X100 series cameras are so great, the accessories are so small! Perfect for this visit, since it was a trip with my wife and not a photography trip.
However, I knew there were a couple of things I regretted not photographing last time I was in Tokyo and this informed my kit this time around. I have a fascination with the train and subway system, thus I wanted my small and discreet kit. I also knew that there was potential we might decide to visit Mt. Fuji if we could get a bus on one of our free days. So, this meant taking both conversion lenses, a small tripod, and my Haida M7 filter kit. Let’s take a look at a few examples of this kit in action.
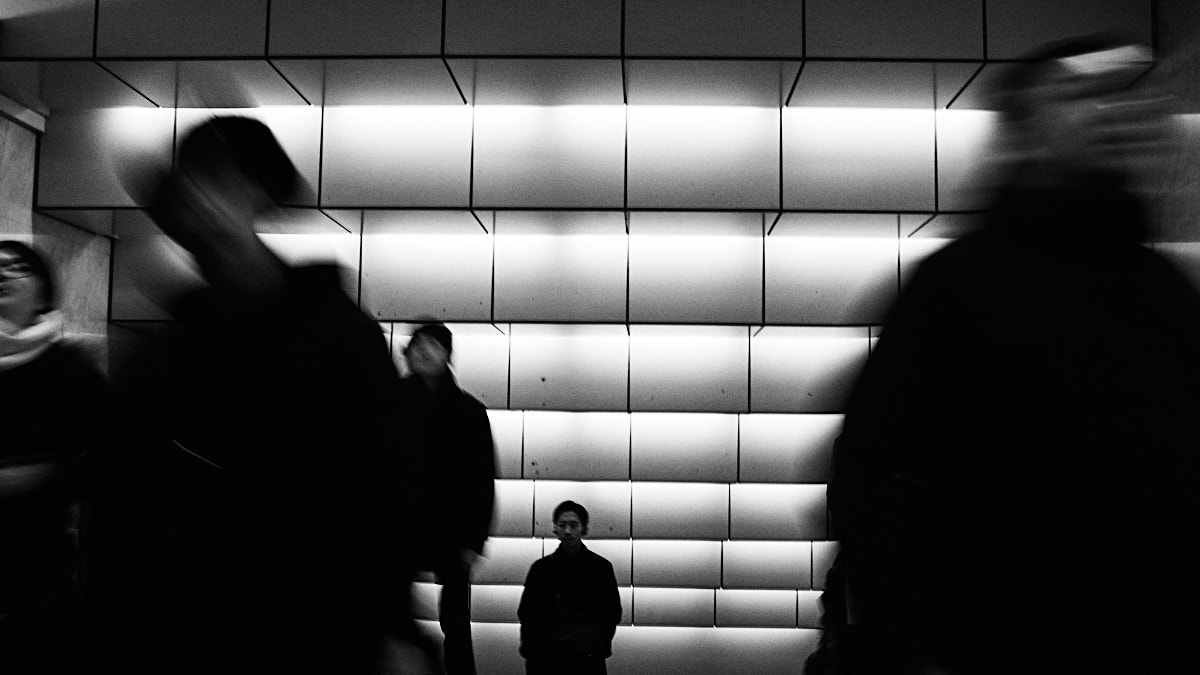
To get us started, let’s take a look at a shot of the Tokyo trail system. Somewhere around Shinjuku, the world’s busiest commuter station, was bound to be a spot where I would see a few trains. So, one evening as my wife went shopping for gifts for her family, I did a quick loop around the station photographing the commuters in the city lights. Eventually, I came across this corner near Kabukicho where I could see the trains leaving every minute or two and had plenty of foreground traffic with some city to hold background interest. All in all, a fairly typical Tokyo image, but one I’d never photographed.
I didn’t have my tripod with me, so I took out my Manfrotto Pocket Tripod (I guess technically it’s a tripod?) and set up the camera on a small brick fence on the corner of the road. This would allow me to make long exposures. From there, I set my ISO to the base of 200 and played with the aperture until I got a level of blur I was happy with. It turned out that 5 seconds would get me a significant amount of traffic coming if I timed the traffic lights with a passing train. If there’s one thing I could change about this image, it would be making it around an hour ealier when the sky was still a deep blue. That would give me more detail in the buildings, road, and sky. Unfortunately, I didn’t discover this scene until after dark.
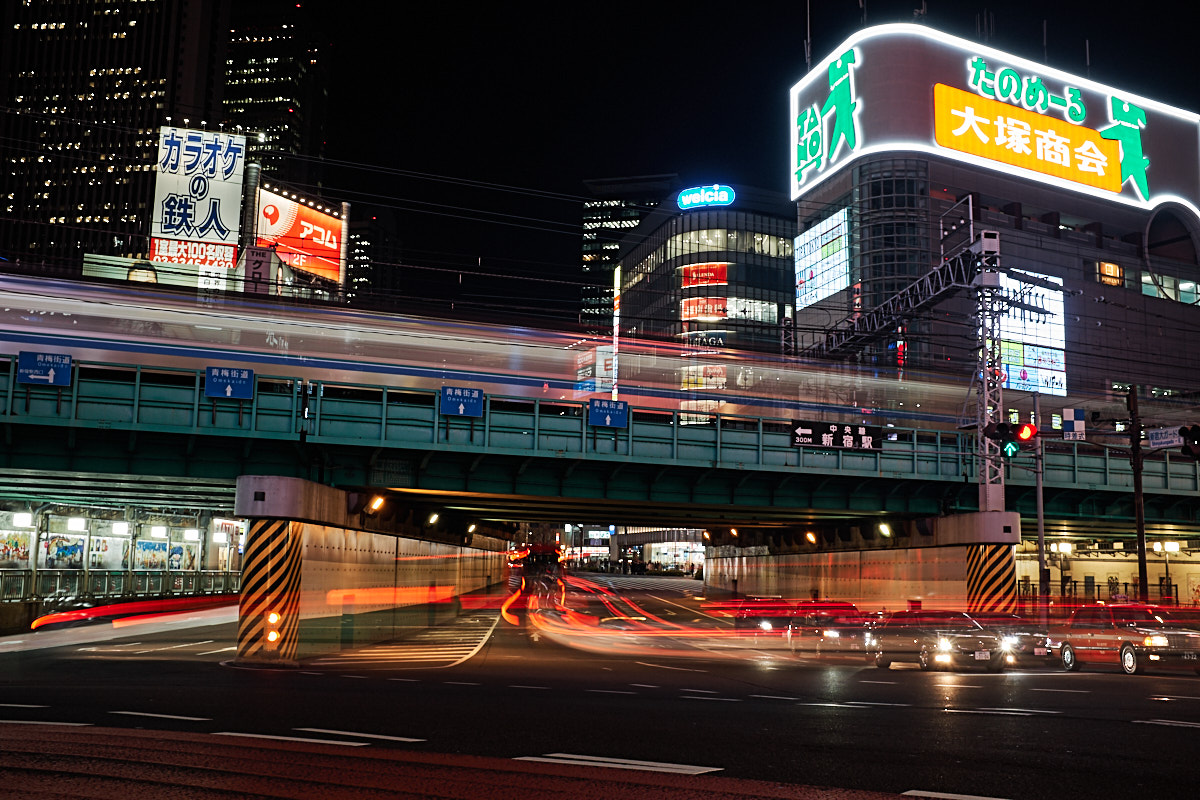
X100F + Manfrotto POCKET Tripod – ISO200, f/11, 5 seconds
Then it was off to catch my evening bus to Kawaguchiko. The next morning, I’d fulfill a boyhood dream to visit Mt. Fuji. On four previous trips to Tokyo, I’d always missed out and I really wanted this to be the one. For this morning at Mt. Fuji, I wanted to travel as light as possible. This wasn’t a planned trip (we’d booked it just before dinner), so I wanted to leave all my clothes, chargers, and everything else I had with me in Tokyo. I’d be gone for less than 24 hours. I walked out the door with nothing but my camera satchel and Manfrotto BeFree tripod. This tiny kit would be all I’d need.
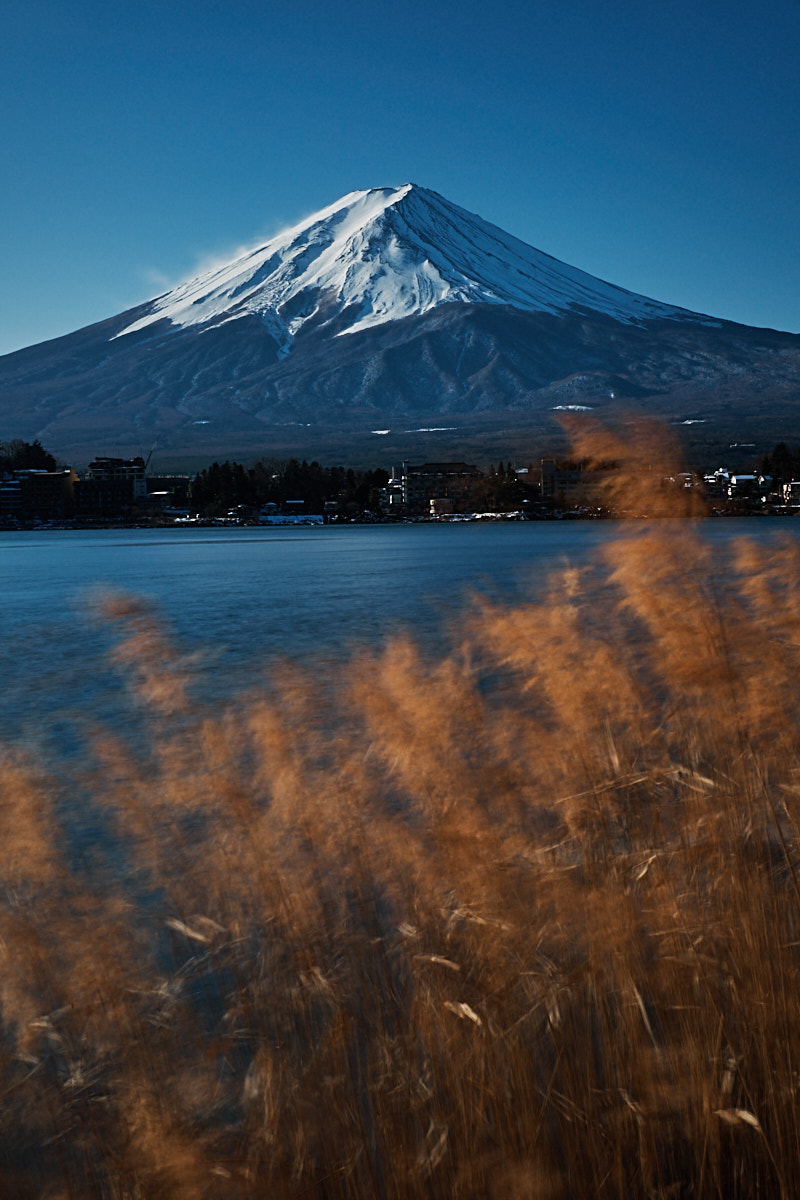
As I walked across the bridge to find my vantage point at 5:30am the following morning, I caught my first glimpse of the peak and the excitement rose. I hurried across, being careful not to slip on the ice-covered ground. For the first shot of the day, I wanted to get the classic horizontal shot of Mt. Fuji with the lake. We didn’t have many clouds around, so the sky wasn’t something I was worried about. Looking for some foreground interest, I came across the little jetty I’d seen in so many images. This would be my first scene as the sun rose.
I wanted to give a little more prominence to the lines leading to the mountain than the 23mm lens would afford me, so I attached the WCL conversion lens. Framing with some of the trees, hills, and finally the jetty pointing you at the peak, I made a few frames. In the end, though, I went with a frame where I used the Haida M7 with a 6-stop ND filter to give me a 30-second exposure. This smoothed out the water somewhat and allowed us to focus on the mountain more effectively.
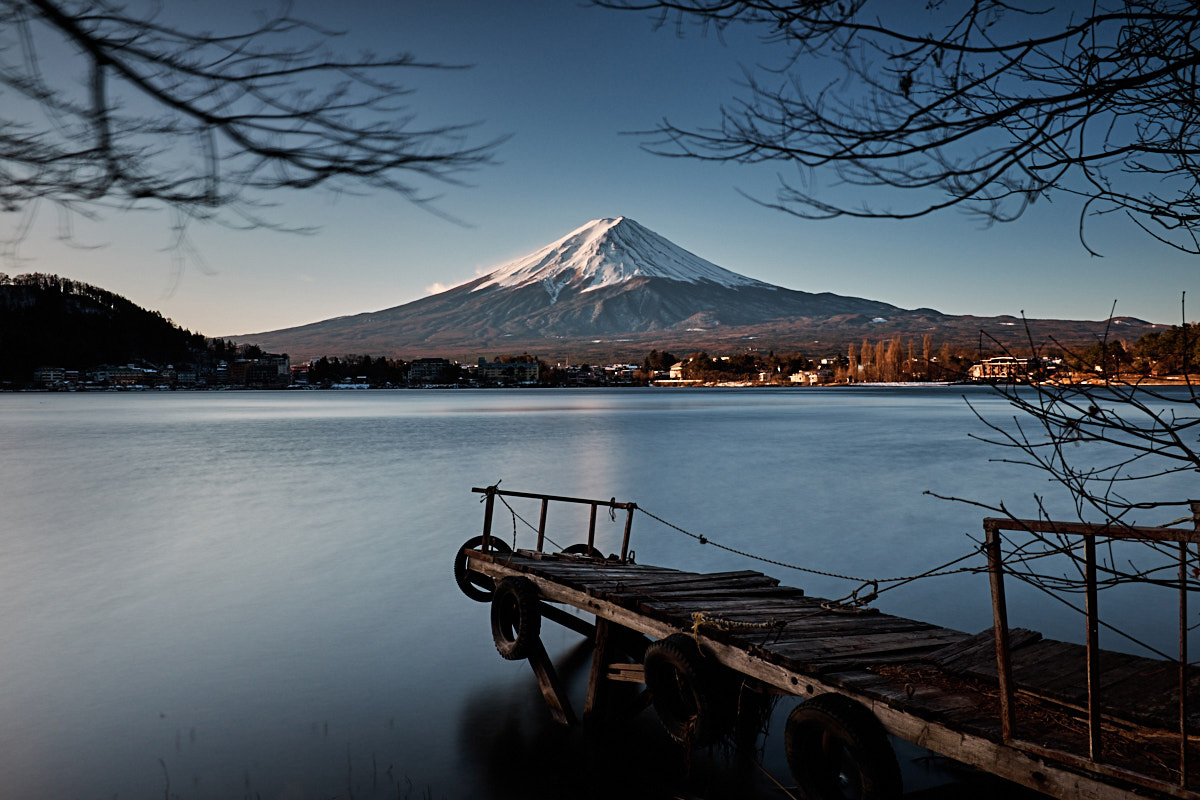
X100F + WCL, Haida M7 + 6 Stop Red Diamond ND, ISO200, f/16, 30 seconds
For my next frame of Mt. Fuji, I wanted to show the grasses on the shoreline swaying in the breeze, but I’d need a longer shutter speed than what was possible with just the in-built ND filter. The sun was up now, so 3 stops of ND simply wouldn’t be enough. I also wanted to deepen the contrast between the sky and the mountain while reducing the glare on the snow. With the direct sun hitting the peak, the snow was much brighter than everything else in the scene. I also wanted to make sure only the mountain and grasses were the focus of this image, so I attached the TCL to bring my framing in to a 33mm focal length.
With these in mind, I took out my Haida M7 kit and added a polariser to the lens. Dialing this in gave me a pleasing depth to the blue sky and prevented the snow from blowing out too much. However, even with the built-in ND filter of the X100F, I was only able to achieve approximately 1/15 of a second as my longest shutter speed at f/11. While this would have been enough in a particularly vigorous wind, we had more of a constant breeze at the time I made this image.
So, I took out my 10-stop ND filter and placed it in front of the polariser. After the in-built ND filter was switched off, this gave me just over a 5-second exposure. To minimise the possibility of camera shake, I set a two-second timer and made several frames of this composition. In the end, all were sharp and I chose the one with the most pleasing foreground blur.
X100F + TCL, Haida M7 + 10 Stop Red Diamond ND + CPL, ISO200, f/11, 5.3 seconds
After this quick journey out to the countryside, it was back to the big city to meet a friend for dinner. On the way, though, it would be wrong not to make a few images in and around Shinjuku again. For the time being, I’ve settled on the below image as being my favourite from that set. The 23mm lens is just wide enough to give a good sense of depth and the X100F is easy to handhold at slower shutter speeds thanks to the leaf shutter.
X100F, ISO200, f/8, 1/8 second
I hope you’ve enjoyed this little journey. I’m very much looking forward to seeing what everyone is able to create with their new X100Vs. Will you be upgrading? Keeping your current X100?