As many of us are aware, Capture One have launched their complete support for Fujifilm cameras. Most surprisingly, this even includes the GFX line of cameras. Several versions of the software are available ranging from the free version supporting only Fujifilm cameras to a fully featured version supporting cameras from various manufacturers. In version 12, support was added for Fujifilm’s Film Simulations, so now we have a workflow that is Fujifilm specific!
Capture One takes a slightly different approach to Digital Asset Management (DAM) than many other software packages, so we’ll begin there as it is a source of confusion for many. The two basic ways you can have Capture One take care of your files are called Sessions and Catalogs. Catalogs are a familiar way of working for many but lack some key features that Lightroom and others have, such as easily importing and exporting between catalogs. Sessions, on the other hand, are self-contained folders that are designed to keep a specific shoot or project neat and tidy. Thus, the main difference between catalogs and sessions for our purposes is their intent. A catalog is designed more as an archive, whereas a session is designed to be a contained unit of a particular project or session.
Today, we’ll focus primarily on the Session workflow, which is how Capture One was originally designed. If you are interested more in how the catalogs work, the Capture One YouTube channel has an excellent video on the differences between the two. The basic workflow of sessions is create, import, select, post-process, export, backup. Within these, there are multiple ways to achieve most steps and plenty of customisation to be had along the way. Today’s focus will be getting the images into Capture One, organising them, and getting them out for delivery.
Step 1: Create a New Session and Import Images
When you create a new Session (CTRL<CMD> + N), you’ll be presented with a dialog that allows you to customise the folders Capture One will automatically create for your workflow. These are based around a typical studio workflow and are designed to keep an entire project self-contained. We’ll be using this structure in a more generic way, so we can leave the values as they are. Just give the session a name and place it in the physical location on your hard drive that you would like to store it. Capture One will then create its session file and 4 primary subfolders in that folder. Now we’re ready to bring in some images.
There are a few ways to bring images into a Capture One Session, but the simplest and easiest way to keep everything self-contained is by placing them in the “Capture” folder (one of the 4 subfolders inside your session folder). You can do this via tethered capture, or simply dragging and dropping existing files into the Capture subfolder. Note that this is not a recursive operation, so Capture One will not watch additional subfolders within the Capture subfolder. Those need to be added manually as Session Favourites. For now, let’s keep it simple and have all images we wish to import placed in the Capture subfolder.
Capture One is set to automatically watch that folder and will begin bringing in images immediately and generating previews. For Lightroom users, here is where you will notice an extreme difference in Capture One. This process is exceptionally quick.
Step 2: Organise your Files
If you’re containing a single set of images within this Session, your next step is very straightforward. You need to select the images you want to post-process. Working in the way Capture One would like you to, you can make those selections using CTRL<CMD> + J. This will send (physically move on disk) the currently selected image to the Selects subfolder that was created with your Session. However, that does mean that in order to remove that from the selection, you’ll need to go into the Selects folder and move it back to the Capture folder. This also makes it difficult to compare a selected image with a non-selected image as Capture One does not allow you to show images from multiple folders at the same time.
It is for this reason that I choose to use colour tags to rate my images. You could also use star ratings to the same effect. This way, my images stay in the Capture folder and I can choose to show either my selection or the whole collection at a moment’s notice using filters to make comparisons if needed. For me, this is a more efficient way of working.
If you’re planning to use Sessions more like Lightroom’s catalog system (multiple folders of images in one Session), you can achieve a similar result by using Session Albums. After your images are imported into the session (Step 1), create a new Session Album and drag the images you want in that album there. This will allow you to quickly filter to images from just one set. It is important to note that these albums are just references within Capture One. You are not physically moving files on disk by doing this. From here, you can follow the steps above to make your selections within those Albums.
Step 2.1: Deleting files
If you like to clean up your rejected images as you go, there are two ways to delete files in Capture One Sessions. You can physically remove the files from disk by using ALT<OPT> + DEL. This deletes them the same way your operating system does. You can also use CTRL<CMD> + DEL. This will move them to the Session Trash subfolder. This is great if you may want to retrieve them later. You can also permanently empty this trash folder at any time (recommended when you get to the backup stage as you’ll likely no longer want those files).
Step 3: Post-Production
Here again, there are myriad options for all types of photographers, but we’ll focus on the new Fujifilm specific option in Capture One 12: using Film Simulations.
In Capture One, basic interpretations of raw files are set in the Base Characteristics tool. If you don’t see this in any of your tabs, right click in an empty area to add the tool. Once your camera is selected in the ICC Profile (usually done automatically), the Curve list will populate with all of the different Film Simulations Capture One Supports for your camera.
The first item in the list is “Auto.” This will automatically apply the curve for the Film Simulation you used while making the photo if it can be detected. There are also Film Extra Shadow, Film High Contrast, Film Standard, and Linear Response curves in the list. These are Capture One’s built-in interpretations of your Fujifilm raw file.
In order to select a different film simulation from the one you were working with at the time of capture, all you need to do is open the drop-down menu and click it. It is always a good idea to check this value as an initial step in your post-production workflow. This is especially true if you work with Capture One Styles as most of these will not select a new Curve as a base for their colours, so your Styles may not look as you intended them (consider if you were working in Acros while photographing and then apply what should be a colour Style over the top – you will simply get a tinted monochrome image).
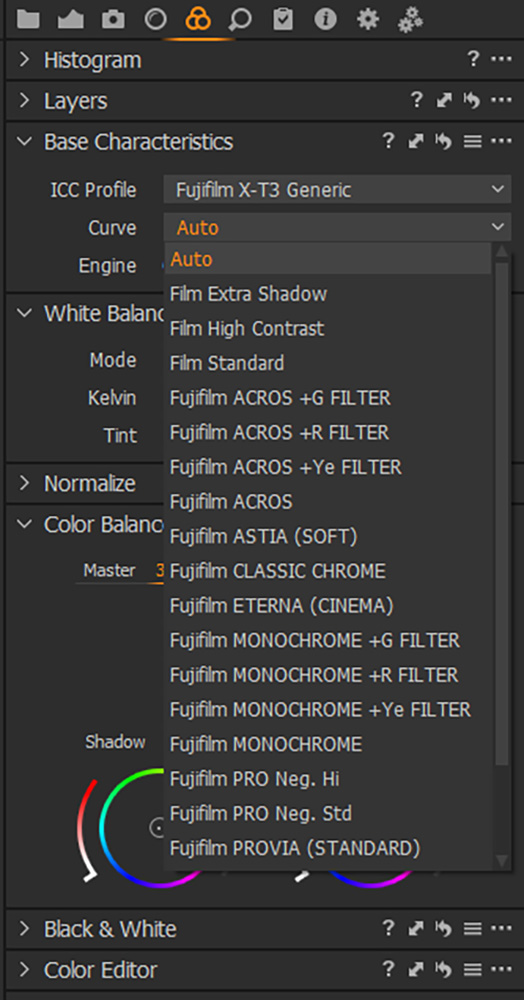
From my tests, these curves are extremely close to Fujifilm’s own Film Simulations. Across the board, Capture One’s curves seem to produce a slightly brighter, slightly more saturated look. However, small differences like that are easy to correct if you so desire.
Step 4: Exporting from Capture One
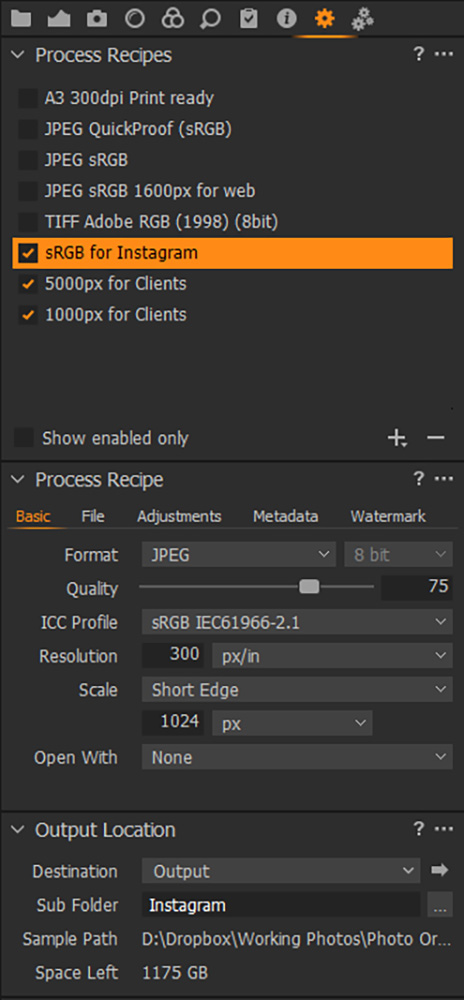
There are two basic ways to get images out of Capture One for web, print, or delivery. The first is using the Export Variants option. This is great if you’re only exporting a single set at a time and only need one output file. For example, if you want to export both social media resolution and print or archive resolution at the same time, Capture One will override your first export with your second. So, we’ll focus on the more robust tool, the Process tool.
By going into the Process tab, you are given all of your export options and can make as many presets (Process Recipes) as you would like (these can be selected simultaneously as well). Once you click process, everything is exported using all the Recipes you have selected. A good example of how to use this is my family session deliveries. I have two Recipes set up that export two different resolutions (smaller files for online use and larger ones for print use). These are both set to export to my Session’s Output Location sub-folder. By storing them here, they’re also contained within the Session folder. This means when I back up, the exported files will be backed up as well. If a client asks for the files down the road or I want to blog the session, I don’t even need to open Capture One in order to access them. I already have pre-made jpegs ready for delivery or online use.
Step 5: Backing up a Session
This is where Capture One sessions are great. If you noticed, I encouraged you to use Capture One’s pre-made folders all the way through this workflow. That way, when it comes to backup time, you can simply drag and drop the Session folder onto your preferred archive drive and everything from your imported files to your delivered jpegs will be backed up in one self-contained folder.
As you can see, Sessions are a great way to work with your Fujifilm images. With Capture One’s implementation of Fujifilm’s Film Simulations, it has become a great choice for Fujifilm photographers now. Please let me know in the comments if you have any workflow or adaptation issues with Capture One. I’m happy to try and answer your questions! If you have any suggestions for Capture One users, drop them below as well! We’d love to hear how you make use of this software.


