As a travel and landscape photographer, I most often capture photographs with an extended dynamic range. From my perspective, the use of advanced masking is essential when editing landscape photos and I use it extensively in different applications.
Disclaimer: This article has been sponsored by Exposure Software, makers of Exposure X5, non-destructive RAW photo editor and organizer. We would like to thank them very much for their support.
My experience with advanced masking predates my photography days. Before switching to photography, I spent years as a graphic designer working mostly on broadcast projects. A big part of my job was to create complex transparency masks in Photoshop (we called them alpha masks) so that animated backgrounds could be overlaid with semi-transparent images.
When I switched to photography, my first Canon DSLR had an awful dynamic range. To capture the full range of light of landscape scenes, I had to bracket everything and use the HDR technique to merge multiple brackets together. This is when my understanding and experience with advanced masking in Photoshop came in handy. Instead of relying on HDR programs, I blended multiple images together using transparency masks.
Today, it is much easier to deal with advanced masking in Photoshop, which is also known as luminosity blending. There are plenty of solutions available like the Raya Pro Photoshop panel, which I’ve used for years and find to be very effective.
The drawback of Photoshop masking is that you have to leave the nondestructive RAW editing workflow by rasterizing the image and then manage huge PSD files.
Advanced Masking in RAW Editors
When Adobe announced their new Range Mask tool in Lightroom Classic a few years ago, it did not generate much excitement. But I was probably the happiest photographer that day because I waited for years for this feature.
The Range Mask tool allows you to create sophisticated masks based on Luminosity or Color and target the specific areas of the image for precise selective editing. But, since Lightroom does not have layers, the Range Mask implementation was awkward. Plus, you could not combine Color and Luminosity for mask creation. You had to choose one or the other.
Nevertheless, it was a groundbreaking feature for my workflow. It allowed me to prolong editing in a nondestructive RAW workflow even further.

Exposure X5
Since Adobe transitioned to a subscription model, the most popular request I’ve received from my blog readers is to help them find a Lightroom alternative.
Earlier this year, I downloaded 12 different RAW editors and tested them against Lightroom to determine if there was a true contender. The biggest surprise for me was Exposure X4, an application I did not know much about. It was, by far, the fastest and most responsive editor with a simplified and logical workflow. It is now one of the programs I most often recommend.
When advanced masking was listed as a new feature in the upcoming release of Exposure X5, I did not pay much attention because I did not expect much. But I was wrong.
The 3D Color masking functionality exceeded all my expectations.
The functionality allows you to create masks based on Hue, Luminance, and Saturation. Plus, you can use them simultaneously to create the most sophisticated masks.
You also have the Range and Feather sliders for precise blending.
One of my favorite features of the 3D Color is the ability to detach the entire panel from the Exposure X5 interface and use it independently in a separate window. When I work, I always resize the Color Constraint panel and move it to my second monitor to make it much bigger for more precise control.
Let me show you how I use the 3D Color functionality in my typical RAW editing workflow.
My Landscape RAW Editing Workflow
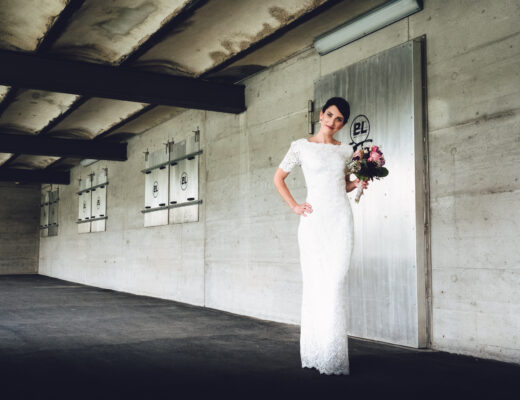
Here is the photo I took in the vicinity of Montreal at the Saint Lawrence River at sunset.

I shot with Fujifilm X-T2 and a Fujinon 10-24mm lens in RAW format.
It is hard to believe that today I can use a camera with an APS-C sensor to shoot directly into the sun and not have to bracket or use HDR processing. The quality of images that Fujifilm produces is scary.
Fujifilm X-T2 Shooting Technique
I used my standard technique to get the best possible exposure.
- First, I pointed the camera in the direction of the sun and pressed AE-L to lock the exposure.
- Second, I pressed the front customizable button to activate the Histogram.
- Third, I used the front command dial to increase the exposure compensation to ensure the image was as bright as possible without clipping the histogram.
- Finally, I pressed the shutter.
It is always the same technique for me because it produces reliable and predictable results.
Exposure X5 Advanced Masking
Here is the photo straight from the camera.

The key to producing the final image was to separately target the red and orange highlights in the clouds and the blue hues in the rest of the sky.
I achieved this with the help of the 3D Color tool found under the Color Constraint panel in Exposure X5.
Step 1
To start, I used the same routine I perform on all my landscape photos.
I opened the shadows, recovered the highlights, and boosted the contrast, saturation, and vibrance.

Step 2
I created a new layer of Sky Highlights. To activate the Color Constraint panel, I selected the mask icon next to the layer thumbnail.

I detached the panel from the user interface (UI), selected the color picker next to the color wheel, and clicked on the sky highlights area of the image.
Next, I customized the Sky Highlights mask by adjusting the Luminance and Saturation sliders.
I wanted to first target the colors from yellow to purple to ensure I covered the entire range of highlights.
Second, I targeted the bright areas of the highlights with lower saturation values.
Here are the settings I used for the Sky Highlights mask:

I then used the Color Filter to warm the highlights and boost the saturation.

Step 3
I used a similar routine to create a Blue Sky layer to target the less saturated and brighter areas of the sky.

Once again, I started with the color picker and selected the color range. I used the Luminance and Saturation controls to target the desired areas of the sky.
Below are the settings I used for the Blue Sky mask:

Final Step
At the end of processing, I jumped to Photoshop to clean up the image by removing any distractions in the foreground and masking the unwanted lens flare.
I also used Photoshop for advanced sharpening and noise reduction.
That was it.

Final Thoughts
I really appreciate it when software developers give photographers advanced tools for selective editing. We might not use them on a daily basis, but it is good to know that they are always available when we need them.
The 3D Color masking is one of those advanced tools that drastically extends the options for selective editing in a nondestructive RAW editing workflow.