In a recent wedding I shot, I was asked to set up a photo booth. The idea was to have guests take photos, unassisted, with fun props like hats, moustaches and all kinds of crazy accessories, while the party went on. Guests could have their photos printed on the spot, and a blank guestbook was available so they could attach their photos with some words for the happy couple. The photos needed to be available in digital format, so simply using an Instax camera wasn’t an option.
This is a guest post by António Jorge Nunes, award-winning photographer based in northern Portugal.
Would you like to write about your photography and share your images with the FujiLove community?
Go ahead and send a brief description of your article idea and a couple of samples of your work to
contactfujilove@gmail.com.
As I had to take a flight with all the gear, keeping it light and small was a must. After putting some thought into it, this is what I came up with.
GEAR
I’ll list all the gear I used and then explain how it was all setup.
The photo booth
• Fuji X-E2
• Fujinon 18-55mm F2.8/4.0 R LM OIS
• Fuji CP-W126 DC Coupler
• Fuji AC-9v
• 2 x Light stands with speedlite adapters
• 2 x White umbrellas
• 2 x Yongnuo YN-560 MkIV speedlites
• Yongnuo YN-560 TX Transceiver
• Yongnuo RF-603NII Transceiver
• Fuji X compatible 2.5mm shutter release cable
• Manfrotto BeFree Tripod
• Toshiba FlashAir Wi-Fi enabled SD card
• Batteries, batteries, batteries…
• Gaffers Tape (optional)
• Sekonic L-308S – or any Incident light meter (optional)
Printing
• Mobile phone / tablet (I used an Android, but iOS or any platform the Toshiba FlashAir App supports would work, too)
• Canon SELPHY CP-910 for 10x15cm (4″x6″) prints or Fuji Instax SP-1
Set-up

Yongnuo YN 560 IV
The photo booth allowed for individual or small group photos. Given the area (around 4x4m / 12x12ft), I decided to go with two Yongnuo YN-560 MkIV speedlites because they are light, powerful, reliable and inexpensive. They were powered by Amazon 2500MAh AA batteries, which lasted around 300 photos per set.

WT-802 Light Stand
The YN-560 Mk IV have built-in transceivers, so no other gear is needed to trigger them remotely other than a transmitter (like the YN-560 TX as explained below).
The flashes were mounted on small studio light stands with speedlite adapters so that the flashes could be set up at the desired height. White umbrellas were attached to diffuse the light.
The light stands were cheap, small and light enough to carry in my luggage. While their construction quality wasn’t great, they served the purpose well.
Camera
I used my beloved Fuji X-E2 for the booth, with the Fujinon XF 18-55mm F2.8-4 R LM OIS lens. In my tests, the X-E2 worked reliably with the Toshiba FlashAir Wi-Fi SD card as described below in the Printing section.
As the camera is used on a tripod, OIS should be turned off.

The Fuji X-E2 and Fuji XF 18-55mm F2.8-4 R LM OIS
Unlimited Battery/Power
Having to swap batteries to keep the camera on for several hours would have defeated the idea that the whole setup should be as autonomous as possible. Therefore, I used a Fuji XP-W126 DC coupler, which is basically an adapter shaped like the WP-126 battery that the camera uses, and can be connected to a power adapter (Fuji AC-9v). The Fuji AC-9v power adapter, in turn, connected to a wall power socket, thus keeping the camera on with unlimited power.
-

- AC 9v
-

- CP W126
Triggering / Taking shots
I wanted the guests to be able to take the photos themselves, so I needed some way for them to control the camera remotely. For this, I kept a small Yongnuo RF-603NII Transceiver on the props table with an instruction sheet so anyone would know what to do. Basically, the instructions were:
1 Pick up the remote
2 Position yourselves on the line
3 Act awesome
4 Press the button to take a shot
5 Drop the remote where you found it
and, well, it worked 🙂
So, I knew how the guests would take the shots. Now I needed to figure out how to trigger both camera and flashes together.
The YN-560 TX transceiver was mounted on the X-E2 flash shoe with Fuji X compatible 2.5mm shutter release cable connecting to the camera remote trigger port.
When someone pressed the shutter button on the small Yongnuo RF-603NII Transceiver, the YN-560 TX transceiver would receive the shutter signal, and then trigger the camera via the cable and the flashes through the built-in radio system. Note that the RF-603 NII has two working modes, TX (transmitter) and TRX (transceiver). For this to work, it has to be set to TRX or the camera won’t trigger.
-

- The X-E2 connected to the YN-560TX
-

- Yongnuo YN 560 TX
-

- Fuji X compatible 2.5mm shutter release cable
-

- The RF-603 IIN, which should be set to TRX
The YN-560 TX is able to control all the settings (zoom, power, etc.) on up to three groups of speedlites with different channels. The YN-560 MkIV have built-in transceivers, so no further setup is needed. Set the flashes to the channel you want, sync with the YN-560 TX, and you can fire or change settings on both flashes from the YN-560 TX itself, which is practical as you can adjust settings without ever leaving the camera.
The camera was set with a 2 second self-timer at F8 (to allow a relatively safe DOF for group shots), 1/60 and ISO 1600. The flashes were set to 1/2 power. To get these numbers, I used an incident light meter (trial and error being the alternative). Depending on the space you’re in and light/background positioning, you may get different numbers. After choosing the camera settings, I took several measurements, changing the flash power until I got the correct exposure. If, for some reason, you max out the flash power (1/1 – full power) and still don’t get a correct exposure, you can either open the aperture (say, F5.6) or increase the ISO (say, ISO 3200), thus increasing the exposure – but this is something for another tutorial.
I shot in JPEG only as the photos were being transferred to an Android tablet, and no careful editing would be done on these files at a later time. Gaffers tape was put on the floor so people would know where to stand.
We went with the plain wood background available in the room, but adding a customized one would be as easy as hanging it behind the scene.
PRINTING
Having guest take shots while simultaneously transferring the photos to a phone or tablet for quick editing and printing was another challenge. The XE-2’s Wi-Fi system is a great feature, but, unfortunately, it doesn’t “multitask” – in truth, the connection isn’t stable enough anyway – so it was not a viable solution.
After some research and testing, I went with a Toshiba FlashAir Wi-Fi SD Card. It recorded the shots and also served as a Wi-Fi hotspot, allowing me to not only transfer shots, but also connect the Canon SELPHY CP-910 printer via Wi-Fi for printing on the fly.
Using theFlashAir App for Android is straightforward. You connect to the card and immediately see every file saved on the SD card. You can then transfer the files to your phone/tablet and do what you want with them.
As people came to ask for their prints, I’d transfer the file(s), quick edit them on Snapseed (basic adjustments and cropping if necessary) and then print them via Wi-Fi. As the camera, phone/tablet and printer were all connected via the card’s Wi-Fi hotspot, it was rather painless. It also proved to be very reliable and worked flawlessly for more than 6 hours.
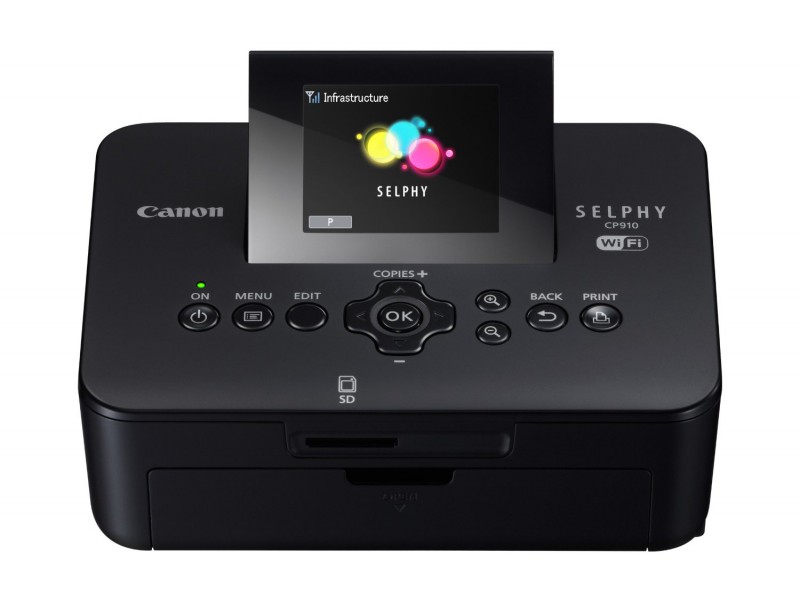
The Canon SELPHY CP-910 is a dye-sublimation printer that delivers good prints for this kind of relaxed shooting. Since it works without inkjet cartridges, there’s no potential for clogging, which makes the whole process cleaner and less error prone. It uses the SELPHY Ink/Paper Sets – when you run out of paper, you run out of “ink.”
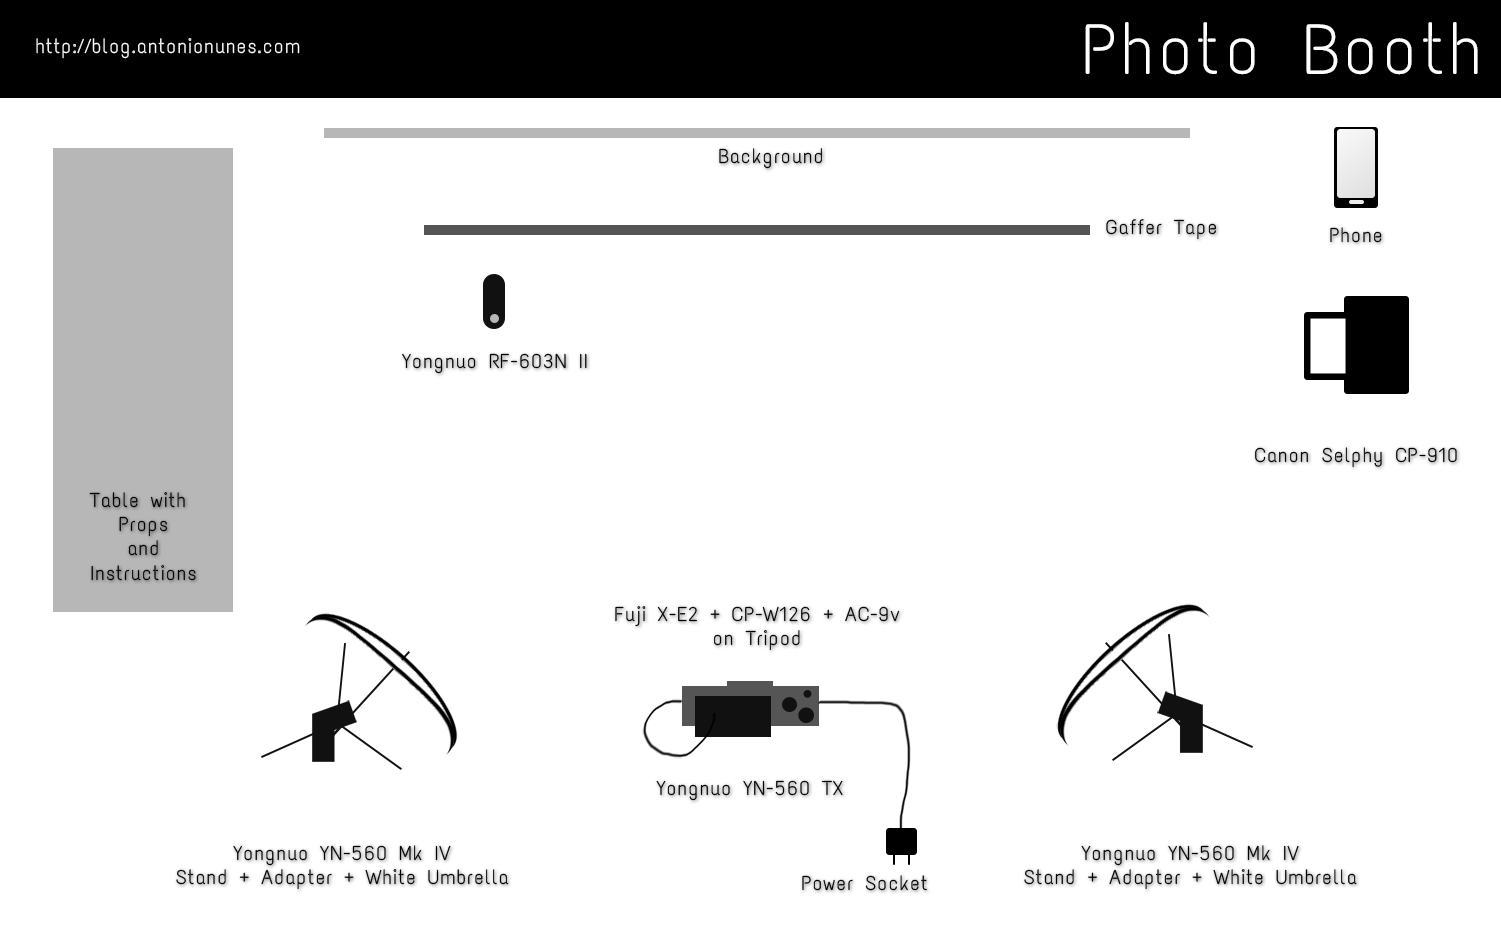
Here’s a complete schematic of the whole setup:
How it turned out
In a sentence? It was lots of fun.
Guests really got into the fun and silly self-portrait thing, and the results were hilarious. Also, in the end, the Bride and Groom had this cute book full of happy shots and warm words, which is something I’m sure they’ll treasure.
I hope this gives you some ideas on how you can put together a similar setup and have fun with your own photo booth, whether it’s for a wedding, birthday party or just for some family fun. ????
If you have any questions feel free to drop me a line.
António Jorge Nunes is an award-winning photographer based in northern Portugal. He specializes in fine art, cinematic and documentary photography, and is the co-founder of 1000imagens (ThousandImages), Portugal’s oldest online photography community. His work and contact are available through his website at antonionunes.com.