I would like to start off by clarifying what we commonly understand panoramic photography to be. Panorama photography is a technique that enables us to capture an image with an elongated field of view, approximating or greater to that of the human eye. This is widely considered to be around 160° by 75°, which equates to an aspect ratio of 2:1 or an image that is at least twice as wide as it is high. Some panoramic images are 3:1, 4:1 and larger, sometimes even covering the full 360° field of view.
The above image of the Trevi Fountain in Rome was the first stitched panorama I attempted with my original X-E1 and XF 14mm lens.
Fuji X-E1 and XF 14mm lens. Exposures 2.5 seconds, f8 and ISO 200 consisting of 8 images.
While there are a number of different ways to produce a panoramic image, I’m going to tell you how I approach this subject, specifically using my Fuji X system. First of all, in terms of taking the image, I use a specialist panorama head that rotates around what is called the nodal point, to capture multiple images of the subject. By rotating around this nodal point, we avoid parallax error (where there is a change in the apparent position of a closer object relative to a more distant object). I then take the sequence of images, say typically between 5 and 7 images, and stitch them together in specialist stitching software in my computer. In my case I use PTGui Pro.
There is something rather special about an image that more closely resembles the field of view of the human eye, yet ironically, it tends to be more difficult to produce really strong images. There are a number of reasons for this. There is the added difficulty of stitching a number of images together in a seamless manner, but more importantly the need to compose the image specifically for a panorama print, when we’re much more used to working in a format such as 3:2, the most common digital sensor or long standing 35mm film format. Using the Fuji X system, I actually find it easier to produce panoramic images than with many of the DSLR systems and I’ll go on to explain why this is.
You can of course simply crop an image to the panoramic dimensions in your editing software, but even with a wide angle lens such as the Fuji XF 10-24mm, the field of view will be typically limited to 110° by 61° when using the lens at 10mm. If you make this a 2:1 panorama, through cropping of the top and/or bottom of the image, you lose about 16% of your pixels. By going to 3:1, you lose 56% of your original image and therefore your original and much sought after pixels. The image below of the Murder hole in Donegal is one where I’ve cropped a single mage to create a 2:1 panorama.
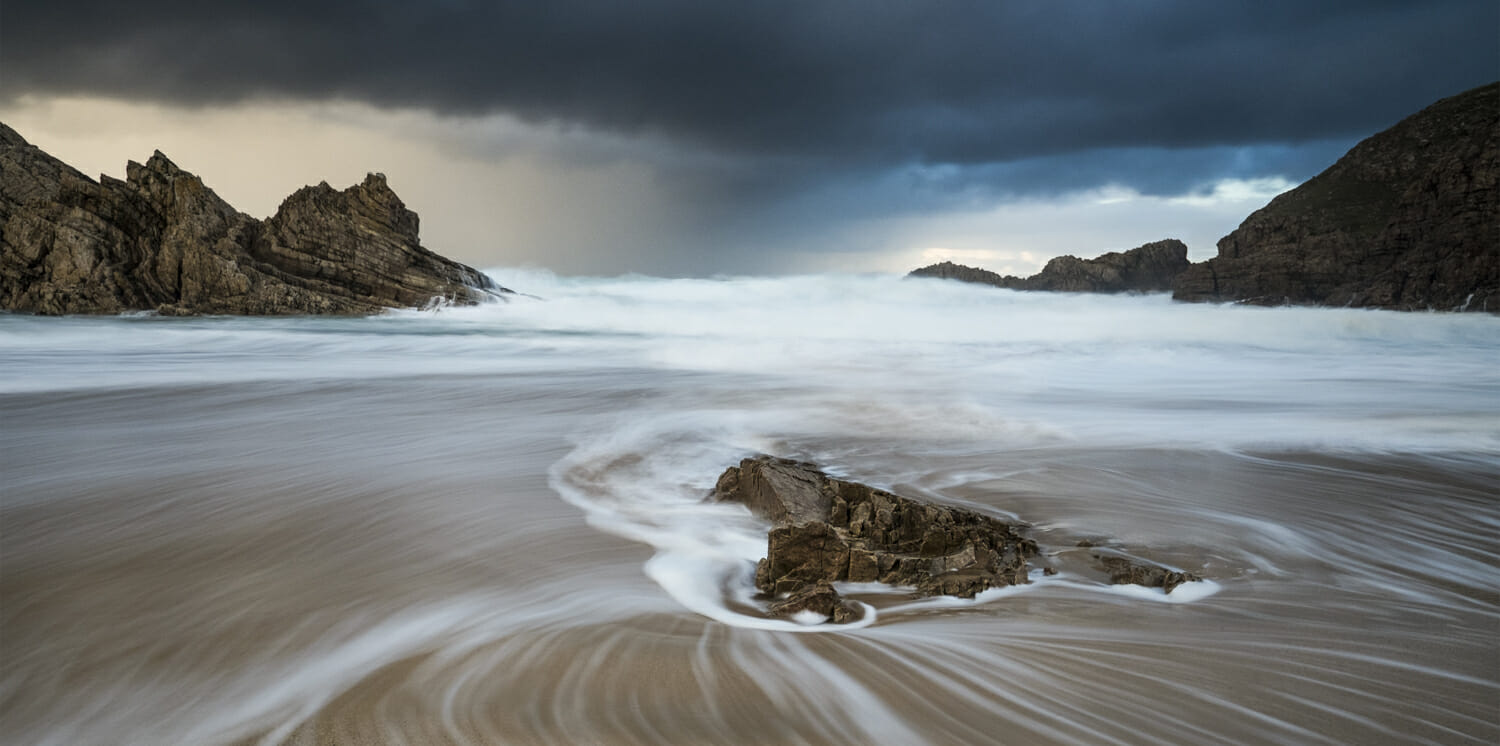
The murder Hole, Donegal, Ireland. Fuji X-T1 and XF 14mm lens. Exposure 2 seconds, f8 and ISO 400.
My preferred method actually creates the effect of increasing the pixels, often by a factor of 2x or 3x, allowing very large prints to be made containing incredible detail.
However, it’s not just about pixels and numbers. It’s actually about the compositional opportunities that the panoramic viewpoint provides, allowing us to create something different and unique. It’s a format that especially suits those wide open spaces that surround us here in the UK and that so many of us love to photograph.
I start off by attaching my Fuji XT-1 to the panorama head in portrait mode, which will have the effect of giving me a ‘taller’ image than if I were to mount it in landscape format. This avoids creating very long and narrow images that don’t look as well.
The key to producing a good panorama is by overlapping each of the individual images to be stitched together, by between one third and one half. This gives plenty of room for the stitching software to be able to do its job and not have a situation where one or more images prove difficult to stitch together.
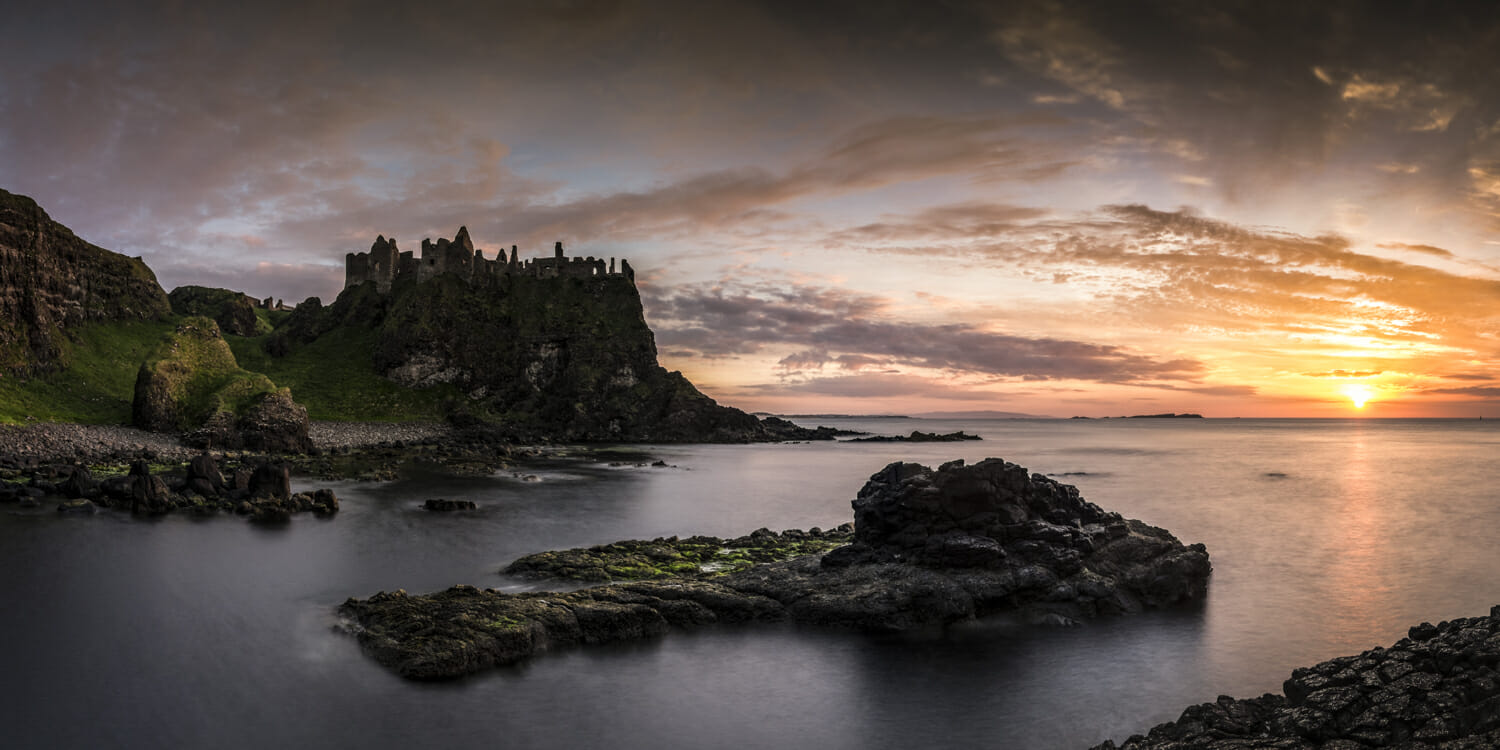
Dunluce Castle, Northern Ireland. Fuji X-T1 and XF 14mm lens. Exposures 10 seconds, f8 and ISO 200, consisting of 7 images.
One of the things I really like about the Fuji for doing my panorama images is the great quality of the LCD live view image. This makes it much easier to compose the image in the first place.
As I often do stitched panoramas using my LEE Big Stopper filter, it has the effect on most cameras of making it impossible to see anything through the viewfinder as the filter is so dark. It is also a problem to get a usable live view image, again due to the fact that this 10 stop filter is almost completely black. However, on my Fuji, the live view, even with the Big Stopper attached is really clear, which helps greatly when I rotate the camera as I recompose each image in the sequence and ensuring the right overlap between each of the images. The example below of St Peter’s in Rome was actually taken with the Little Stopper and shows the type of work the Fuji just makes it easier to do! While this isn’t a traditional letterbox panorama, it actually consists of three images stitched together to give a square image, it delivers incredible detail in a large print, so don’t restrict yourselves to one format.
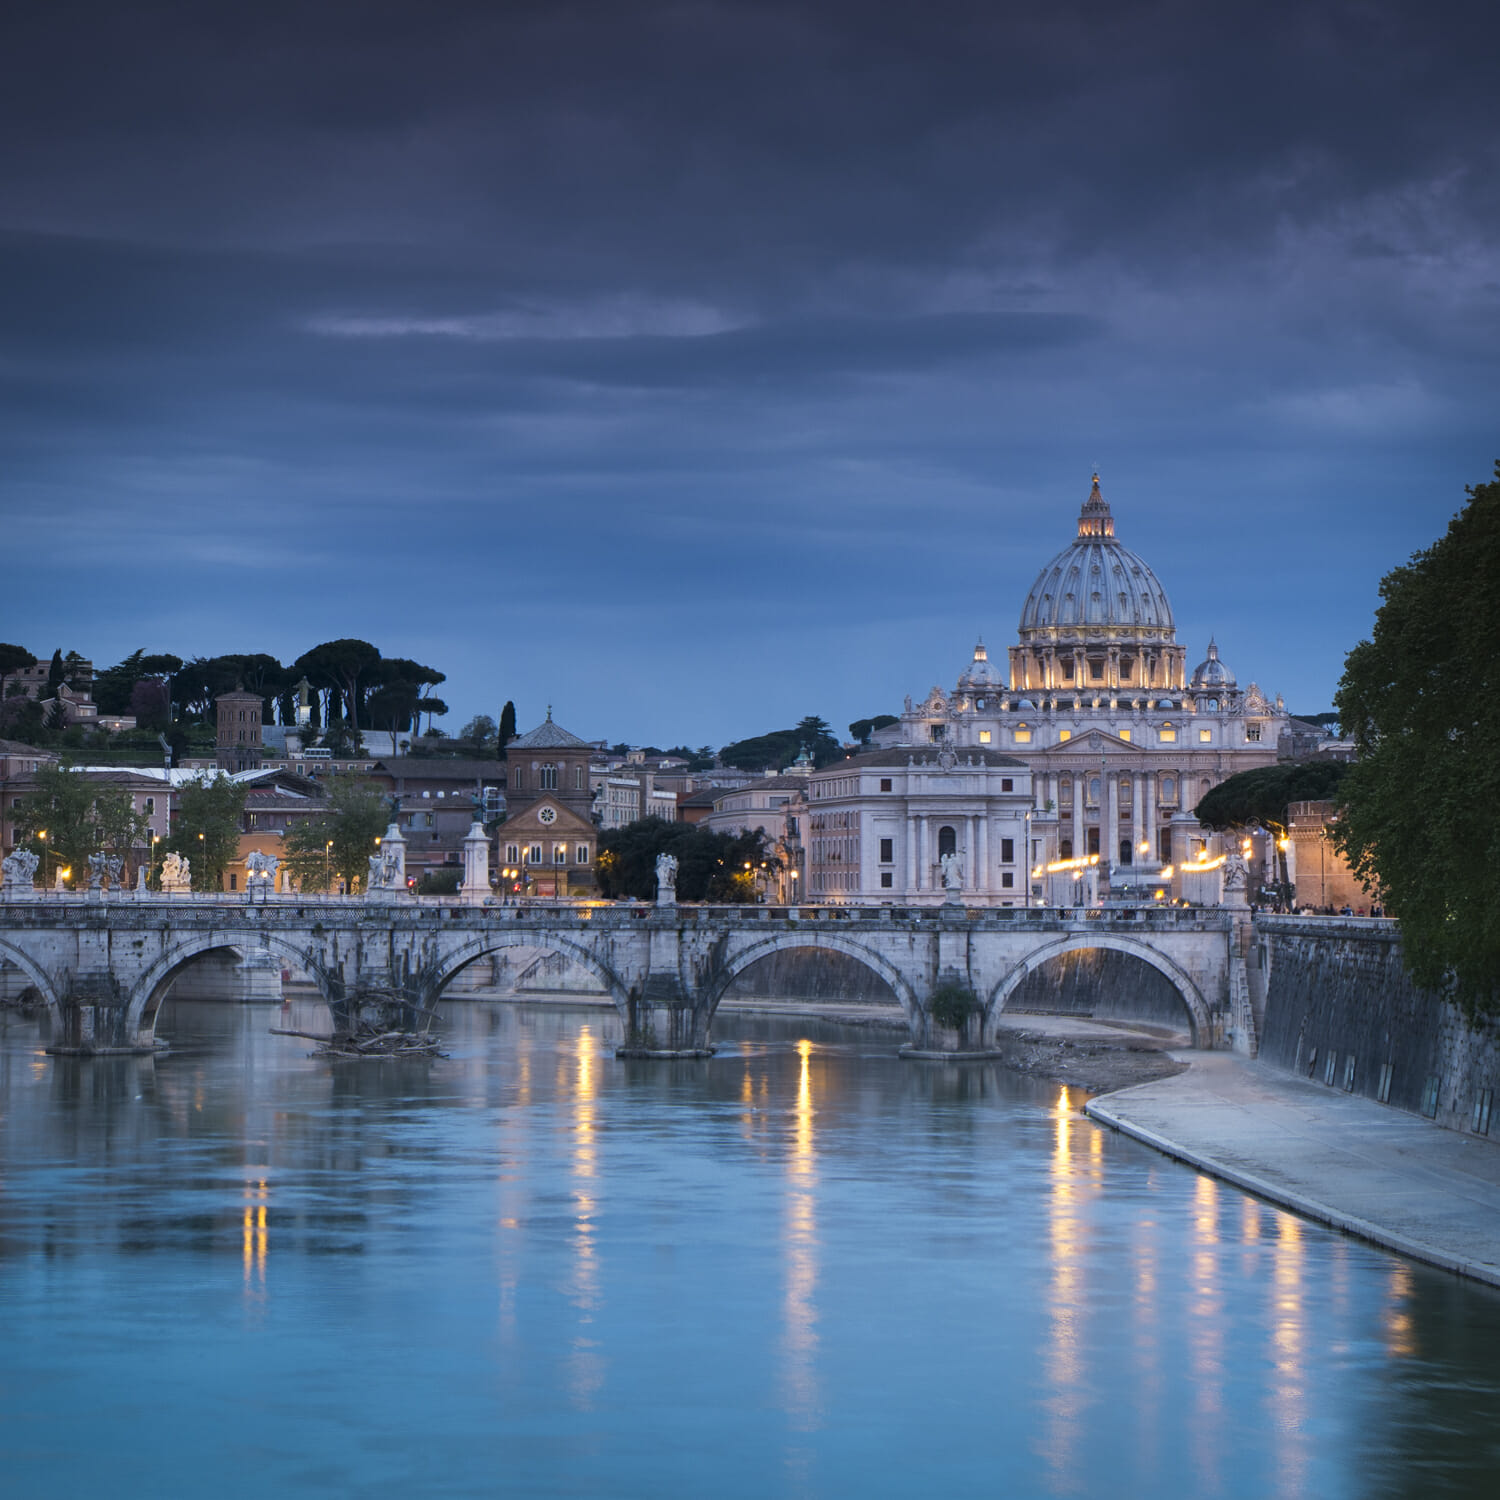
St Peter’s, Rome. Fuji X-E1 and XF 18-55mm lens. Exposure 2 seconds, f8 and ISO 200 consisting of 3 images.
Its important to also realize that shooting panoramas does slow down the picture taking process, enabling us to think more about composition, light and the emotion of an image. I liken it to working with the 5”x4” large format camera beloved of some of the best known landscape photographers.
Its also important to realize that it’s also important to use manual mode on our cameras, both for exposure and very importantly, for focusing. If we stay in one of the auto modes, I often find exposure changing from image to image, which will show up clearly when we join these images together. It’s the same with focus, where the camera will often ‘choose’ a different focus point than we may desire. I also use the hyper focal distance techniques to get as much of the image in focus as possible for a given lens. With the Fuji’s excellent manual controls, it just seems so natural to shoot in manual mode.
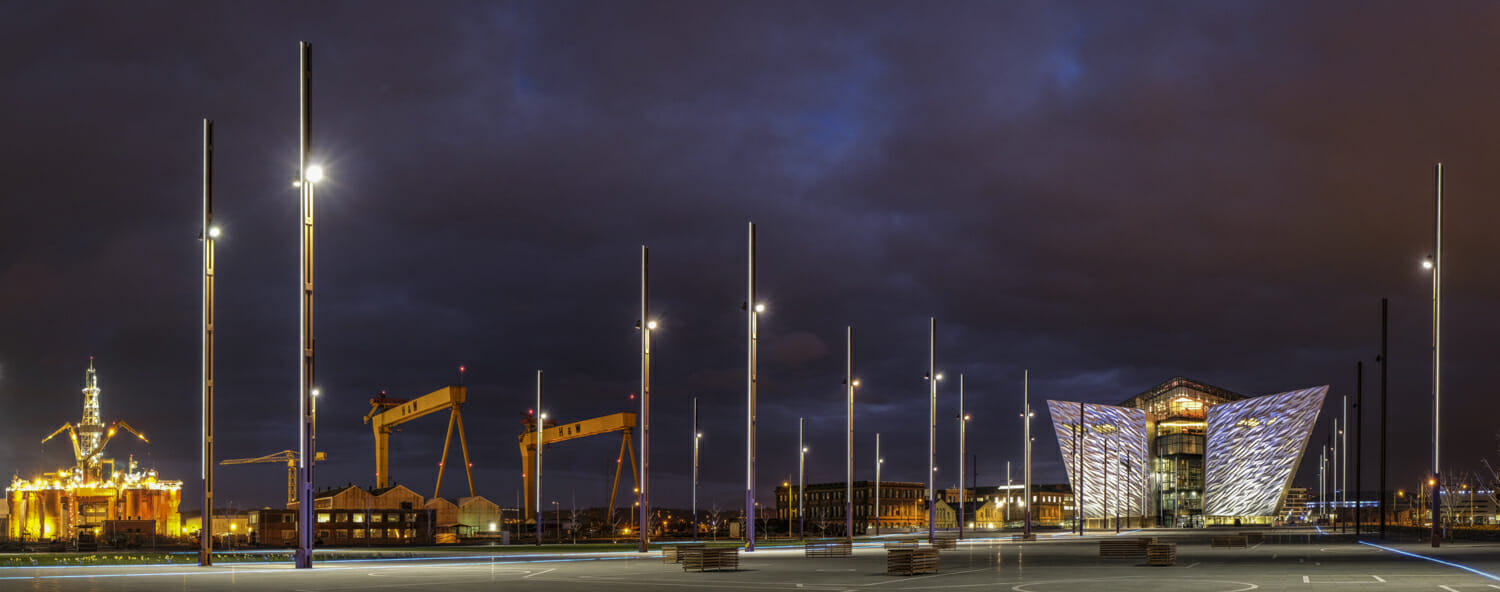
Titanic Belfast. Fuji X-T1 and XF 23mm lens. Exposures 2 seconds, f8 and ISO 200, consisting of 8 images.
The image above was taken one evening at the Titanic Quarter, the home of the original shipyard where the Titanic was designed and built in Belfast, which sits alongside the new Titanic Belfast visitor centre.
While it may seem like a lot of work to get a single panoramic image, the sense of wonder and achievement when it all comes together while being in some of the most beautiful locations is actually priceless. The technical aspects become second nature with practice.
One other thing that I haven’t yet mentioned is the lightness and portability of my Fuji system. This is especially relevant when I’m travelling on planes around the world or hiking up mountains to get a shot. My DSLR system and tripod weighed in at 20Kg, whereas the equivalent Fuji system, with a lighter tripod is only 6Kg. A huge difference when you have to walk many miles in the mountains to get to your chosen location!
While I have talked about using my specialist panorama tripod head, sometimes when travelling I don’t want to have the extra weight of this, so I just mount the camera onto the tripod in portrait mode using my ‘L’ bracket. While there is a higher risk of parallax error as discussed above, this can be minimized by avoiding any key compositional elements being too close to the camera and just stepping back a little to recompose the image with these items now maybe around three meters from the camera.
So I hope this article has inspired you all to go out and try taking panorama images with your Fuji X system. There is really good software out there to stitch the individual images, that is low cost or even free. Also be aware that Photoshop has a built in stitching facility if you already have this software. The key thing is to experiment and have fun taking pictures, as this is what it’s ultimately all about!
Please visit my website to see more images and also details of my landscape photography workshops at http://www.johnmiskelly.co.uk.