There has been a lot of positive buzz around Alien Skin’s Exposure X4 post-processing solution. Rightly so, photographers who have used and reviewed it refer to many of the product’s features that make this a standout alternative to subscription-based solutions from Adobe and others. It has also received rave reviews for how it handles Fujifilm raw files.
I’ve been a long-time devotee of Exposure from its earliest days on the market when it was used as a plugin for Lightroom and Photoshop. I used it regularly to get that “look” that I frankly missed when I moved from the film to the digital darkroom. I would jump from Lightroom or Photoshop to Exposure, tap the Kodak Tri-X preset and instantly get transported back to my film days (to the extent possible without the chemicals and silver-based paper).
Exposure X4 is now much more than just a plugin, although it can still be used as one. Exposure in standalone mode provides us with a complete workflow solution, from non-destructive editing to the implementation of layers, masks, printing and much more. And the presets that initially sparked my interest in this solution years ago are still there to explore and use as starting points. The presets are so good that I sometimes use them without additional adjustments to the sliders.
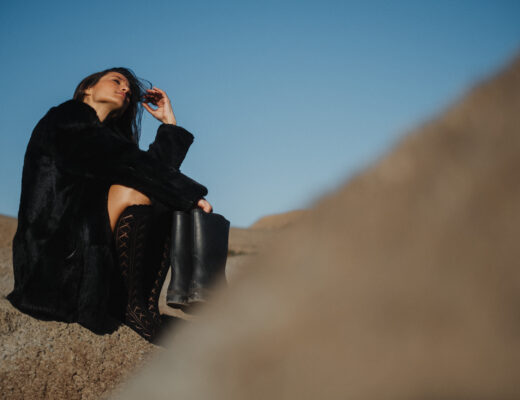
I provided a high level overview of my post-processing approach using Exposure X4 in an October 2018 Fujilove Magazine article, entitled “Moody Views.” All of the photographs in that article were from New York City’s Central Park and taken with Fujifilm cameras, including the XPRO-2, the X100F, X100S, and the XT-1. The cameras were set to record the images in both RAW and JPG formats.
I received a lot of positive feedback from readers of the magazine in which they requested a more detailed step-by-step workflow to describe how I made the images in the Central Park series. This article provides an example of my workflow, with additional information on my folder organization and bringing the photo from its folder through the final result.
File Folder Structure
A consistent workflow should always start with a good file structure. I have found that the structure shown in Figure 1 works well for me.

Figure 1 – File Folder Structure
I like this file structure because it keeps me organized and it’s perfect for how I use Exposure X4:
- I copy the RAW and JPG files from the camera’s card to the applicably named subfolders of the CAPTURE folder. This is easily done with Exposure. Just insert your camera’s card into your computer and Exposure will recognize it. You can tell Exposure where to place the image files and have it rename them according to your file naming conventions.
- The SELECTS folder contains the images I want to work on after viewing them in the Exposure X4 interface.
- I place partially edited (in-process) files intothe MASTER folder.
- I save (export) the final post-processed images from Exposure into OUTPUT subfolders (sized for print and for web).
The bottom line is that I will always know where everything will be at every stage of the post-processing workflow and I can work on my images over a period of time and easily pick up where I left off.
Bringing the Images Into Exposure
My file structure makes it easy to begin using Exposure X4. All I need to do is drag the RAW folder into Exposure. The images in that folder are immediately available to Exposure X4 (and it’s very fast at loading them). Figure 2 shows my Exposure X4 desktop with the file structure in the leftmost panel, the images in that folder in the grid and the image that will be post-processed in the workflow.

Figure 2 – Exposure X4’s desktop, before processing
Image Selection
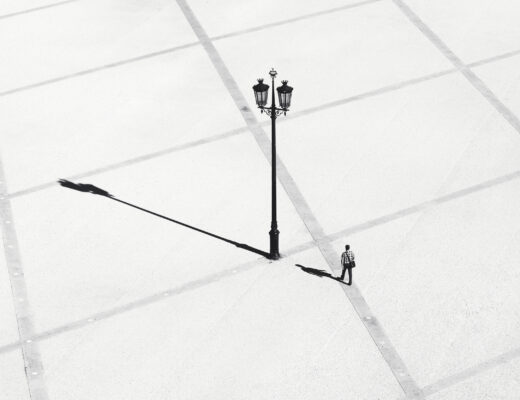
Exposure’s grid allows me to view the images and perform other management tasks. If you are familiar with Lightroom, you’ll pick this up very quickly. In the grid shown above I’ve selected one image for its composition (albeit not straight), lighting and what I believe may be a good candidate for black and white processing. Figure 3 shows the image, ready for post-processing.

Figure 3 – The selected RAW image
Post-Processing Steps
I performed the following post-processing steps:
Step 1: Preview the Black and White presets
At this stage I won’t actually decide on the preset that I’ll use later, but I do want to make sure that one of them will come close to my final vision of the image. Since I’m a big fan of the Fujifilm Acros in-camera simulation, I head over to the Exposure X4 preset section that has it (see Figure 4).

Figure 4 – Fujifilm black and white presets panel
I was pleased to see that Alien Skin does a really nice simulation of Fuji Acros, so that’s what I’ll probably choose later in the workflow.
Step 2: Composing the image
I have used Lightroom for many years but primarily for file organization, ratings, keywords, etc., but I still needed to go to Photoshop or another application in order to edit my images using layers and masking (which Lightroom doesn’t provide). Exposure X4 provides all of these features and capabilities.
The raw file needs to be straightened (leveled), so I add a layer (called “Level”) and use the level adjustment in the crop window, dragging it vertically down the lamppost. See Figure 5 (circled in red).

Figure 5 – Leveling the image
The image is leveled to my satisfaction and I’m ready to make my initial edits.
Step 3: Initial editing steps
I created another layer, naming it “Color” and used the settings in the Basic panel as shown in Figure 6. As you can see, I used the sliders to make adjustments to several of the sliders.

Figure 6 – Adjustments in the Basic panel
Note that I can easily make a new preset from these settings and add it to the presets panel (click the + sign above the presets and name it), so I can use these same settings as a starting point for other images in the series if I choose to.
Step 4: Black and White adjustment
Even though I’ve pretty much decided to use the Fujifilm Acros preset, I hover over the other Fujifilm simulations to see if there’s something I like better. As I do so I look at the effects in the main viewer window to make sure it’s Acros Standard that I want to use – and I do. So I select it for a new layer. At this point, I have a nice black and white image (Figure 7), although it’s not the final style that I want.

Figure 7 – The image after selecting the Fujifilm Acros preset
Note that Exposure X4 provides an easy way to compare the original image to another version of the image after it’s edited, a feature I use regularly. I can also shoot using the in-camera Acros setting, which allows me to see the black and white JPG in the viewfinder and on the LCD screen. That allows me to get a quick preview of the black and white image in addition to having the raw file available for processing in Exposure.
Step 5: Finalizing the image for a Moody look
Creating the moody look is the final step in the workflow.
I usually go back to the Exposure presets to see if there’s one I can start with and modify later with the sliders. But in this case I wanted to do more with the image, so I thought about a Photoshop approach that I’ve used in the past. In Photoshop I would create another layer, brighten the layer, edit a mask and probably use what’s called the “Orton Effect” to apply an ethereal feel to the image.
But I didn’t need to do all of that, as it was very simple to do in Exposure:
I created another layer and selected the “IR – Fog – White Out” setting in the IR (infrared) panel, which gave the image an infrared style, as shown in Figure 8.

Figure 8 – Making the moody effect
I liked the nice glow from the infrared treatment, but wanted a darker image while maintaining the glow and brightening the light from the lamppost.
I finalized the image (Figure 9) by adjusting the Exposure and other settings in the Basic panel. That naturally darkened the image. Finally, I used the brush tool to bring in the bright light in the lamppost from the infrared layer below.

Figure 9 – The final image
Summary
I have used Alien Skin’s Exposure products for many years. But it wasn’t until I tried the Exposure X4 release that I realized its full potential as a complete, full-featured standalone solution for making my images.
Exposure X4 is now even faster than previous releases, has enhanced transformation tools, and fantastic treatment of Fujifilm RAW files. Fujifilm is known for its great JPGs, but with Exposure X4 it’s advisable to shoot RAW to take advantage of more information for post-processing. I’ll continue to shoot RAW+JPG as I do like to compare what I am doing to the way Fujifilm creates the JPG in-camera.