Many of you know that I am an avid film photographer. However, this article isn’t going to be about the merits of shooting film, but the value of Fujifilm’s film simulations. For those who don’t shoot Fujifilm digital, I completely understand their confusion over our collective fanaticism with the film simulation profiles.
Most manufacturer’s JPEG profiles are average at best. The Ricoh GR-3’s Positive Film is nice and Canon’s standard JPEG profile is very good. However, in general, you’re best to shoot RAW and create your own look in post-processing via LR, Capture One, Exposure, etc. In contrast, when you use a Fujifilm digital camera, you’re dealing with a company that has been making photographic film since the 1930s. No current major digital camera manufacturer has ever created photographic film, so Fujifilm has a unique advantage over all of them. In addition to film, Fujifilm also produces paper, chemistry and photographic printing labs. Yes, Fujifilm understands colour and the unique look of film within the digital realm better than any other manufacturer, so it’s no wonder that Fujifilm digital photographers love using their unique digital film simulations. With the introduction of the new Classic Neg film simulation on the X-Pro3, I thought I would review the simulation as I would an actual film emulsion.
Since the introduction of the Classic Chrome film simulation on the X30 back in 2014, it’s been a favourite profile of mine. It had the most film-like feel, and I loved the muted look with just enough punch in the reds and yellows. There was no need to add LR profiles or filters in post. Straight out of camera the JPEGs looked great, or you could easily shoot RAW and add the film profile in LR during editing or processing. I also enjoy the ACROS profile, although I prefer the control I have over monochromatic images in post using the colour sliders (I use a lot of colour filters when shooting b&w film). When Fujifilm announced the new Classic Neg as a ‘retro’ film, I got excited. Classic Chrome was loosely based on Kodak’s famous Kodachrome 64 positive film, and the new Classic Neg is based on Fujicolor Superia 100 from the 1980s. I was also excited because the X-Pro3 would have Color Chrome FX Blue in addition to the standard Color Chome Effect. All images captured with Classic Neg in this article has both types of Color Chrome Effect turned to ‘strong’.

I do find both Classic Chrome and Classic Neg have a vintage film vibe. The shadows are dark, the overall contrast is muted in the right areas, and the right amount of colour breaks through. However, the Classic Neg punches up the colour saturation and has a bit more contrast. Yes, with a bit of fiddling in post, I could probably make Classic Chrome look more like Classic Neg, but why? If Fujifilm can help me get a look without too much work in post, why wouldn’t I allow them to do it for me? It’s no different when shooting with photographic film. Each film type has unique characteristics baked into the emulsion. That’s why we choose specific films for a specific look before we start shooting. When it comes to Fujifilm digital, it’s no different. We know ahead of time the characteristics of a specific film simulation, so even before we take the photo, we already have an idea how the simulation will work with our scene and how the end result will be. The same advantages we get when shooting with photographic film, we get when using Fuifilm’s simulations.
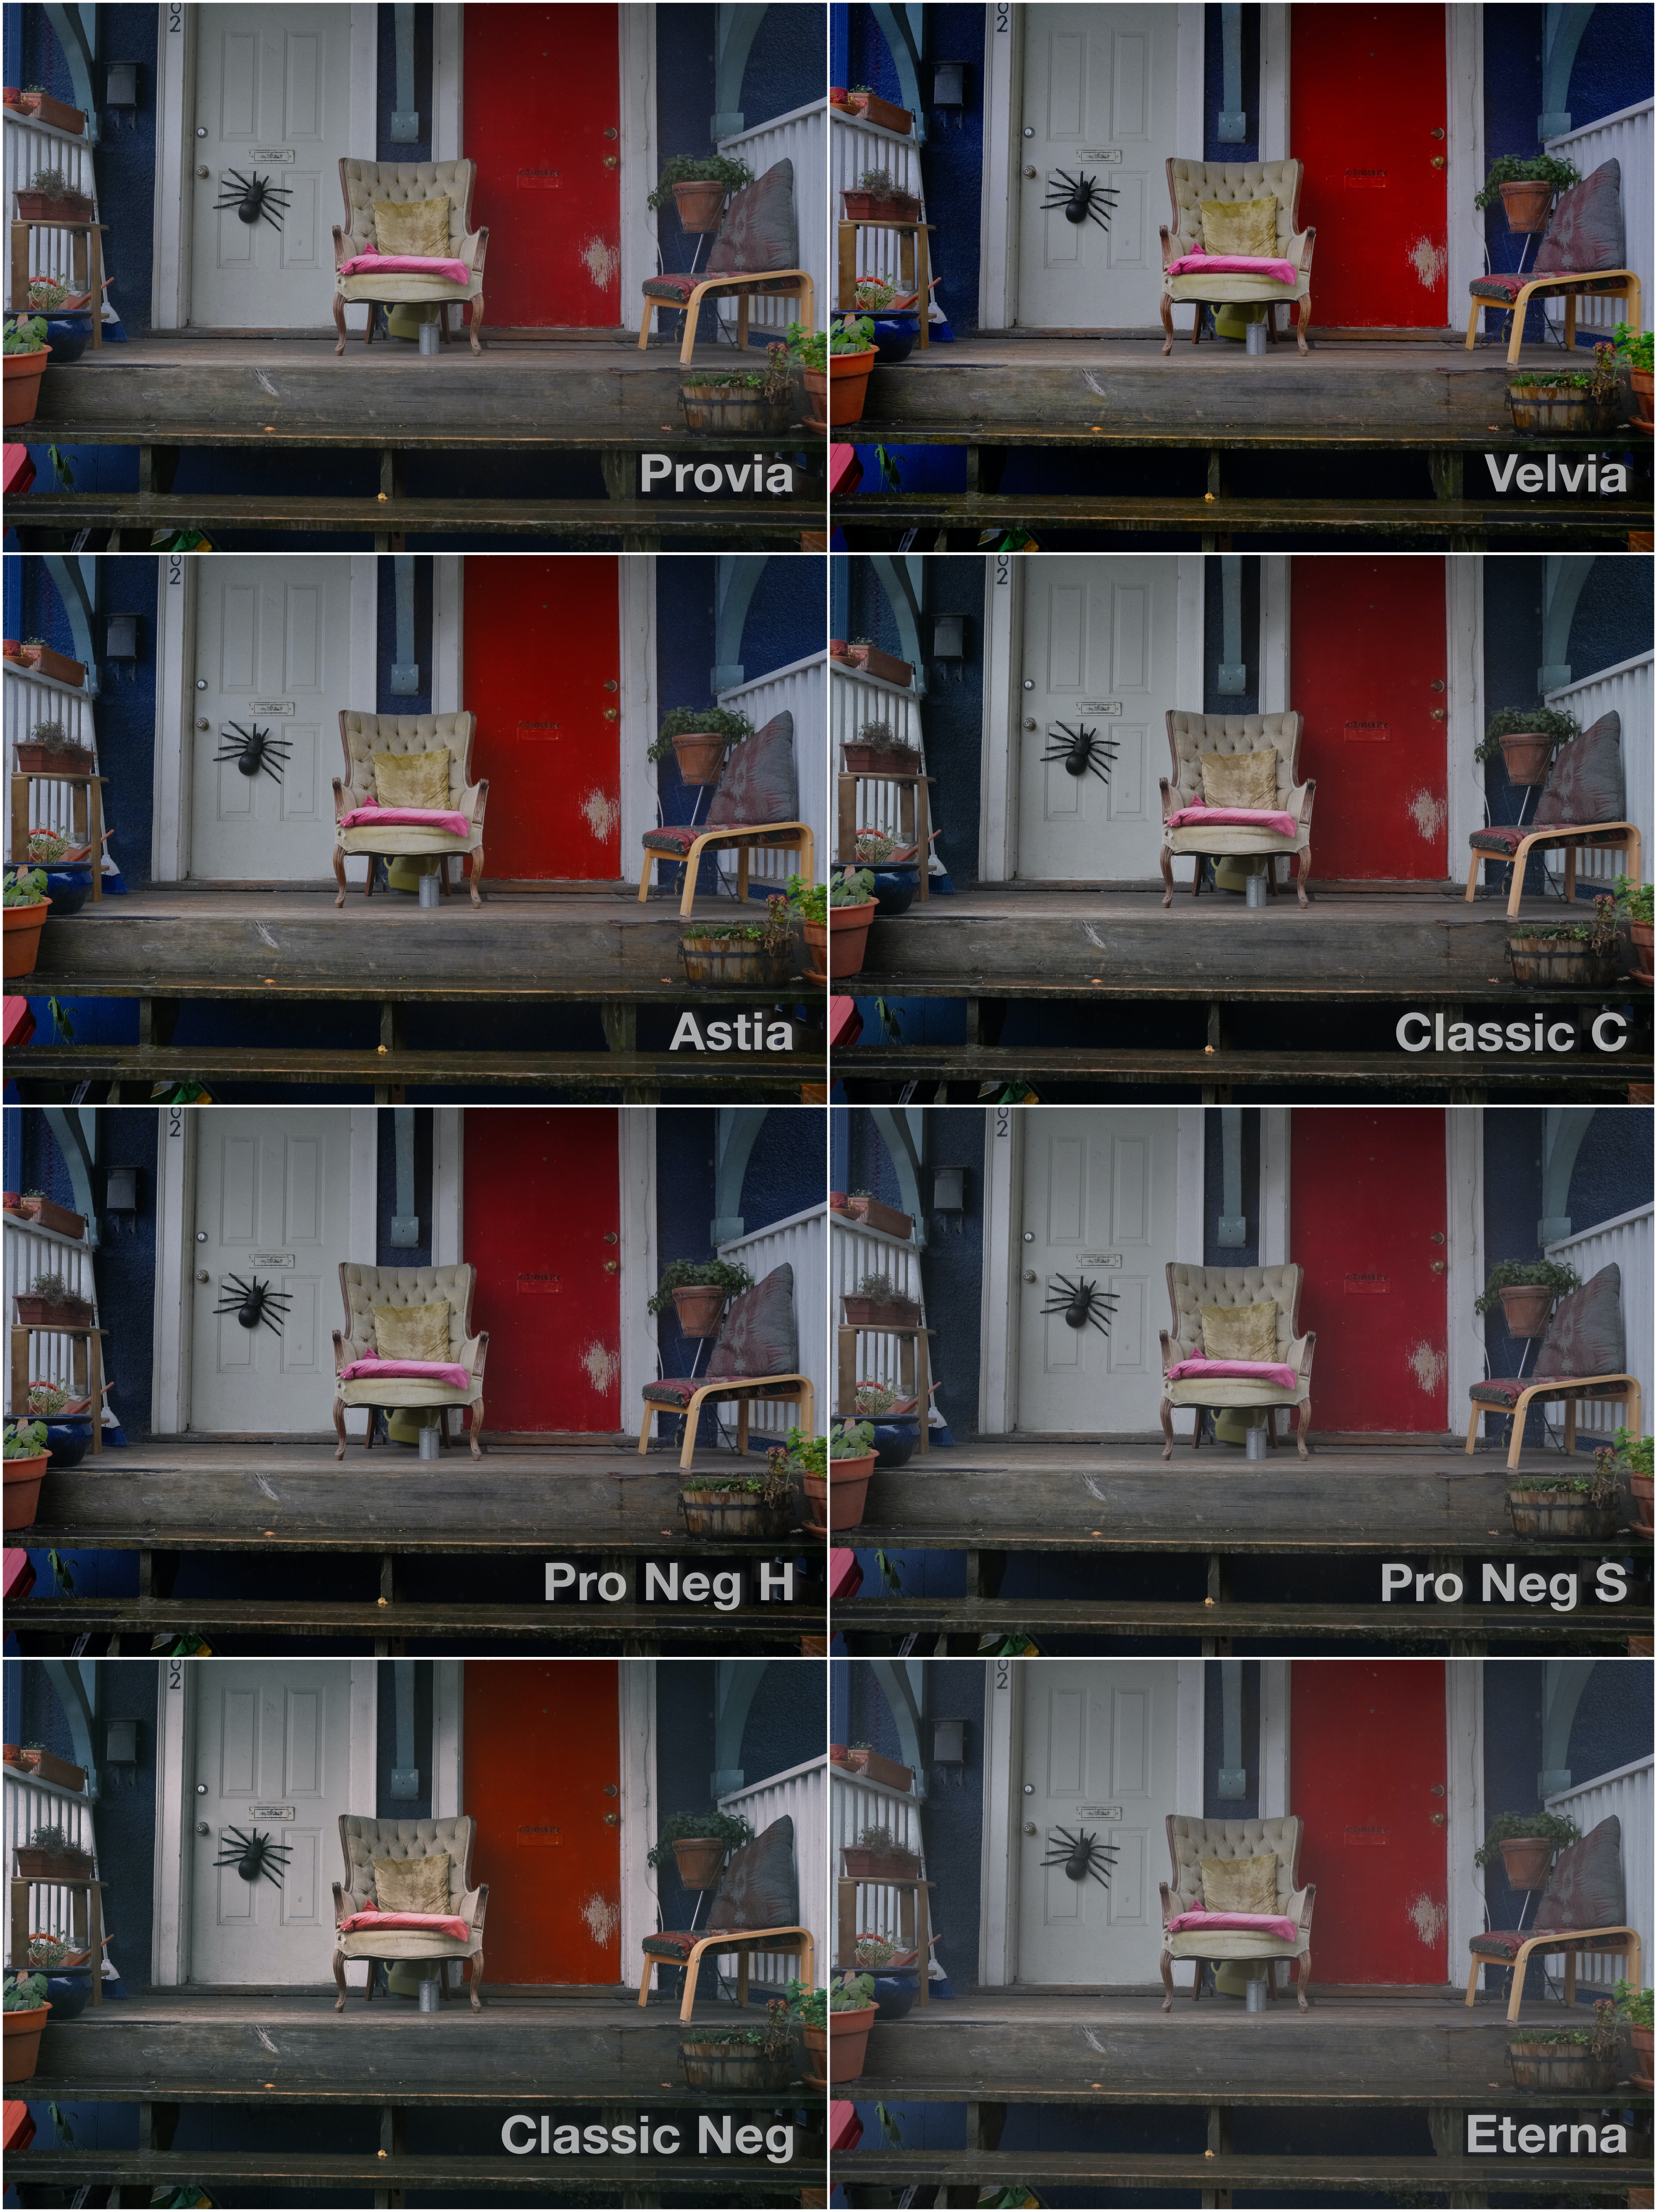
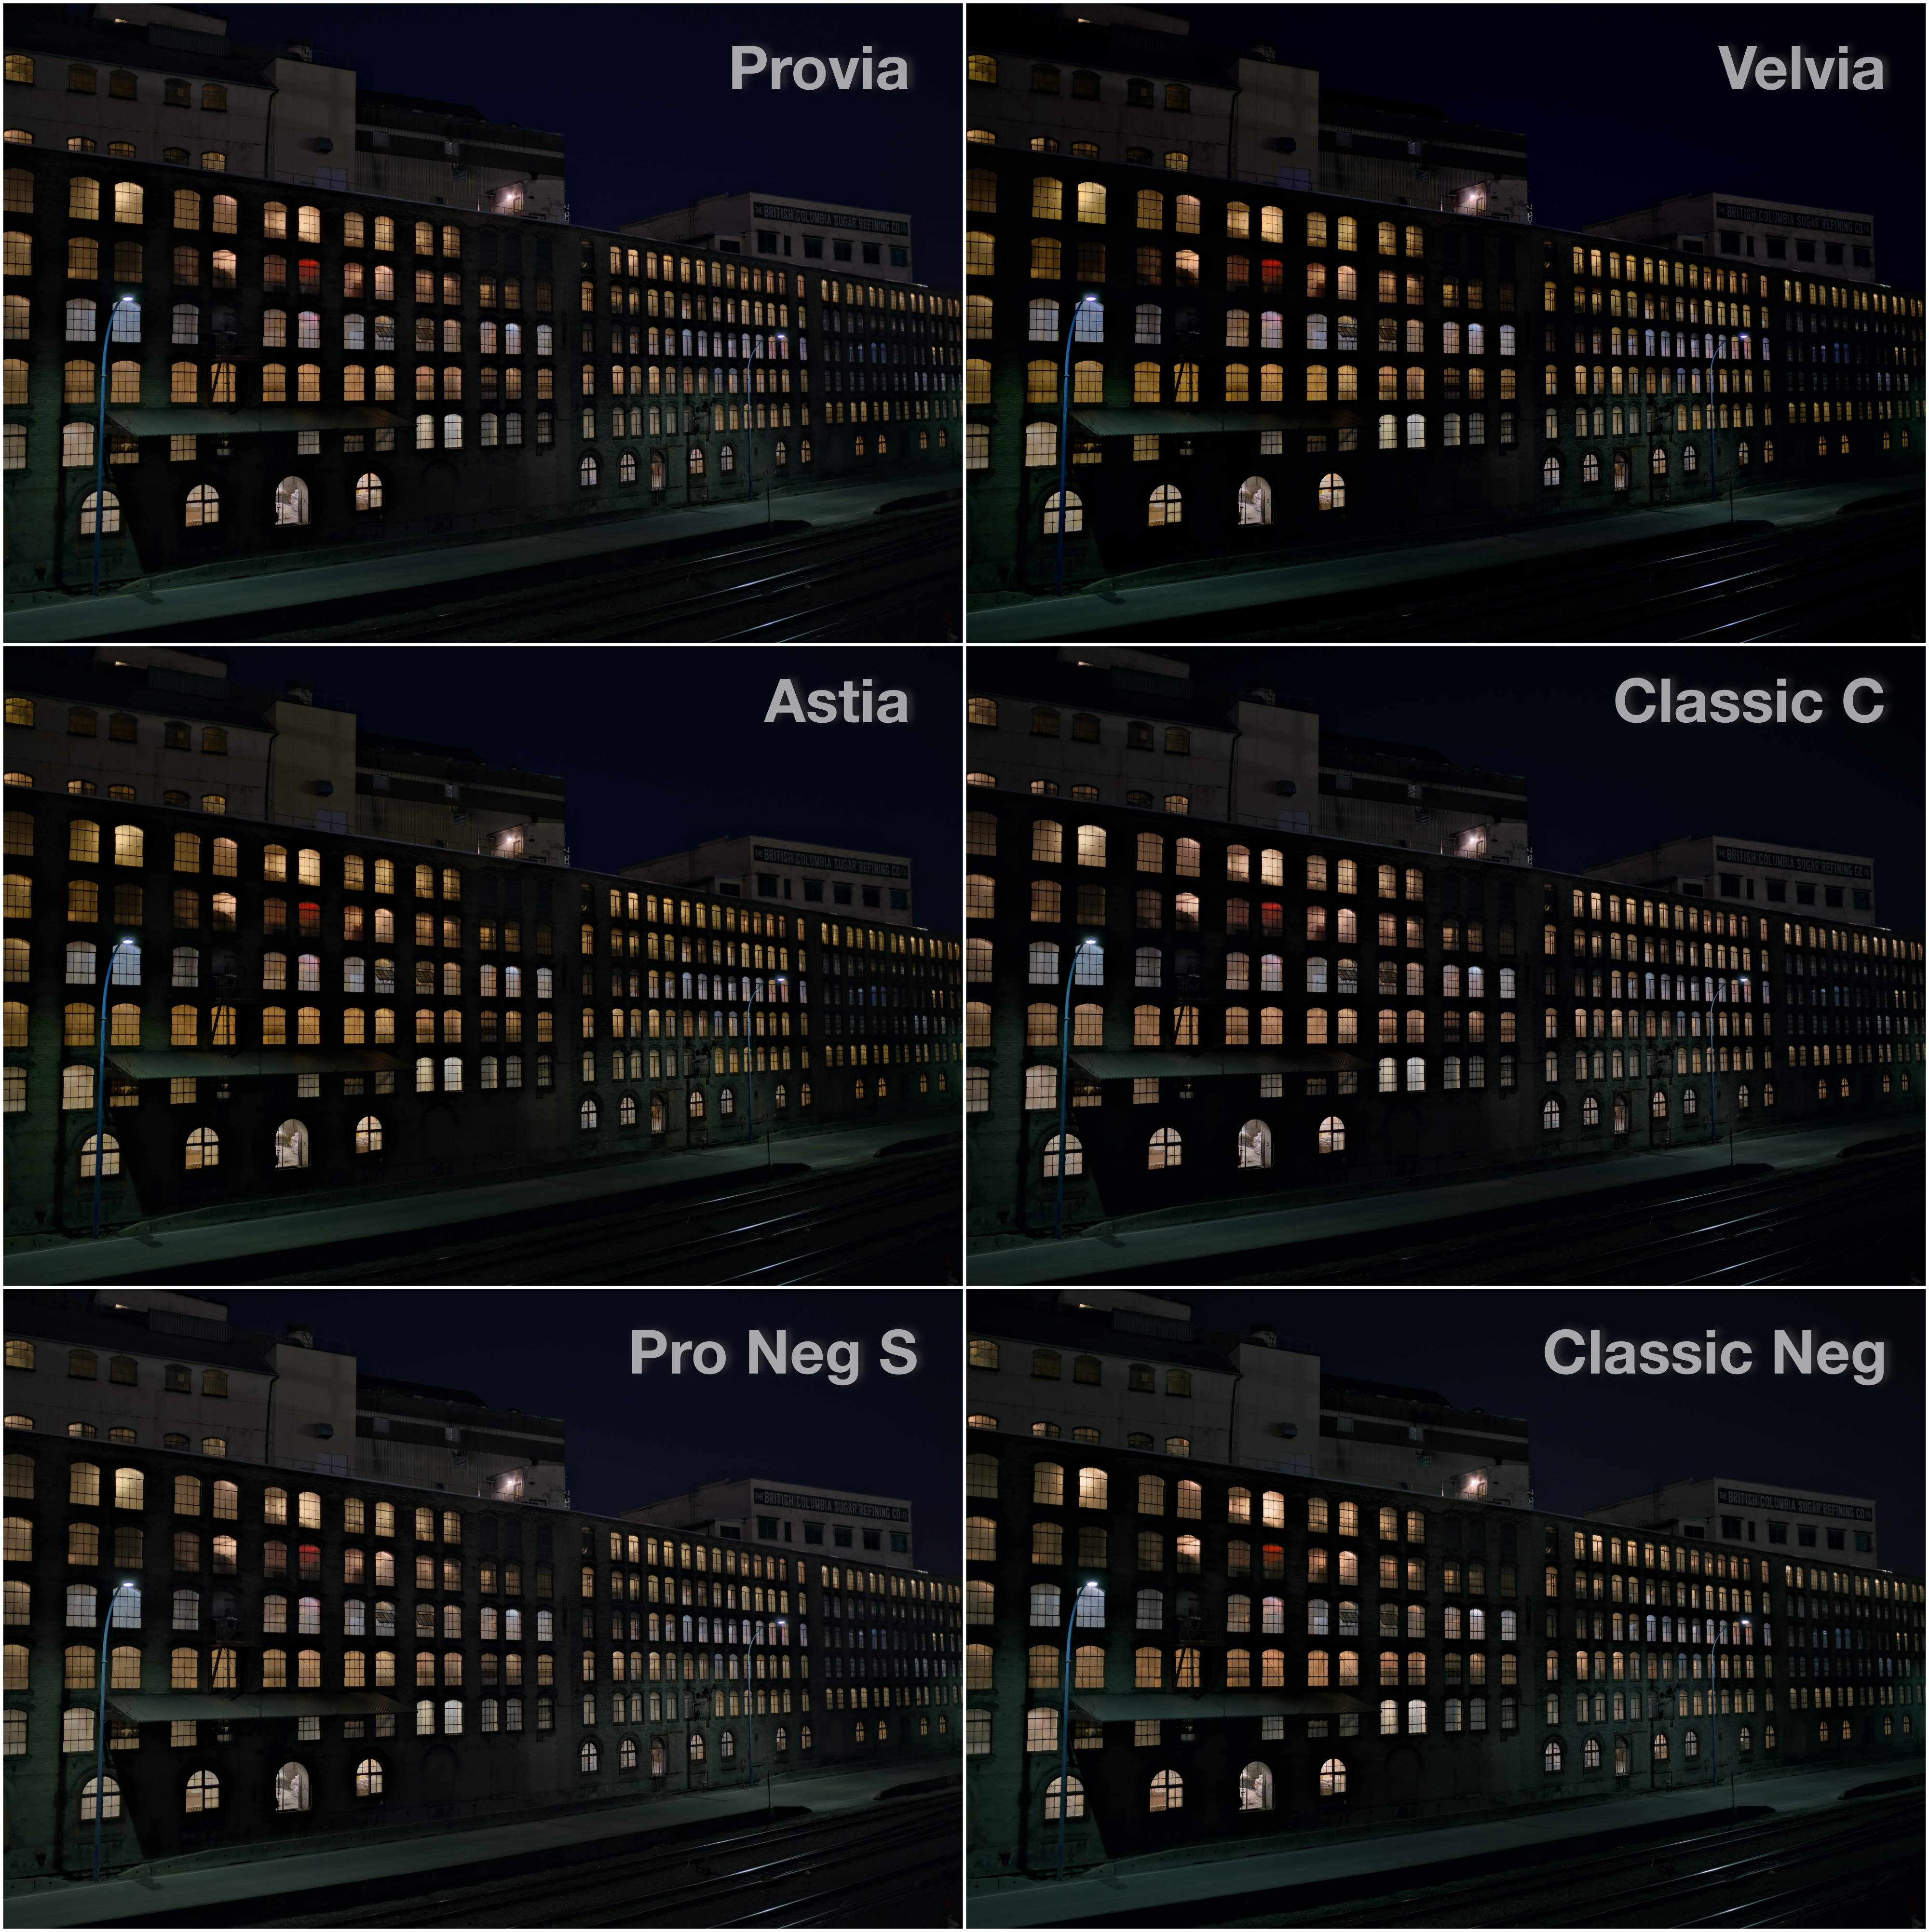 Some may wonder what the same image might look like using different film simulations so I decided to give you some examples. Since the X-Pro3 is not yet available, LR can not process the RAW files at this time. For this test I used in-camera RAW conversion and cycled through the various film simulations so you can see how each profile affects the same image. In some examples certain simulations work better at night, some better when its cloudy, others work well with skin tones. This is not a concise sample, but it gives you a good idea the behaviour of each colour film profile. Again, my favourite is Classic Neg, with Classic Chrome a close second, and finally Pro Neg Std as my low contrast, low saturation choice for most of my videos and night photography images.
 Another important point about using Fuji’s film simulations. The ‘purist’ way to apply film simulations is doing so in camera, either by shooting JPEG or RAW and then processing them using the in-camera convert feature. The second best way is to use Fujifilm X RAW Studio on your computer. To use this application, you download your RAW images onto your computer and plug the camera into your computer via USB. The software uses the computer as the interface to help process the images, but uses the camera’s processor to generate the image profiles. These two ways allows you to shoot RAW and yet get the most accurate rendition of the film profile. In addition, the X-Pro3 can output 16bit TIFF files from RAW instead of standard JPEGs. These TIFF files are huge (140+ MB files), but this allows you to continue processing the images on your computer with similar latitude of a RAW file, but with all your unique profiles baked into the image (film simulation, Color Chrome Effect, etc.). I know many are satisfied with LR or Capture One for adding film simulations in post, and that’s great. Personally, I’ve found in-camera processing and X RAW Studio more accurate and the final output more to my liking versus using LR or PS.

My final thoughts on the new Classic Neg film simulation is that I’m very excited. It’s like getting a brand new film emulsion in the real world, but it’s built right into your camera! The biggest difference between shooting real film and a film simulation is that we can shoot at various ISO speeds and get unique combinations that wasn’t possible with film (or at least difficult). Shooting Superia 100 at ISO 3200 wouldn’t have been ideal, push processing it 5 stops. My opening image I captured the fire chief using Classic Neg at ISO 800. I found this new film simulation looked great both during the day and night. During the day it handled skin tones nicely, being slightly magenta versus green. At night the colours came alive, with the right amount of contrast and shadow detail. I hope Fujifilm will push this new film simulation to some of the older cameras like the X-Pro2, X-T2 and X-H1; although I think the priority will be to update this profile to any camera with the latest X Processor 4 (X-T3, X-T30, GFX 100). Although I am saddened whenever Fujifilm discontinues a film product (I understand it’s a business decision), I hope they continues to update their digital film simulation line-up. Perhaps Fujifilm can continue resurrecting old emulsions (FP100C, FP3000B), as well as creating new ones. How about new cinematic film simulations similar to Kodak Vision3 500T or Kodak Double-X? The possibilities are endless and I know Fujifilm has the expertise to do it. Thanks for reading and happy shooting!